
Would you like some QUICK Background HACKS? Today’s card focus on using Cover (Background) Dies in 6 different ways!
If you missed it, I did a LIVE video sharing 6 Fabulous Cover Die Techniques and now I want to share the cards that I made with them. BUT, I know time is tight so if you don’t have time to watch the whole video I have created a REPLAY which will share the techniques and highlights, you can find it linked below.
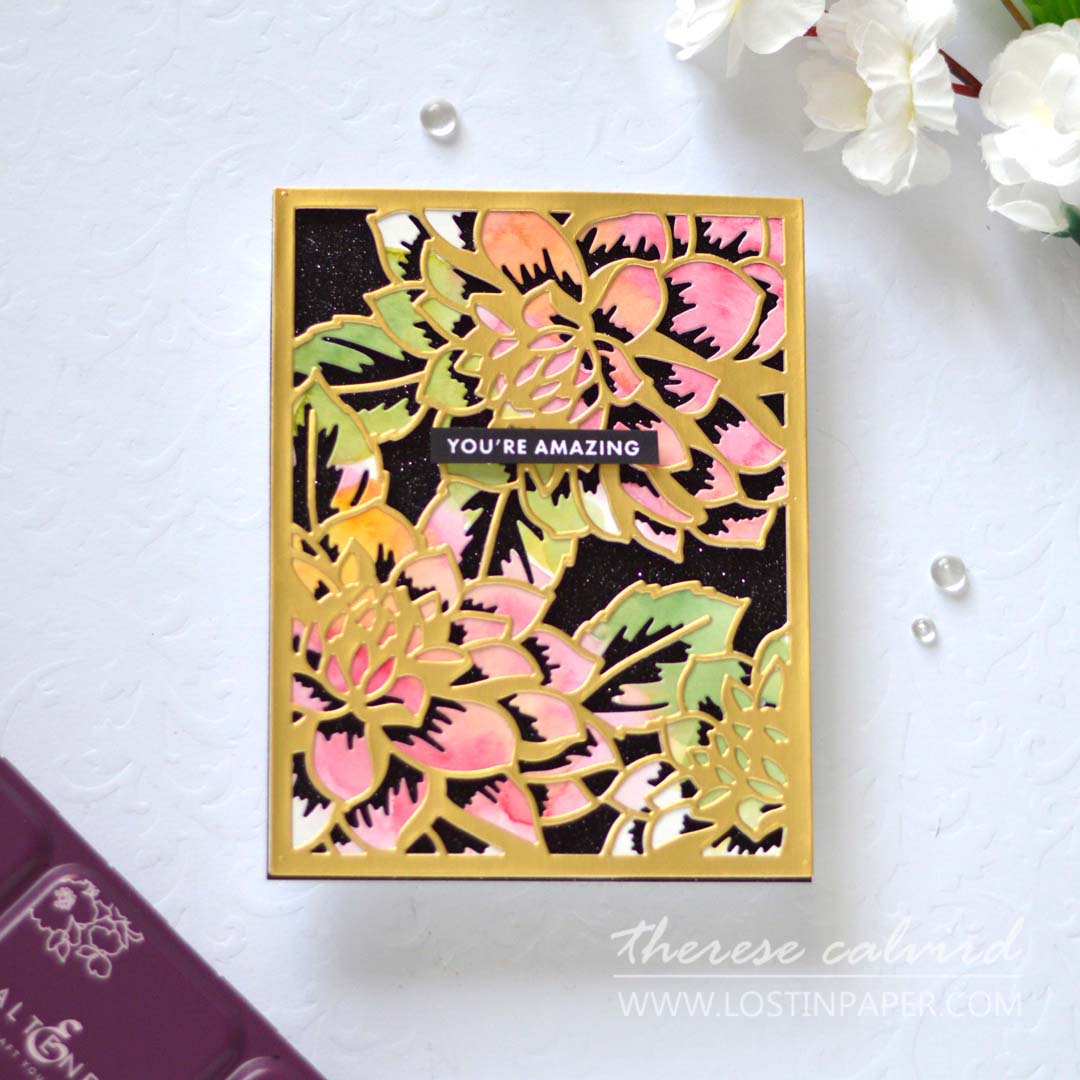
IDEA #1 Layered Dies & Watercolor
Layered dies are an investment so it’s fabulous to add a little something to make them special. For this card design I ‘painted’ my own watercolour piece to die cut the base layer.
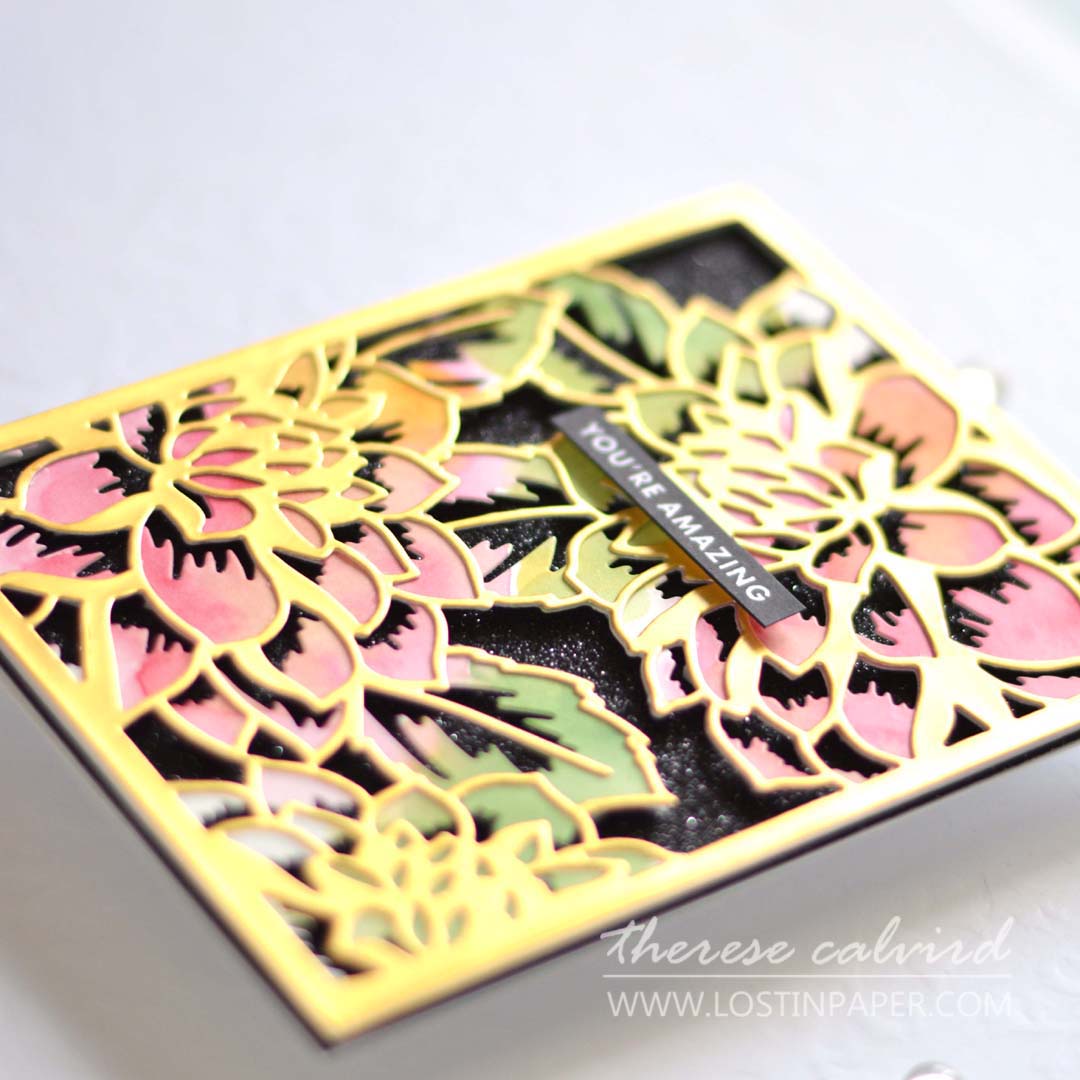
PRO TIP: To keep postage costs low add the panel directly to the black glitter cardstock instead of popping it up.
BONUS IDEA: Want more similar inspiration? Check out this video HERE
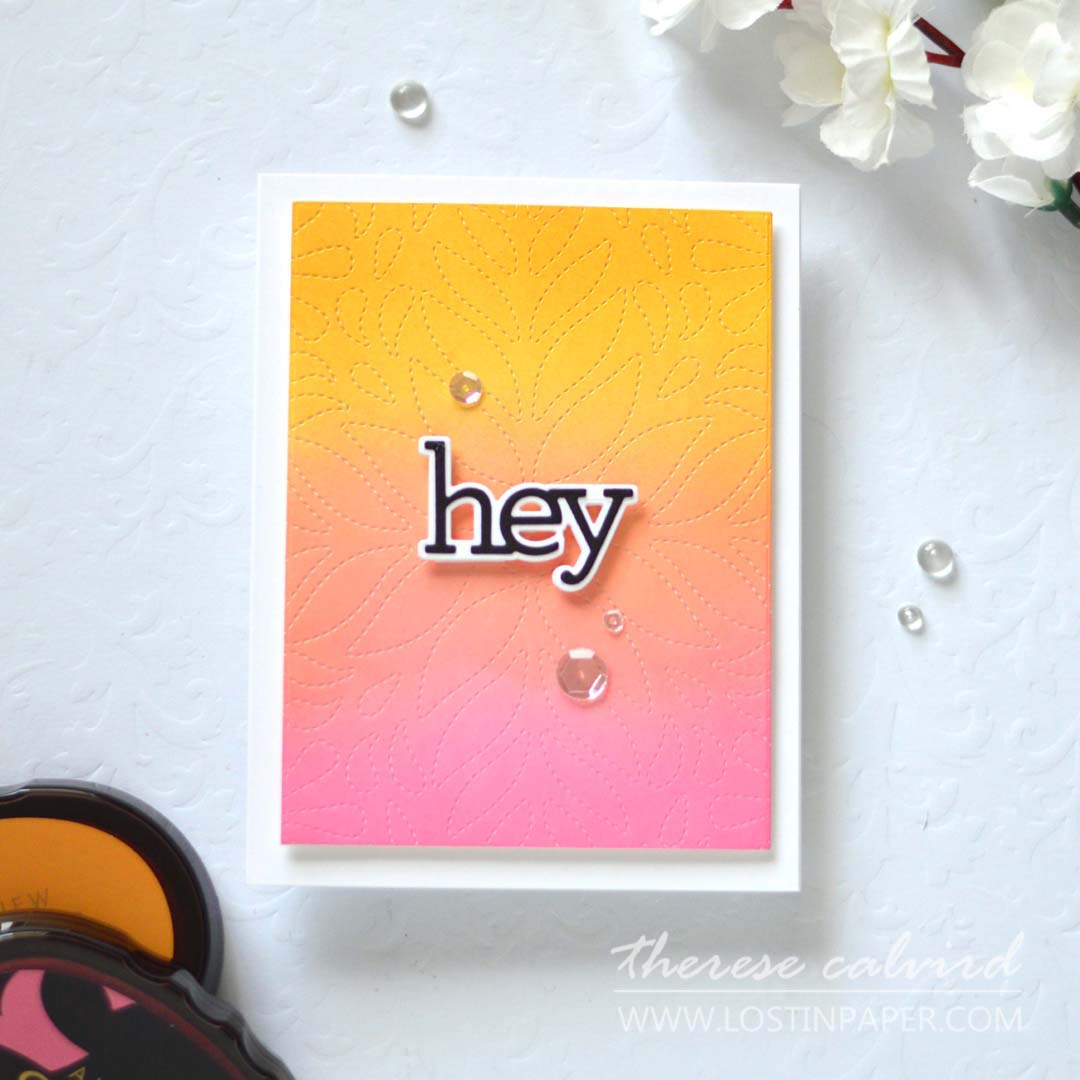
IDEA #2 Debossing with Blending
I adore thes Debossing Cover Dies, but why not take them a little step further and deboss them on a gorgeous blended card panel.
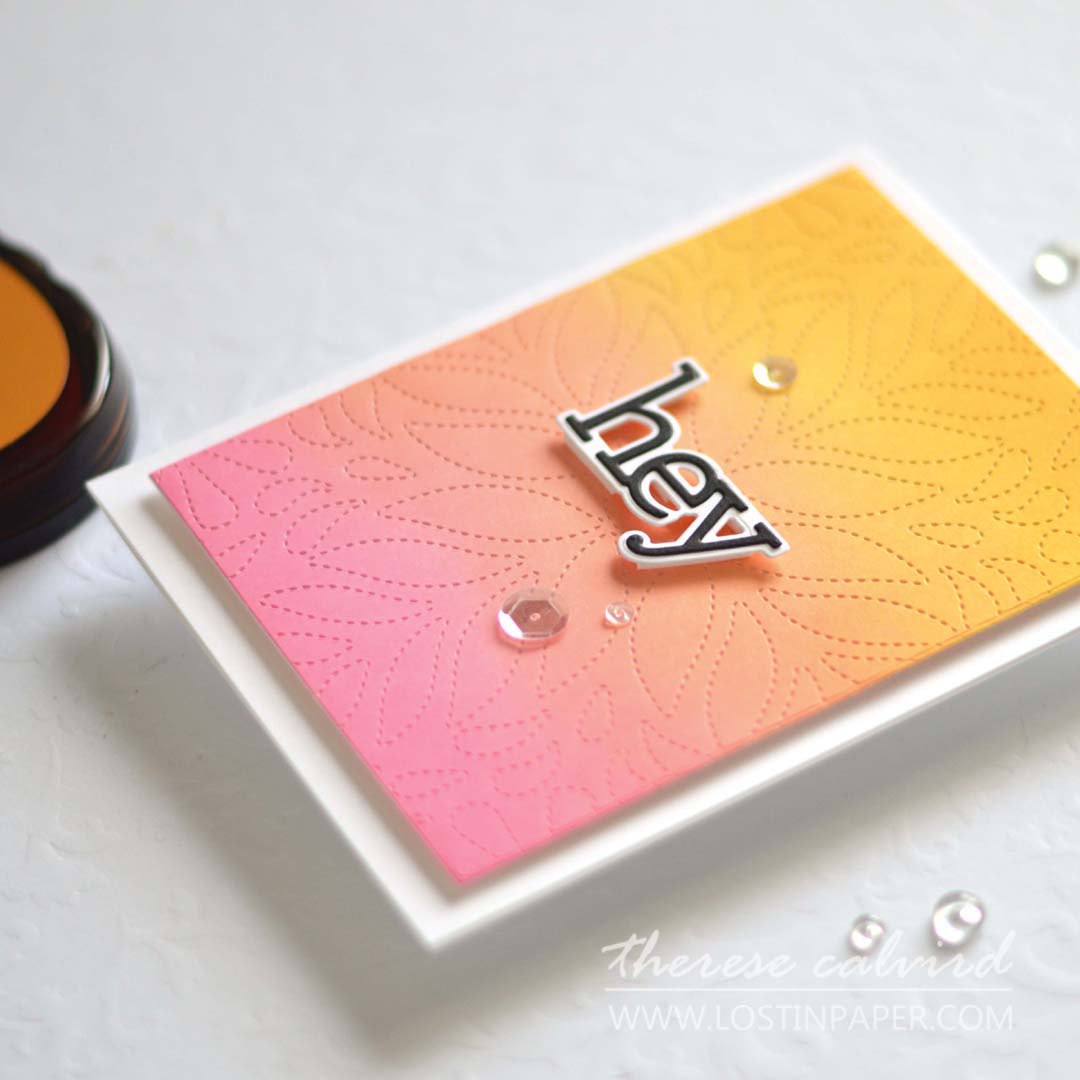
PRO TIP: Why not try debossing on design paper for a unique and fun look.
BONUS IDEA: In this card HERE I created a watercoloured panel before debossing it with the die. Or this Card where I did an inlay die cut flower AND a debossed Cover Die, check out this video HERE.
IDEA #3 Inlay – Adapt the Die Cut
You can use only a portion of the Cover Die to inlay, or why not cut it apart like I did in this card here!
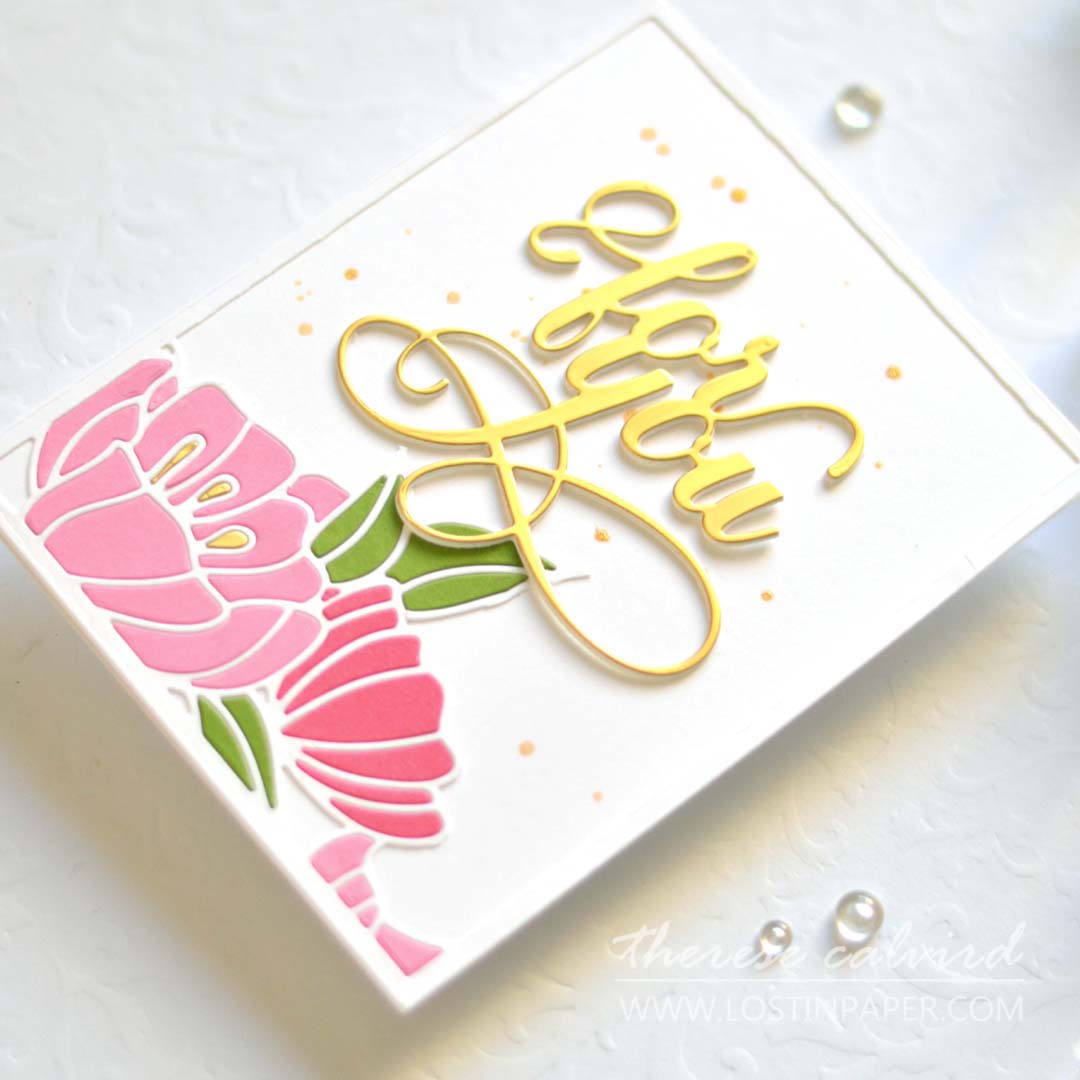
PRO TIP: Don’t have the right coloured cardstock? Why not create your own with ink pads or alcohol markers.
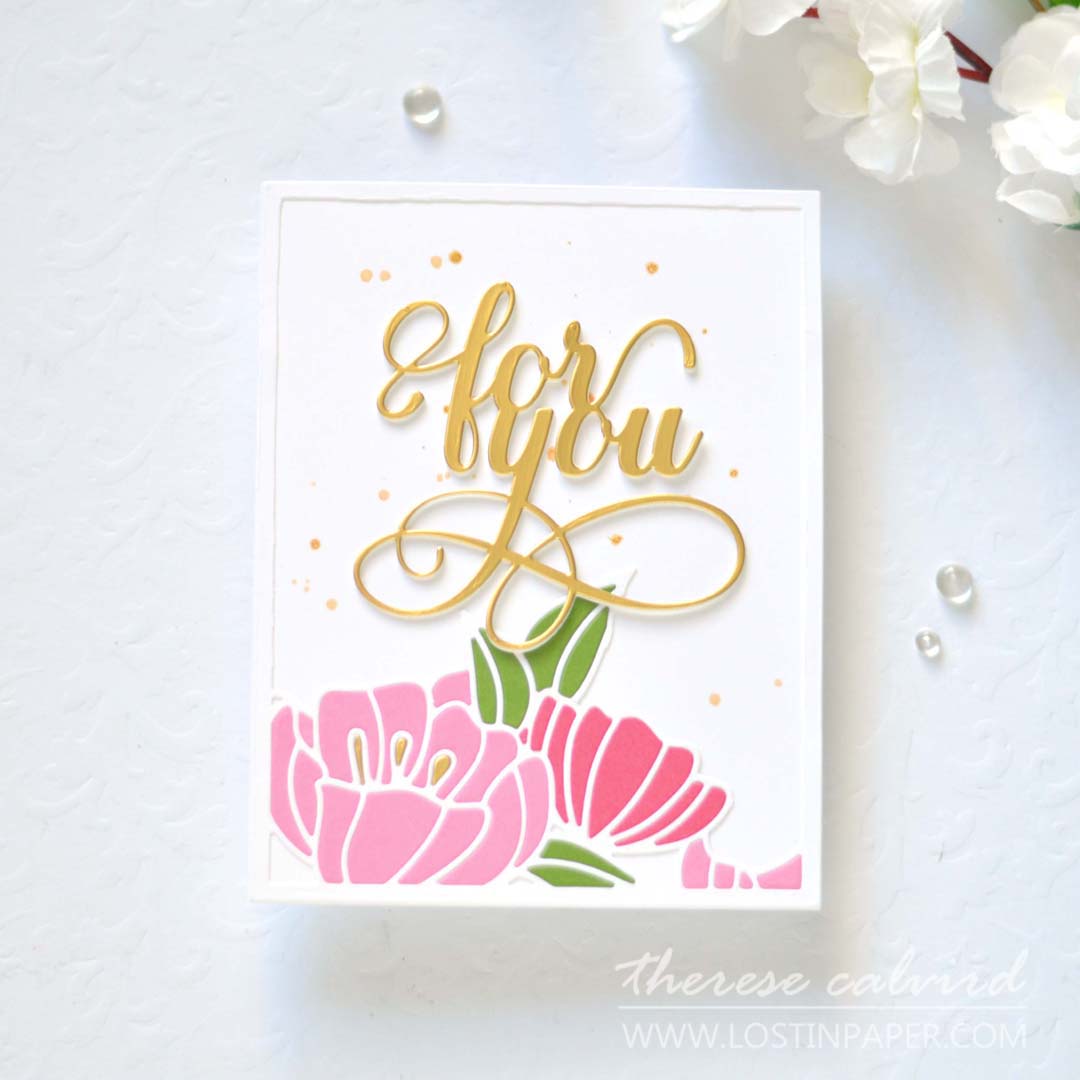
BONUS IDEA: Check out the how I used this same Cover Die in this video HERE.
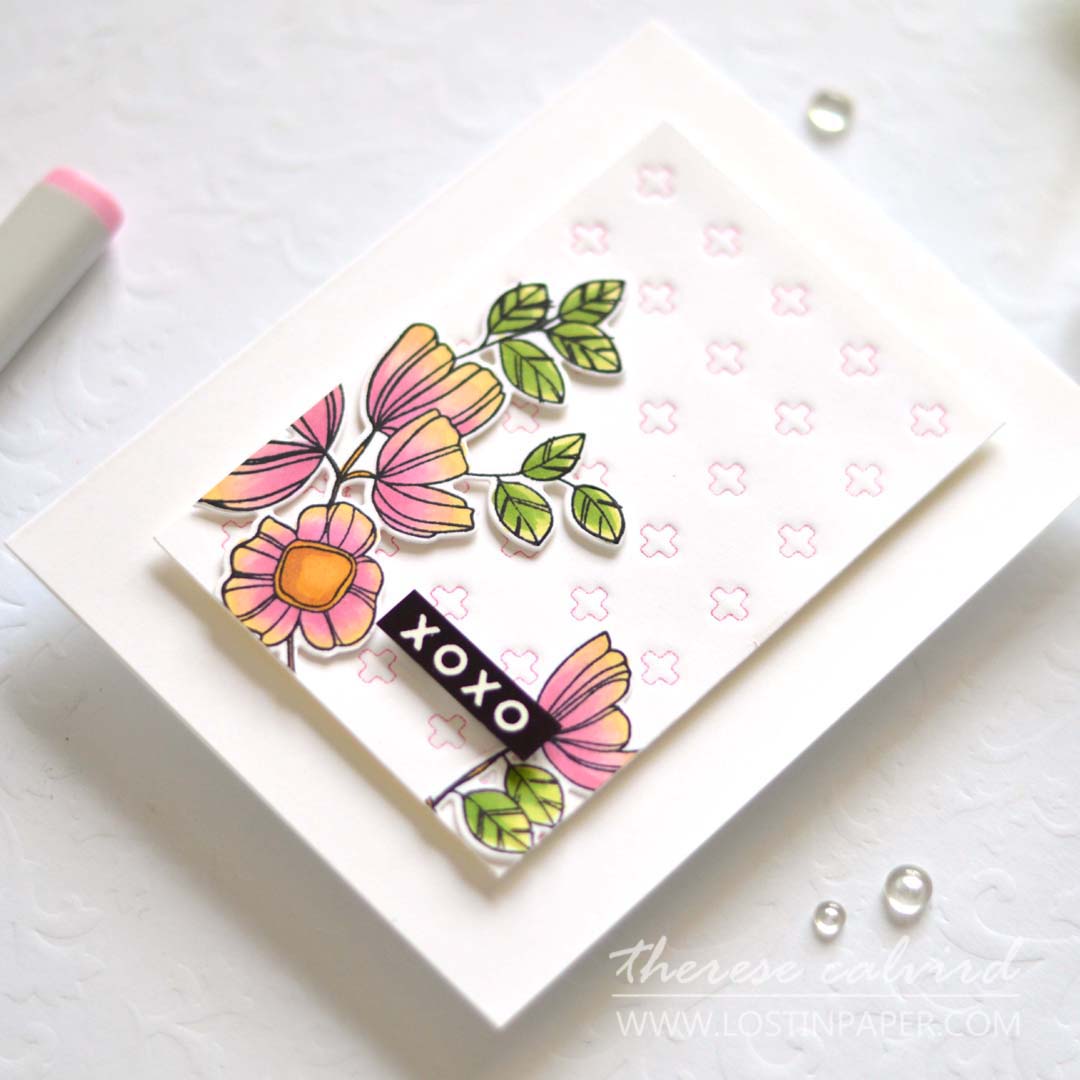
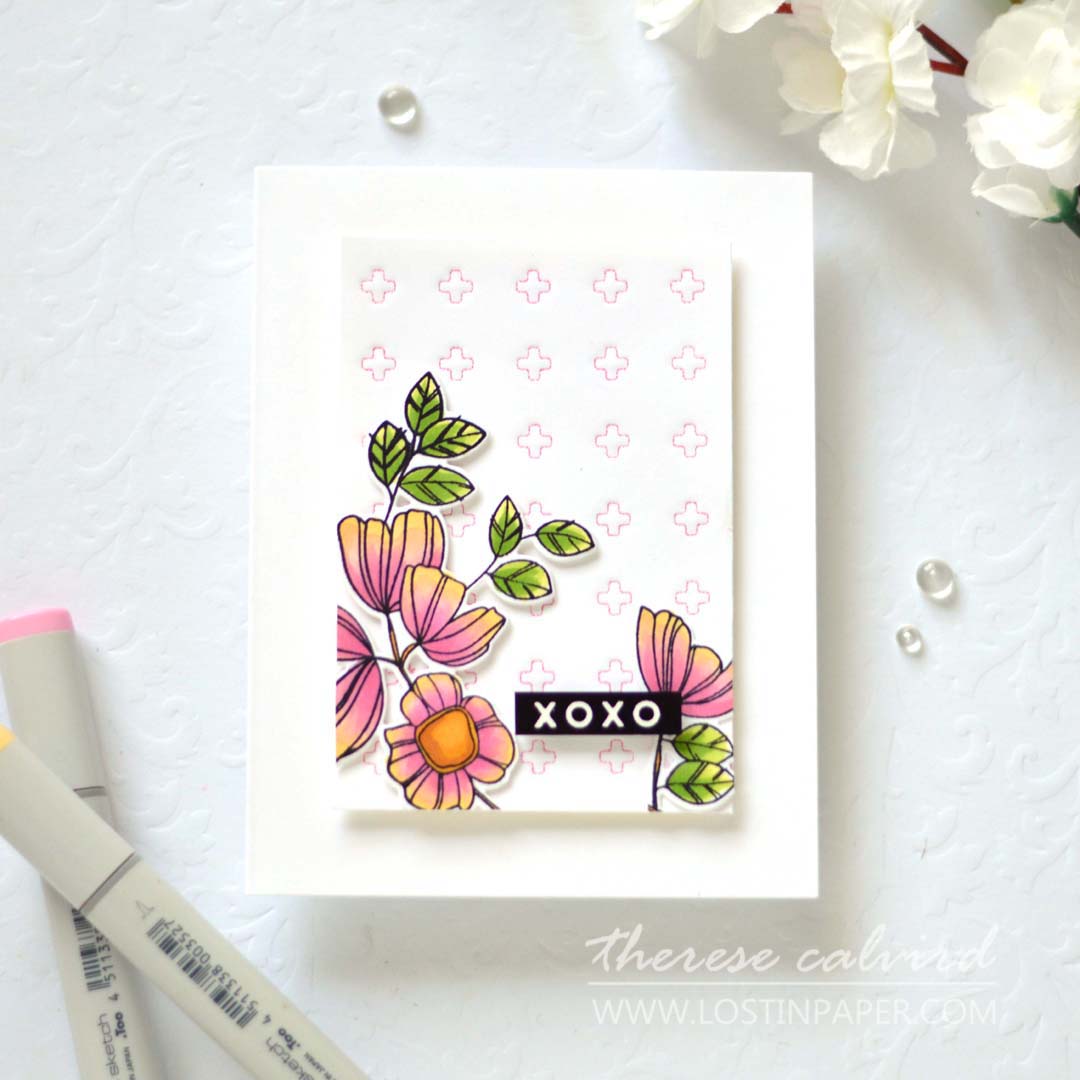
IDEA #4 Create a Stencil
Seriously, this is one of my fave techniques for cover dies, it totally gives them double duty. And you can reuse the stencil for another project.
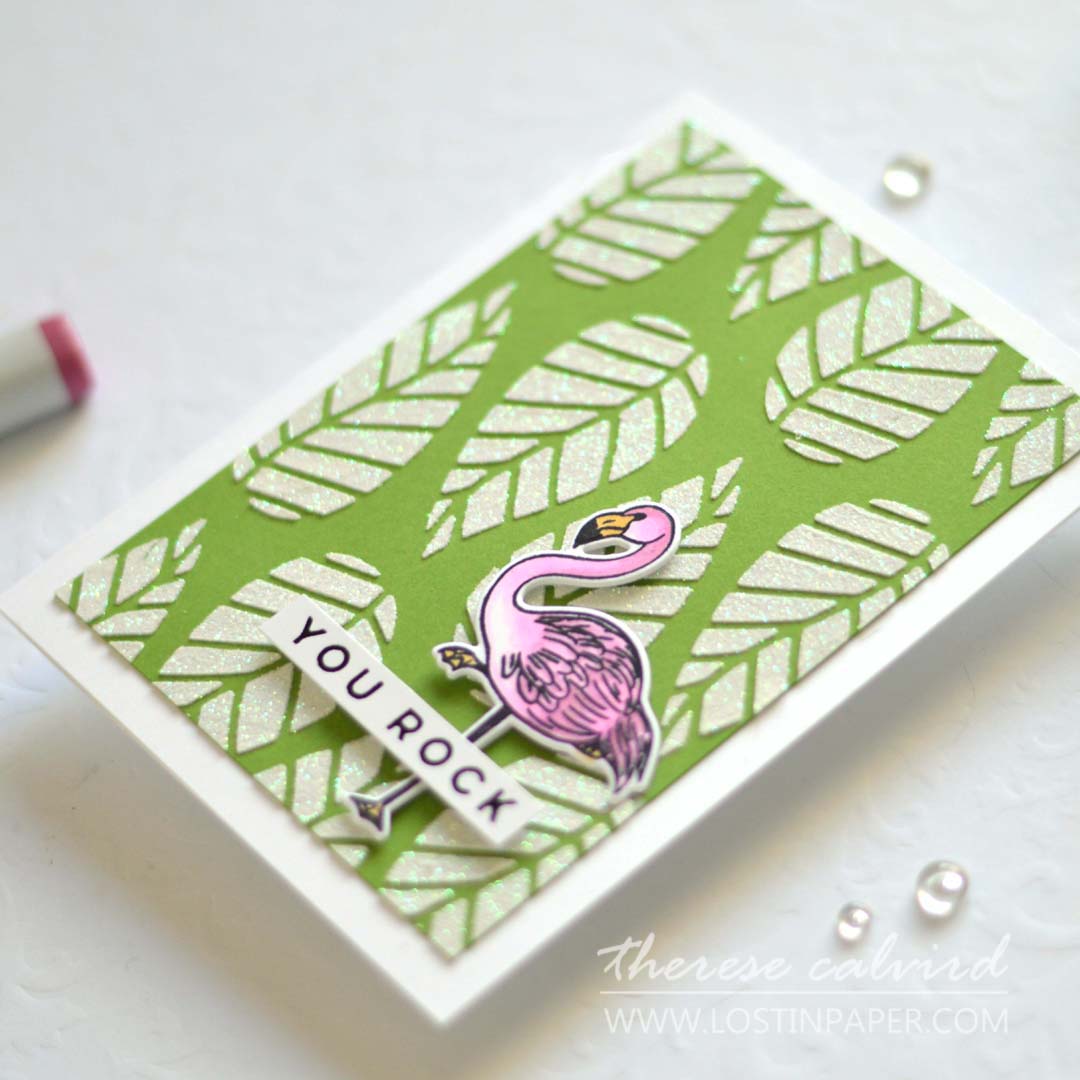
PRO TIP: If you are ‘glitter’ phobic then you could use a product such as Glitz Glitter Gel which has the glitter within the gel so there is no glittery mess lol.
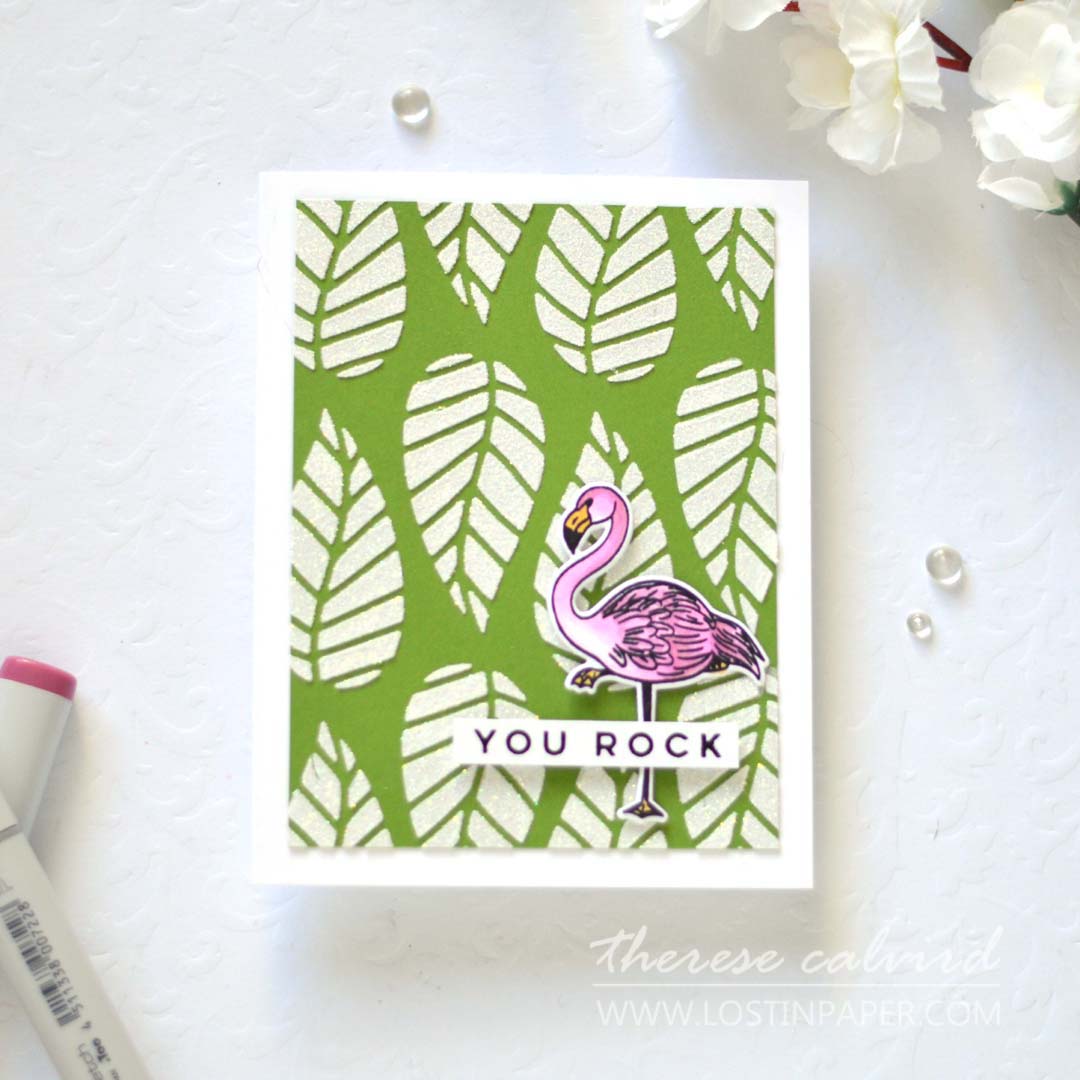
BONUS IDEA: YAY! I found the video where I made this stencil, check it out right HERE.
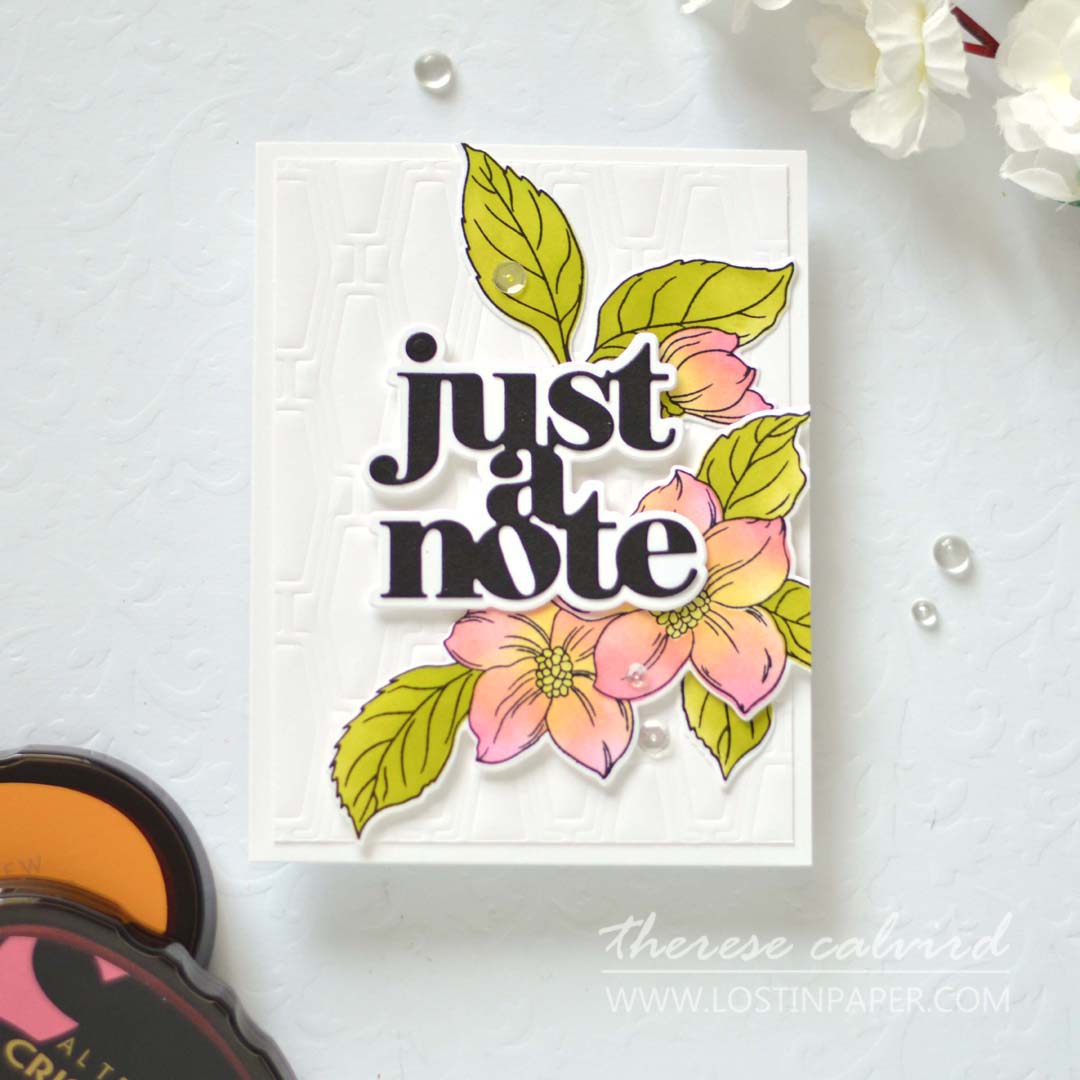
IDEA #5 Debossing a Cover Die
This is a great way to add some subtle texture to a background and perfect for that little something to add to a clean and simple design. You can use whatever patterned Cover Die you like!
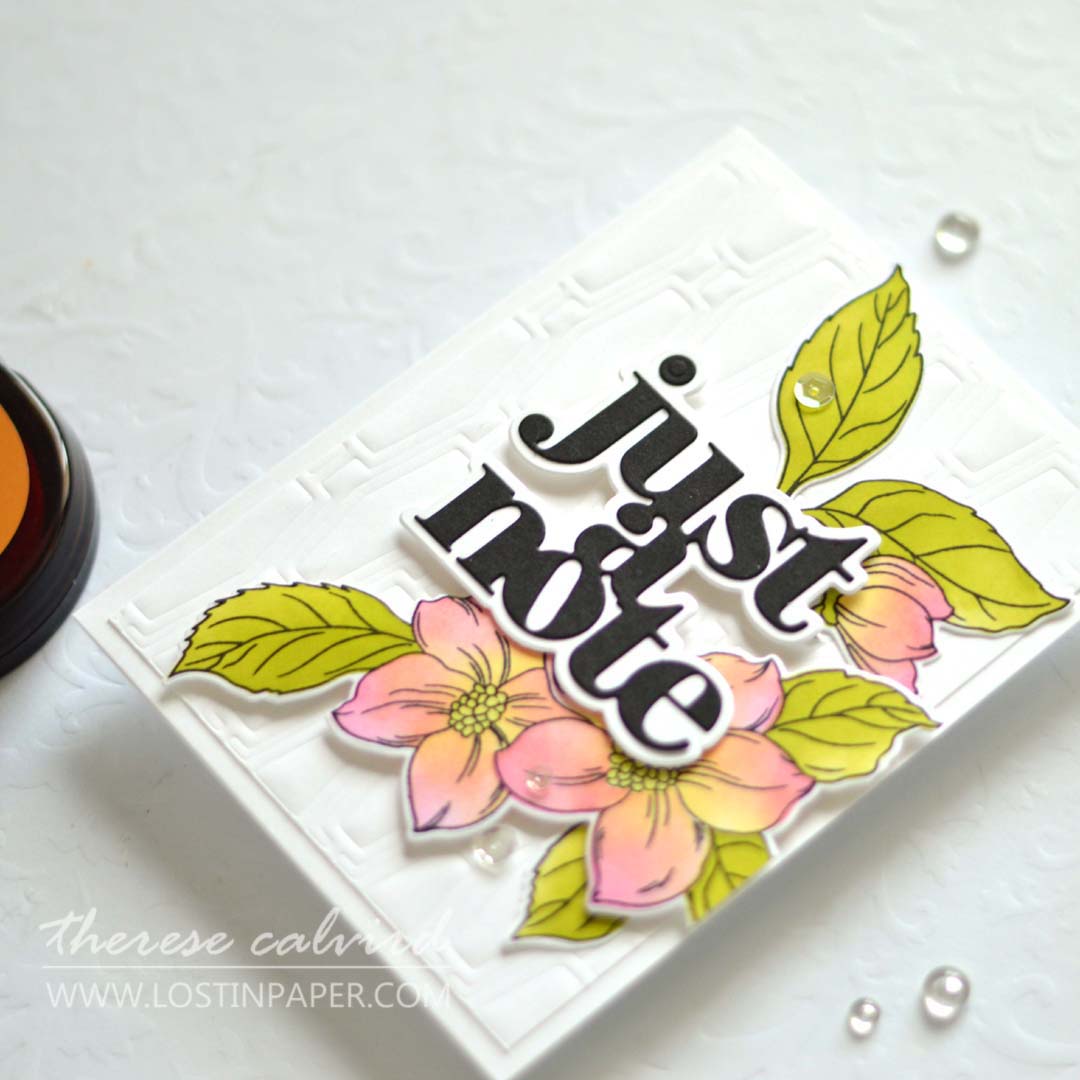
PRO TIP: You will need a silicon mat for this and the next technique. If you want to ‘deboss’ and die cut a piece for your project ensure that you die cut first then deboss (otherwise the debossing may flatten with the second pass of your machine).
BONUS IDEA: Want to see more ‘debossing with dies’ check out this video HERE.
IDEA #6 Stamping a Cover Die
Another classic, but it’s a technique I rarely do. You can impress a Cover Die with ink to add a unique pattern to any piece of cardstock.
PRO TIP: Be careful when adding ink to the cutting plates not to touch the base plate (clean any away with a cue tip). Work quickly so the ink doesn’t have time to dry before running it through the die cutting machine… and the hardest part…. try and keep it very still so the pattern doesn’t shift when rolling it through (what could possibly go wrong lol).
BONUS IDEA: Why not use a ‘Full Shaker’ window in front of a Cover Die? How fun would that be!
You can see my video here or Watch it in HD at YouTube or if you want to watch the FULL LIVE Video you can see that right HERE.
If you would like MORE inspiration for card backgrounds, then check out my Background Series HERE at YouTube.
I’d love to know which technique is your favourite, or if you are going to try any of these ideas? And if you do, I’d love you to share them with me on Social Media, I always love to see what you are creating. Sending big CRAFTY hugs your way,

Other Supplies: Copics – RV02,34 / R83 / YG00,03,17 / YR00,24 / Y21,26 / E33.
 Neenah Solar 110 SSS | AUZ | EH |  Neenah Solar 80 SSS | AUZ | EH |  Concord & 9th – Cardstock SSS | AUZ | EH |  Brushed Gold ALT |
 Bristol Smooth Cardstock SSS | AUZ | EH |  Masking Magic SSS | AUZ | EH |  Layered Floral Cover Die A ALT |  Layered Floral Cover Die B ALT |
 Bold Sentiments ALT | SSS | AUZ |  Dotted Tile ALT | SSS | AUZ |  Hey Mama SSS |  Striped Leaf Cover Die ALT |
 Poised Flamingo ALT | SSS | AUZ |  Poised Flamingo Die ALT | AUZ |  Way With Words EH |  Dainty Blooms Cover Die ALT | SSS |
 Fancy For You ALT | SSS | EH |  Mid-Century Cover Die AUZ | EH |  Just Saying Dies SSS | AUZ | EH |  Hello Beautiful Project Kit AUZ |
 Nordic Cross Over EH |  Weekend Doodles ALT | AUZ |  Tuxedo Black SSS | AUZ | EH |  Nocturne SSS | AUZ | EH |
 Tropical Forest ALT | AUZ |  Red Sunset ALT | SSS | AUZ |  Golden Sunset ALT | SSS | AUZ |  Party Dress AUZ | EH |
 Artists Watercolor 24 Pan Set ALT | SSS | AUZ | EH |  Watercolor Brushes Round ALT | SSS | AUZ |  Faber Castell – Water Cup SSS | OTH |  A2 Shaker Cover SSS | EH |
 Glitz Glitter Gel SSS | AUZ | EH |  Prisma Glitter SSS | EH |  Palette Knife SSS | EH |  Ink Blending Tool ALT | SSS | AUZ | EH |
 Sparkling Clear SSS | EH |  Stay-tion SSS | AUZ | EH |  Copic Markers SSS | EH |  Craft Knife SSS | EH |
 Media Grip Mat SSS | AUZ | EH |  Silicon Mat SSS | EH |  Scissors SSS | AUZ | EH |  MISTI SSS | AUZ | EH |
 Magnets OTH |  Mini Score Board SSS | AUZ | EH |  Cutting Mat ALT | SSS |  Bigshot SSS |
 Gemini Junior SSS | AUZ | EH |  Precision Tip SSS | AUZ | EH |  Multi Medium Matte SSS | AUZ | EH |  Zig Chisel Glue Pen SSS | AUZ | EH |
 Foam Tape ALT | SSS | AUZ |  Glue Tape ALT | SSS | AUZ |  Pink Tape AUZ |
Great to see how you used the backgrounds. The black glitter cardstock is fabulous in the first one. The white debossed ones are great with your coloured flowers.
You are the sweetest, thank you Christine!
Fun to see how the cards came out from the live video. My favorite is the card made with die cut that you trimmed down. I love to do paper piecing but a large design with lots of tiny pieces can be time consuming and frustrating ( those tiny pieces just disappear don’t they?.). Your method makes a nice card which is doable.
I totally hear you….. I can’t tell you how many times I have had to ‘re’ die cut an image just for one piece lol. So glad you enjoyed the cards Linda, thanks for visiting!
Therese: Really great post, enjoyed it very much – hopefully, I’ll get to watch the video’s!! Thank you, Denise
So happy you like the cards Denise!
Great ideas Therese. All the cards turned out beautifully, but I have to say my favourite is no 6 and ironically, it’s the only one of the cover dies I don’t have. Typical🤷ðŸ¼â€â™€ï¸
hahaha maybe you have something similar that could work (I’d hate to be the cause of a ‘spend’ , though I have been spending myself lol)
It was a really fun LIVE and you’ve worked your magic once again, my friend! I love each and every way you’ve finished those panels – especially love this last little sweetie with those doodling darling blooms! xo
=]
Those Doodle blooms are one of my fave sets and they just seem to work with anything really…. some sets are weird (or great) like that lol. Hugs and thanks so much for your help with the troll hunt, you are my fave!!
I watched on the big screen and it was great seeing all the ideas, Therese. I love how you finished them all into cards.
ooh, a Big screen sounds scary, I was thinking more about a ‘phone’ size lol. Soooo glad you liked the cards thanks Bobby!
Thank you for the great ideas on how to stretch my supplies! Sometimes I get into a rut and need a good “kick in the pants” to change things up. I love cards #1 and #3…. I get the same results for the technique on card #6 so it’s a good thing my work is NOT live on YouTube because you would hear some “colorful” language! 🙂
Nothing like a bit of colourful language between friends lol. I was glad that there was ‘enough’ of the panel to create a card with, next time I will choose a different style of ink pad (Like the Altenew ones, I’ve had much better results with them). Thanks so much June!!
Wonderful set of ideas! Great tips on the inking the cover die. I haven’t done that in forever. Going to put that one on my list to do!
hahaha it worked but I’ve done it better lol. At least I had ‘enough’ panel left to create a card! Thanks Lisa
All great techniques and cards. I actually have had a large die “sitting” on my desk waiting for me to make into a stencil for far too long! I think the glitter phobia is me to a t. Love the look dislike the mess!
Me too, that is where the Glitz Glitter Gel or the Nuvo drops really come into their own!