
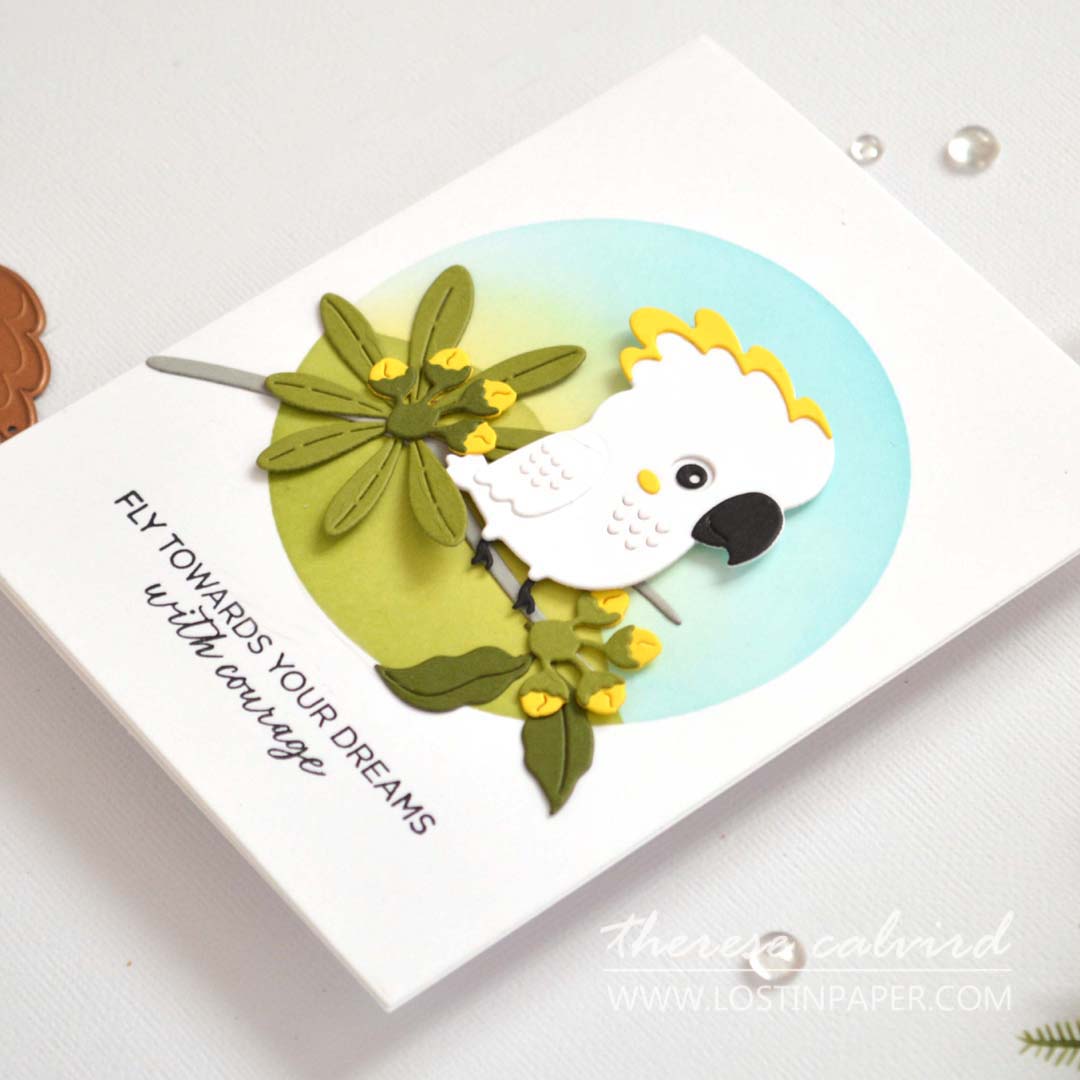
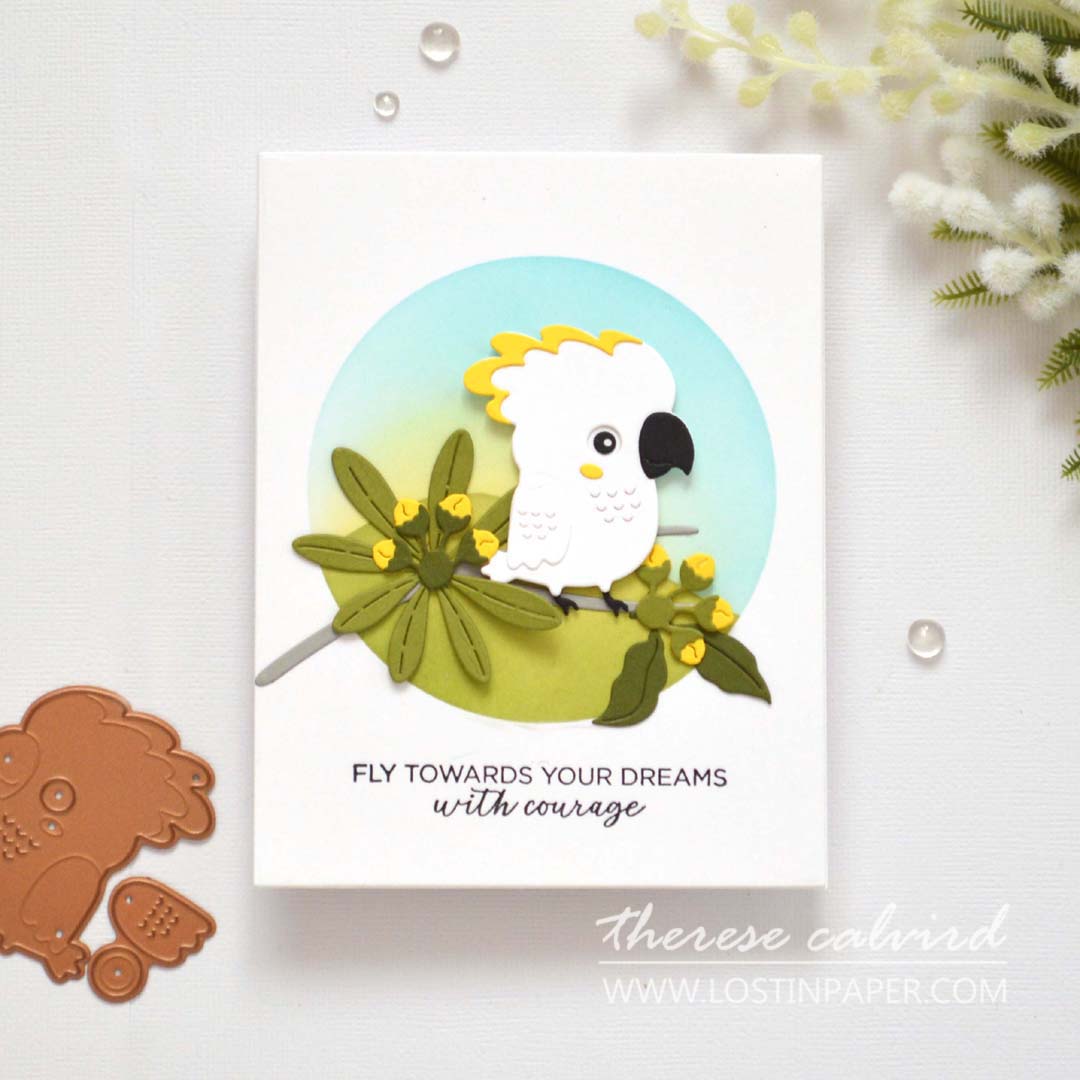
Are you ready to add some fun backgrounds to your stash? These are so handy to have… and today, I’ve spiced up one of my backgrounds with a ‘Gang Gang‘, what are you going to add?
In my recent live video, I showed 3 simple background techniques that are fun and easy to make, so you are ready, for that quick card that you need to throw together.
Would you like to see today’s cards?

You can jump straight into the video or watch it in HD on YouTube HERE. Scroll for more pics and details.
I use affiliate links, this means that if you click on a product that is linked to an affiliate shop then I will receive a small portion of the sale at no extra cost to you).
This is a great way to support me as well as the shops that we love 🥰!
I also featured some stunning new bird dies from Spellbinders that pair perfectly with these backgrounds, but you can customize your cards to use anything that you already have on hand. Keep reading to see how you can recreate these designs and add your own creative twist!
QUIZ TIME – Can you guess which birds I made using these fun dies from Spellbinders?… scroll down for the answer!
#EASYBACKGROUNDS
Technique #1 – Ink Blending
Ink blending is one of the simplest ways to create a stunning, smooth background for your cards. All you need is some ink and a blending tool!
But don’t stop there… there are so many ways to step up a simple ink blended background to make it truly unique.
Here’s how you can customize your ink blending:
- Customise the Colour Palette: Choose colours that match the theme of your card, or experiment with bold, contrasting shades for an eye-catching result.
- Mask a Shape:
- Die cut a shape from masking paper and apply it to your background.
- Use low tack tape or Post-It Notes to mask off certain areas.
- Or use shape stencils to create a defined ink-blended shape that adds extra dimension to your design.
- Combine Colours for Gradients: Create a beautiful gradient effect by blending two or more colours seamlessly together. The possibilities are endless, from soft transitions to bold ombre effects.
PRO TIP: Use a Color Wheel to help you mix colours without creating ‘muddy’ results. It’s a simple tool that ensures the colours you choose mix with each other perfectly! - Step It Up with Patterns or Scenes:
Add multiple masks to create graphic patterns or even use them to build an entire scene with layered ink blending. - Add Stamping: Stamp a pattern or image directly onto your ink-blended background to give it even more texture and interest.
- Emboss for Dimension: Use an embossing folder to add texture and dimension to your ink-blended panel, making it even more visually appealing!
Technique #2 – Ink Smooshing – the NEW Way!
Ink smooshing creates a beautiful, organic, watercolor-like effect on your cardstock. It’s perfect if you want a soft, artsy background for your cards.
There are many ways to ‘Smoosh’… they all start with adding water-based dye inks to a non-porous surface (like a piece of acetate), then spritzing it with water to activate the ink. From there, you can use several ways to transfer the color to your cardstock.
Here are some options:
- Press the cardstock into the ink puddles: Simply pick up the ink by gently pressing your cardstock into the puddles of ink, and move the paper around to spread the color evenly across the surface.
- Use acetate to transfer ink: Pick up the ink with a piece of acetate, press it into the puddles, and then tap it onto the cardstock to transfer the color. This method allows for a more controlled application and variation in texture.
NEW WAY!! In today’s video, I’m sharing a free smooshing tool that I made using a plastic bag stuffed with scrunched-up paper towel inside. I tied it at the top with some twine (yes, I still have some in my stash 😉). This creates a flattened surface at the base, giving you more control when laying down the smooshed color.
**Please note, this isn’t my original idea – Thank you Natalie Bowers, and you can check out her Video Here.
How to Step Up Ink Smooshing:
- Use Multiple Colors: Instead of just one color, press several ink pads and layer the colors together for a vibrant, dynamic background. This creates a more multi-dimensional effect.
- Add Water for a Soft Look: More water = softer, more fluid blending. For a more intense, concentrated look, use less water.
- Layering for Depth: Allow each layer to dry before adding another layer of ink. This gives the card more depth and allows the colors to blend in interesting ways.
PRO TIP: Allow dry time inbetween layers if you do not want the colours to ‘mix’ - Use Embellishments or Stamping: After smooshing, add stamped images, die cuts, or embellishments for more dimension and to bring the card together.
- Use a Stencil: If you want to add more control, try smooshing the ink through a stencil for a more defined pattern while keeping that organic watercolor feel.
- Create a Scene: Layer your smooshed inks to create different “background layers,” adding extra interest to your card’s design.
.
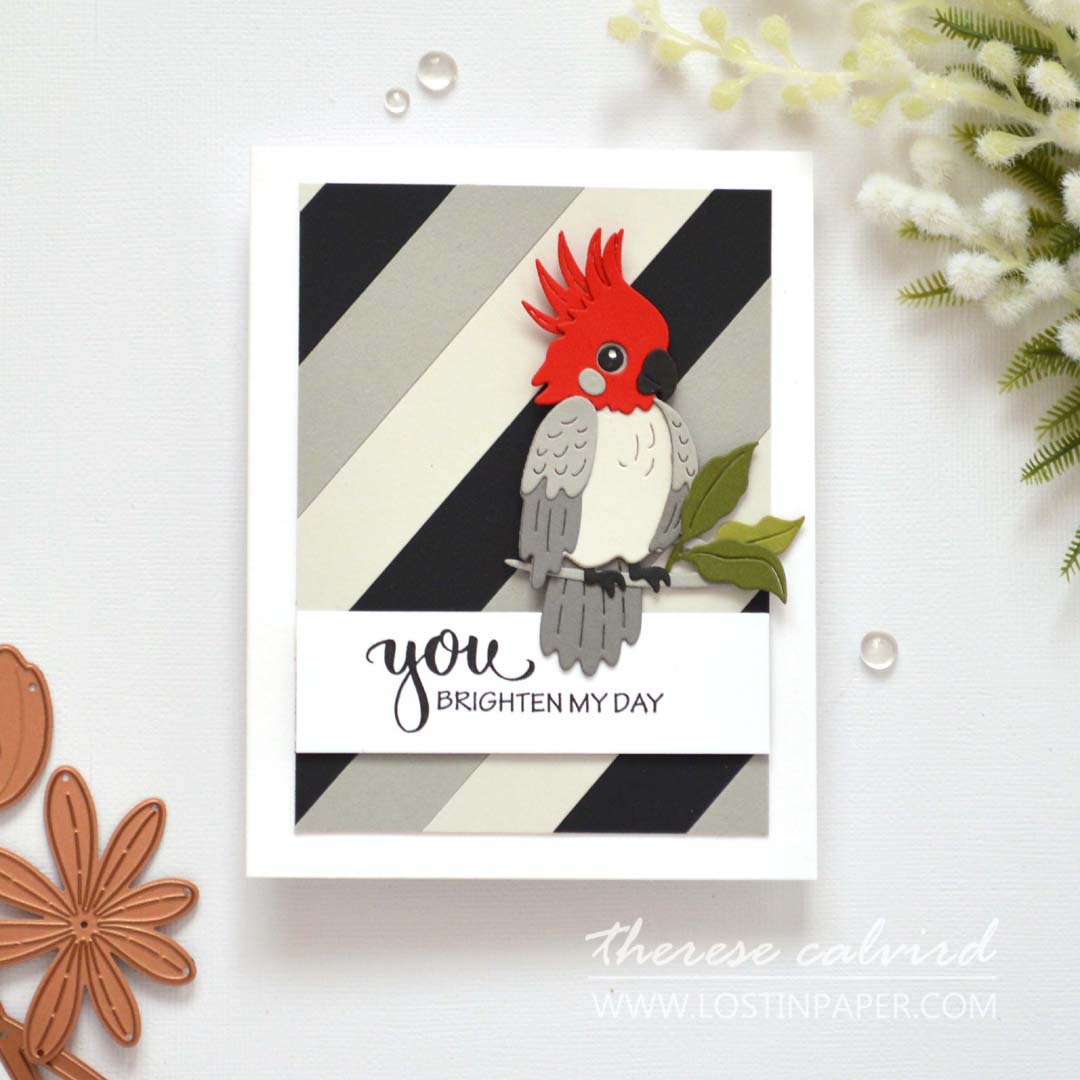
Technique #3 – On the Angle
If you’ve been here before, you know one of my ‘go-to’ quick and easy backgrounds is cardstock stacked into diagonal panels. It’s simple, effective, and perfect for making a bold statement without a lot of effort. This technique is great for adding visual interest and is totally customizable based on your card’s design and colors.

How to Step Up Diagonal Panels
This simple technique gives a modern look to any design, and you can easily elevate it… how?
- Customise the Colour Palette: Choose colors that match the theme of your card or experiment with bold contrasts for added impact. You can also use complementary colors for a more balanced design.
- Alter the Widths of the Stripes: Adjust the widths of the cardstock strips for variety. Narrow stripes will give a more delicate feel, while wider stripes can make a bolder statement… or a mix of both!
- Pop Up the Panel for Fun Dimension: Add some extra dimension by popping up the diagonal panel using foam tape. This creates a more dynamic look and adds depth to your card.
- Add a Border to Create a Frame: By adding a border around the panel, you can turn the design into a framed focal point.
- Mix and Match Patterns: Feel free to alternate between different textures, such as solid colors, patterned papers, or textured cardstock, to add more visual interest.
PRO TIP: A4 adhesive sheets are a game-changer when it comes to layering cardstock onto a panel. They make adhering strips quick, easy, and mess-free, ensuring your stripes stay in place!
These three simple background techniques are a great place to start. If your crafty mojo is low, grab some ink and cardstock and see what you can bring together in just a few minutes… who knows, you may even make a card!
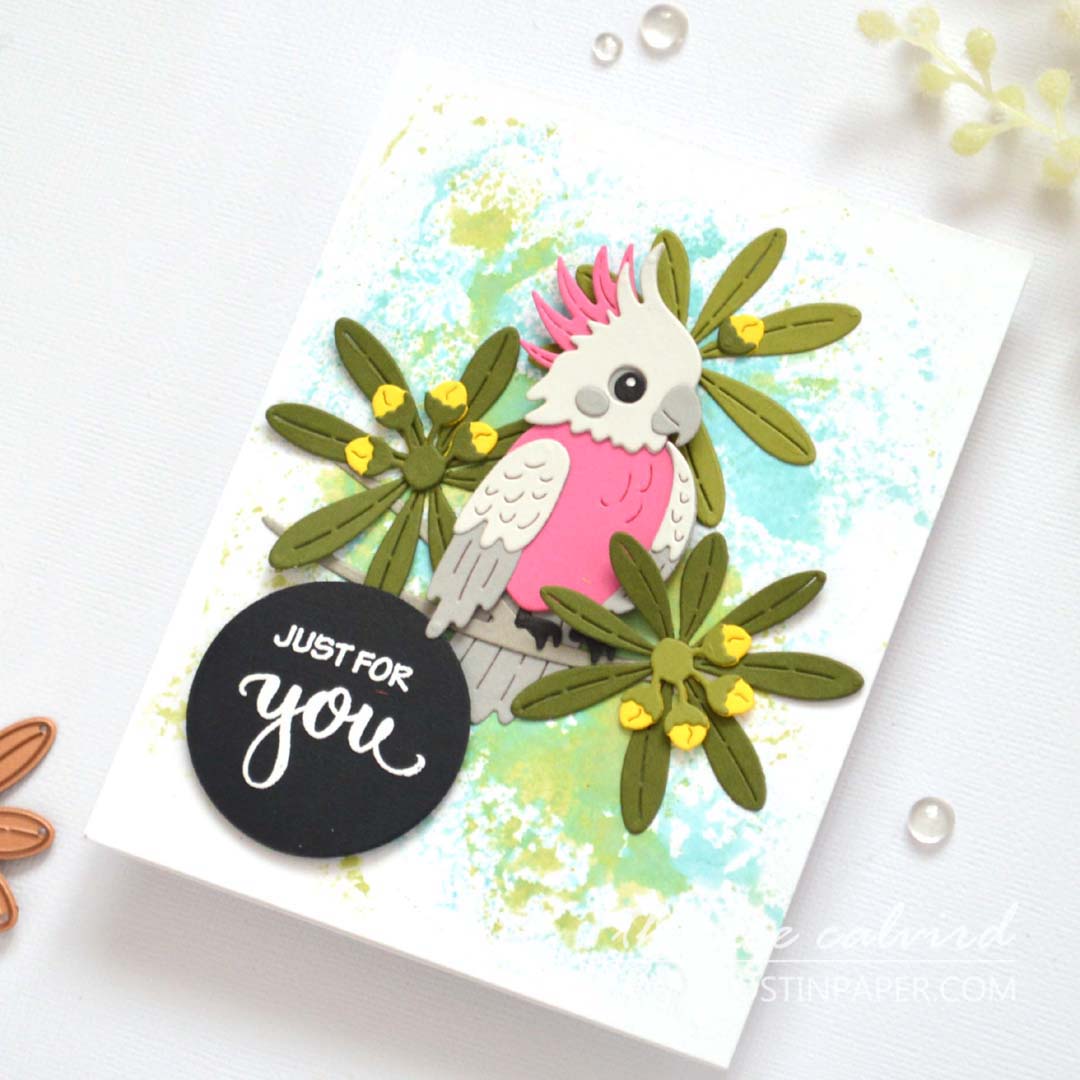
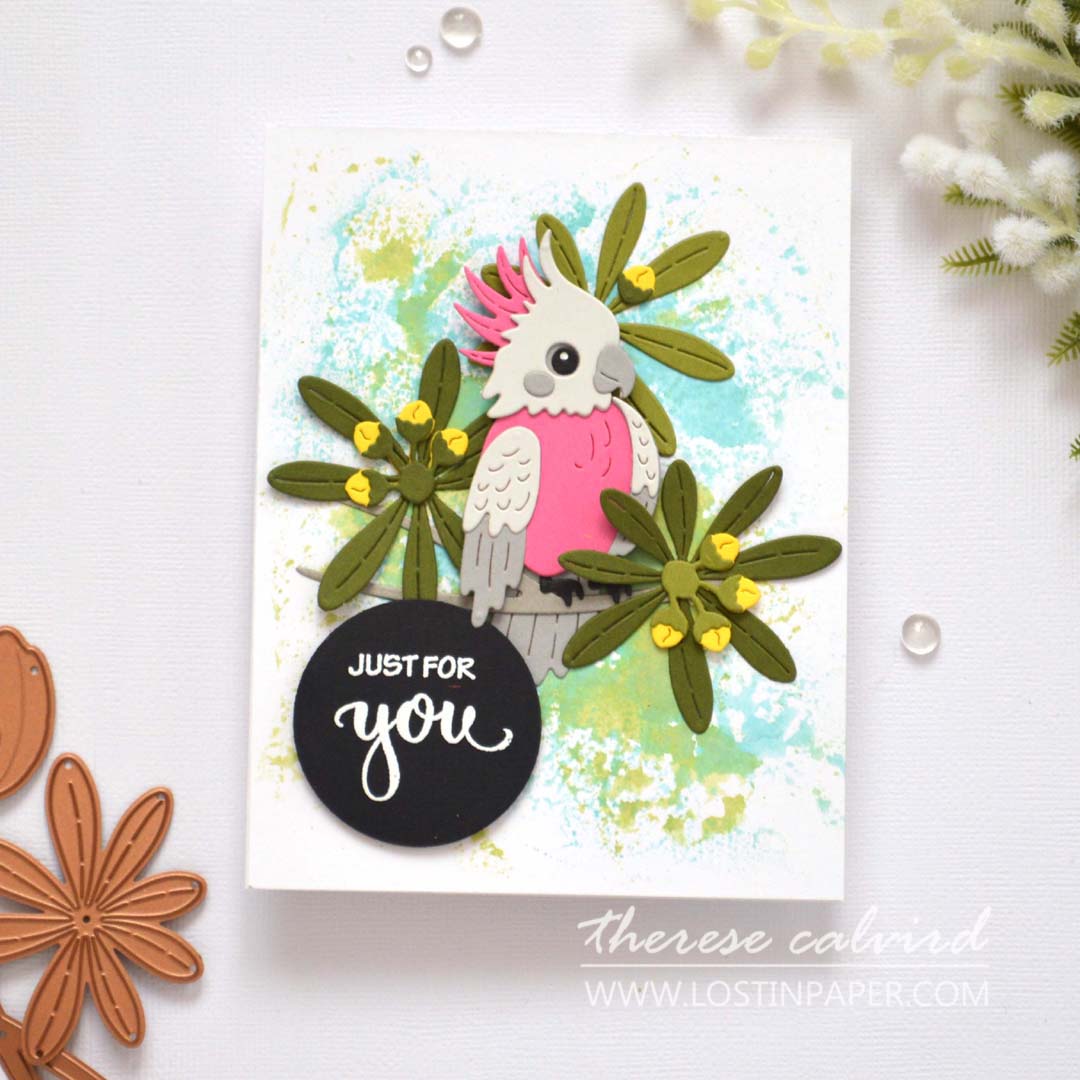
ANSWER: They are ALL Australian Parrots!
Card 1 Ink Blending – Sulphur Crested Cockatoo
Card 2 Smooshing – Galah
Card 3 Stripes – Gang Gang
I hope these tips inspire you to get creative with your card backgrounds! Don’t forget to check out the live replay if you missed it, and feel free to reach out with any questions.
Crafty hugs!

SUPPLIES:
*Certain content that appears on this site comes from Amazon, this content is provided ‘as is’ and is subject to change or removal at any time. As an Amazon Associate I earn from qualifying purchases.
SHOP CHEERFUL CHIRPS Collection here Spellbinders USA | Spellbinders UK
Cardstock: Altenew – Real Gray | Evening Gray | Fresh Lemon – Concord & 9th – Sweet Pea | Poppy | Artichoke | Avocado – Ellen Hutson – Slate Gray | Oyster Gray.
Altenew Inks: Sea Glass | Ocean Shores | Misty Sage | Mossy Meadow | Sunray.
 Free Hugs Oscar SSS | SB UK | SB US |  Flying High SSS | SB UK | SB US |  Spread Your Wings SSS | SB UK | SB US |  Everlasting Circles SSS | SB US |
 Neenah Solar 110 AMZ | SSS | Neenah Solar 80 AMZ | SSS |  Altenew Cardstock ALT | SSS |  Concord & 9th – Cardstock SSS |
 Masking Paper ALT | SSS |  Nocturne SSS |  Versamark Ink SSS | OTH | Color Wheel AMZ | SSS |
 Mini Blending Brush Storage ALT |  Ink Blending Tool ALT | SSS |  Mini Blending Brush Set ALT | SSS |  Perfect Picker ALT | SSS |
 Tweezers ALT | SSS |  Bone Folder ALT |  Stampwheel 2.0 ALT | SSS |  Score Board ALT | SSS |
 Mini MISTI SSS |  9X12 Ultra Sticky Mat: Grid ALT | SSS |  Platinum 6 ALT | SSS | SB UK | SB US | 9″ Fiskars Paper Trimmer AMZ |
 Glue Tape ALT | SSS |  Foam Tape NEW sizes! ALT | SSS | Bearly Art Glue AMZ | SSS |  Adhesive Sheets ALT | SSS |
 Satin Masking Tape ALT |
Brilliant! Fantastic background ideas you can use over and over again!
So glad you like them Lisa!