
Do you think it’s possible to make beautiful stamped cards in just 5 minutes? Stick around, because I have card ideas that will prove it’s totally possible!
Welcome to my 5 Minute Card Series where I give you tips and ideas to make FUN fast cards, without the fuss. And, a ton of tips along the way. You can see the full playlist right HERE and it’s growing!
I use affiliate links, which means that if you click on a product link, I’ll receive a small portion of the sale at no extra cost to you. It’s a great way to support me and the shops we love 🥰!
Let’s take a peek at today’s cards?
You can jump straight into the video here or watch it in HD on YouTube HERE. Scroll for more pics and details.
#5MINUTE-STAMPEDCARDS
Sometimes we need to make a card in a hurry, or maybe you’d just like to challenge yourself. But creating beautiful stamped cards doesn’t have to take hours. In today’s post, I’ll show you 5 simple techniques that will help you create gorgeous cards in 5 minutes.
I’ll be sharing ideas that use minimal supplies but deliver maximum impact. Plus, I’ve included some bonus ideas to step up your creations!
Quick Tips for Speedy Stamped Cards
Before we start, here are some quick tips to keep in mind for faster, easier cardmaking:
- Use Large Stamp Images: These cover more area and save you time.
- Stamp in Colour (or Multiple Colours): Skip the colouring and go for vibrant ink coverage.
- Use Premade Sentiments: Either use pre-made sentiments or ones from the same stamp set for easy coordination.
- Use Line Art Stamping: Great for skipping the colouring, but still getting a clean, detailed look.
- Coordinating Dies: They’ll help you cut out your images quickly – no fussy cutting needed!
- Don’t Overthink It: Keep it simple – your cards will be beautiful without overcomplicating things.
- Use a Similar Colour Palette: If you’re making multiple cards, keeping a similar colour scheme saves time and looks cohesive.
- Work Directly on the Card Front: Skip extra layers and save time.
- Pre-Prepare Your Supplies: Have everything ready before you start—this will save you time during the process!
Now, let’s jump into the card ideas!
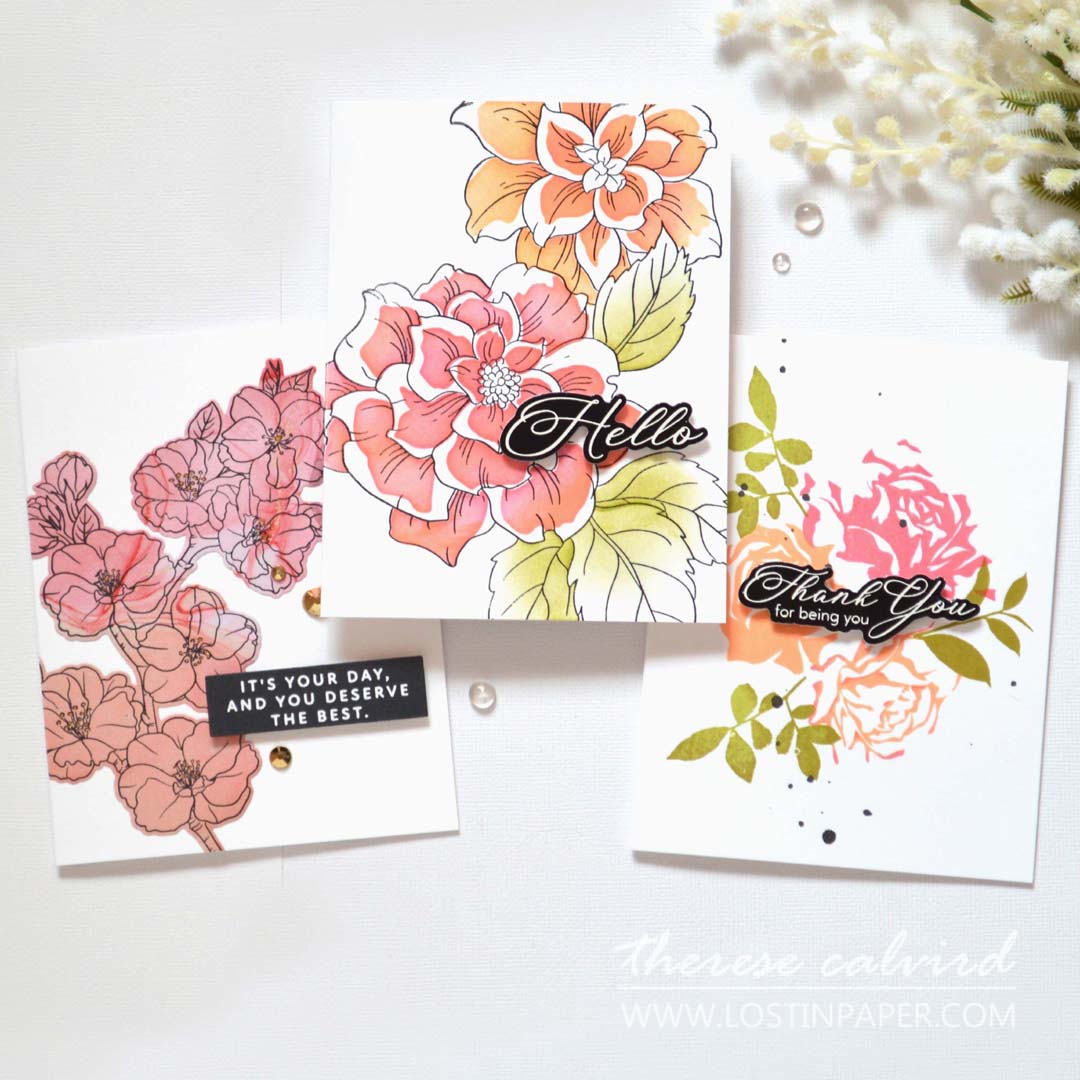
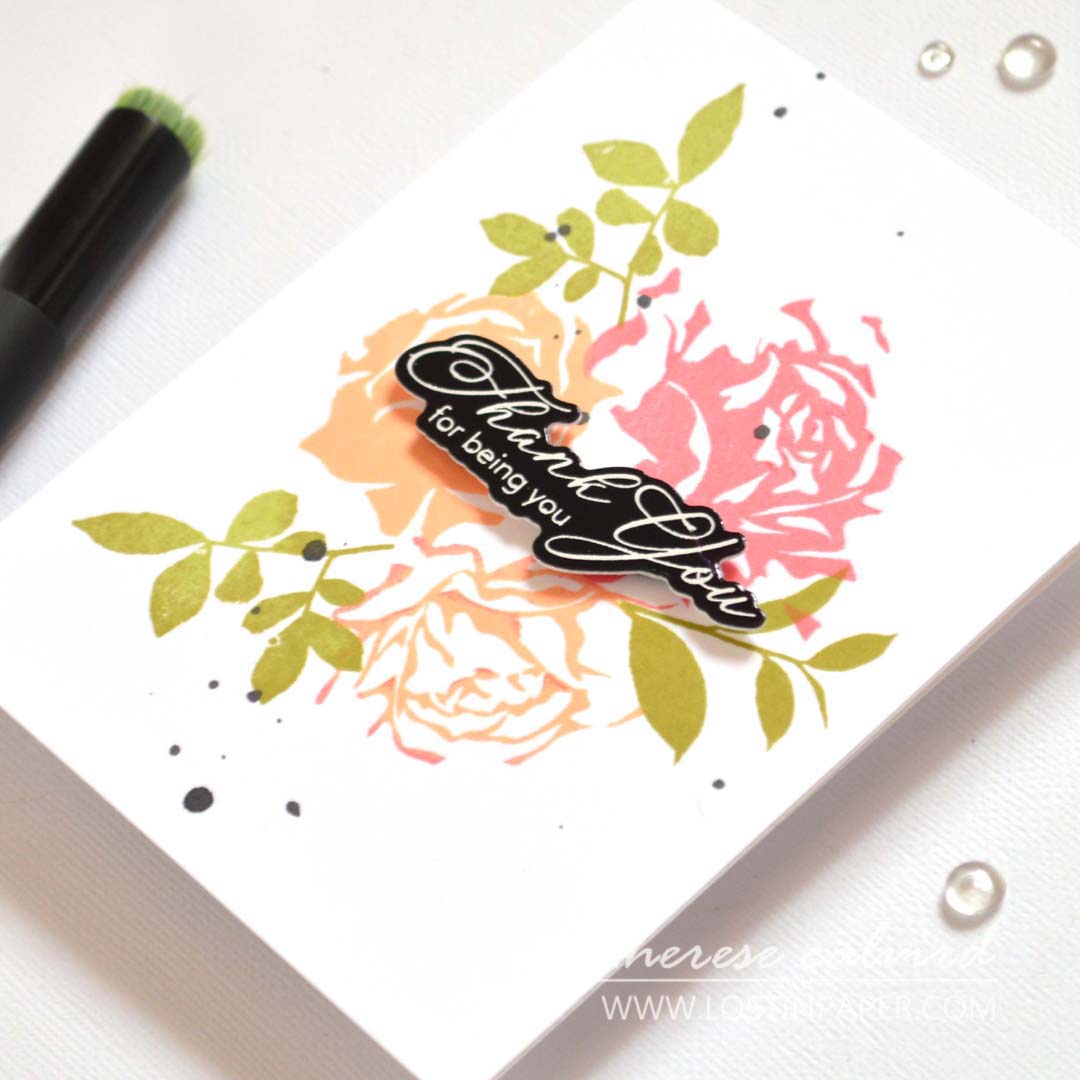
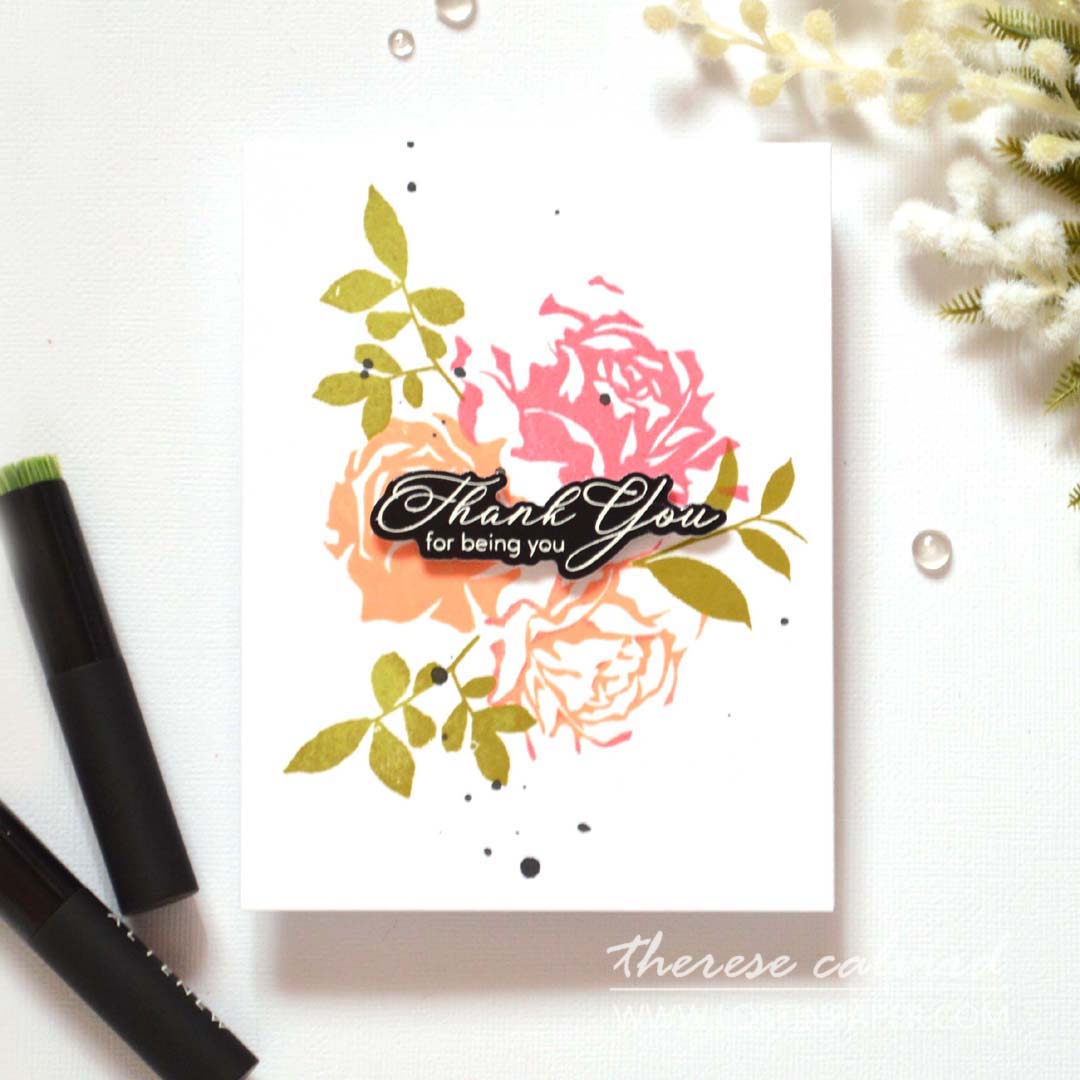
Idea #1 – Large Bouquet & Stencil
This first technique uses a large floral stamp paired with a simple ink blended stencil. It’s a quick way to create a beautiful floral design without spending too much time on the colouring.
How to Do It:
Start by ink blending two colors through your stencil using a large blending brush for quick and even coverage. I love using the big brush because it gives a soft, light version of the ink, which makes the card feel airy and fresh. Stamp the large floral image on top and finish it off with a premade sentiment—this saves time and guarantees it will coordinate perfectly!
PRO TIP: If you have coordinating layering stencils, use just one layer for this technique. It’s quick, and you still get that beautiful, layered effect.
BONUS TIP: Work Directly on the Card Front: Skip extra layers and save time.
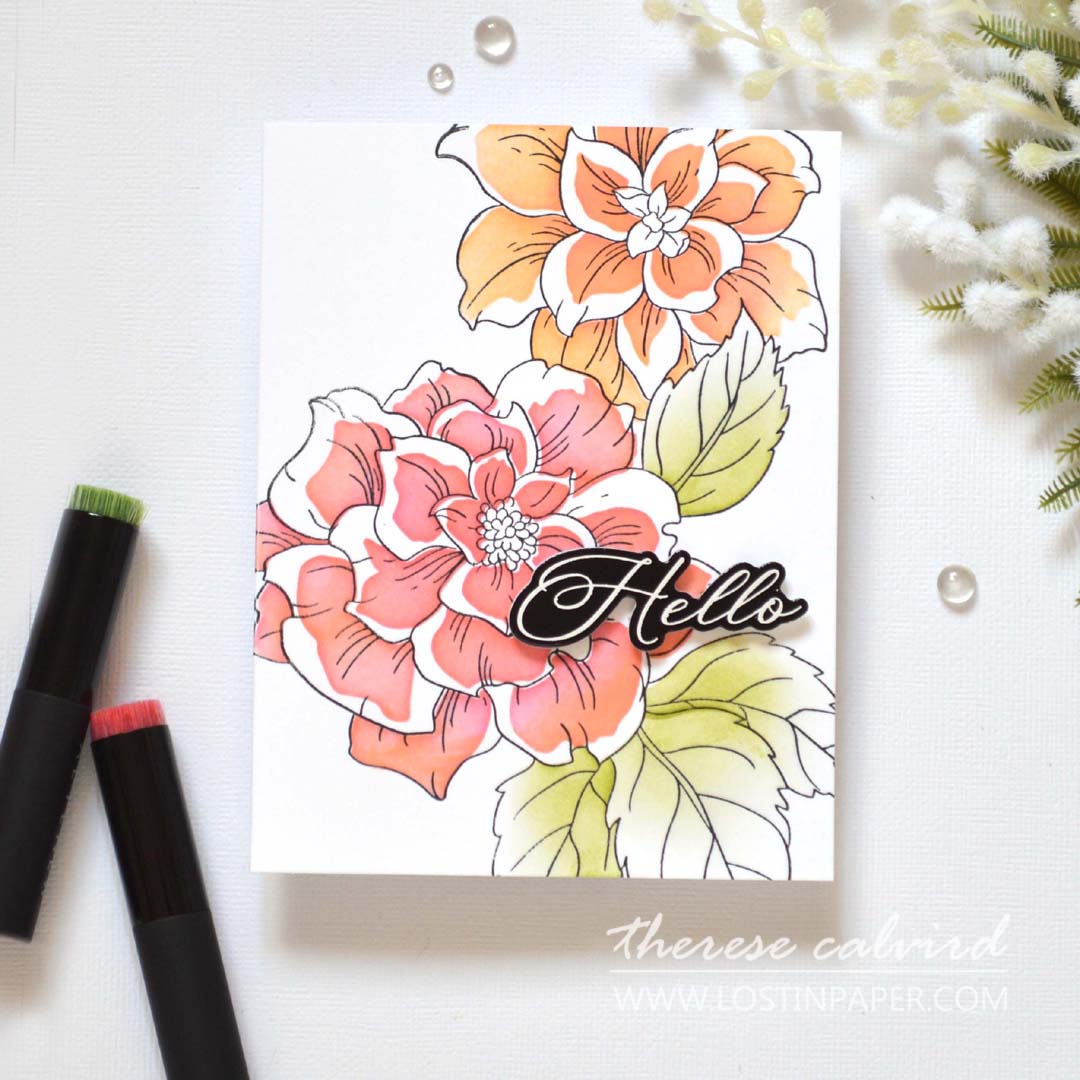
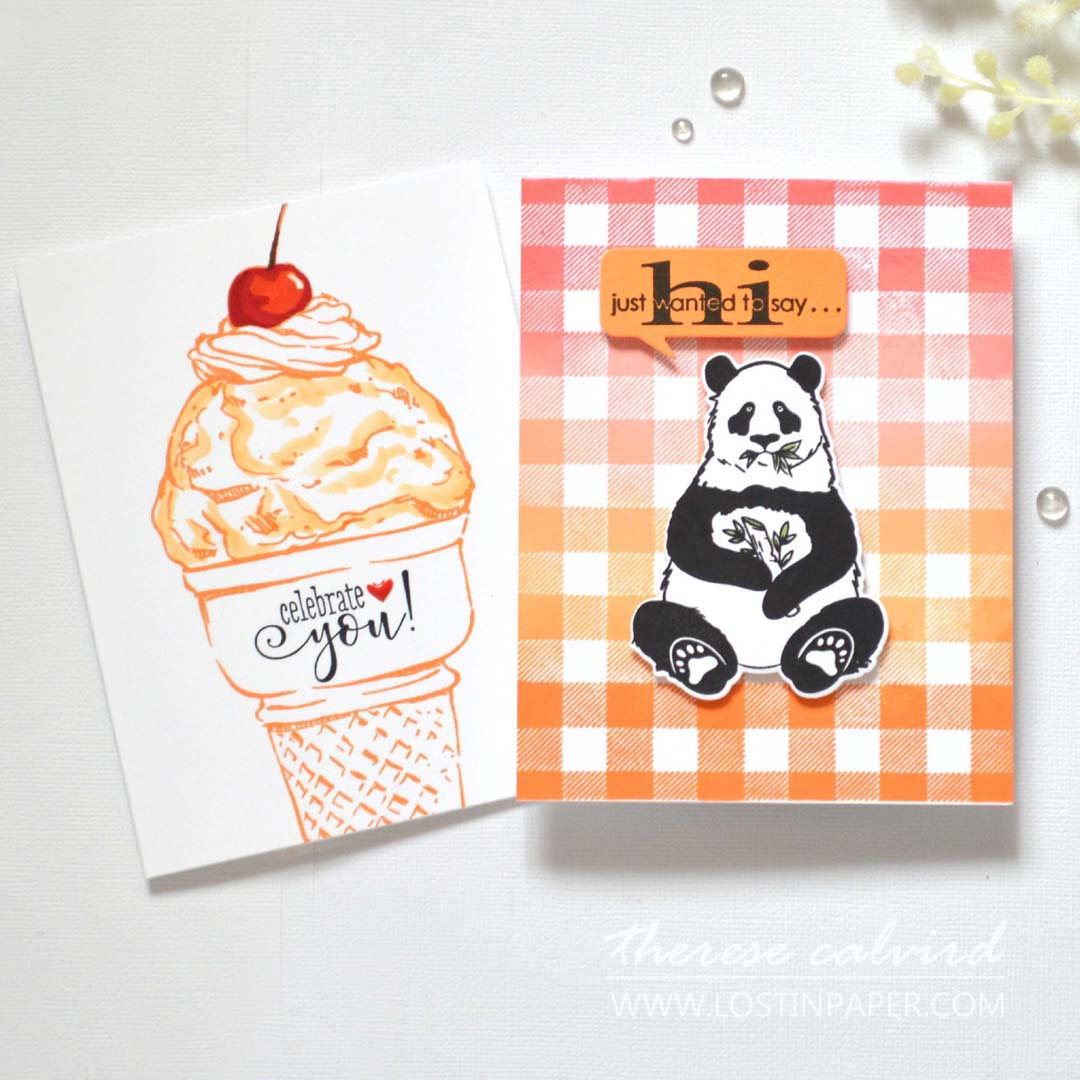
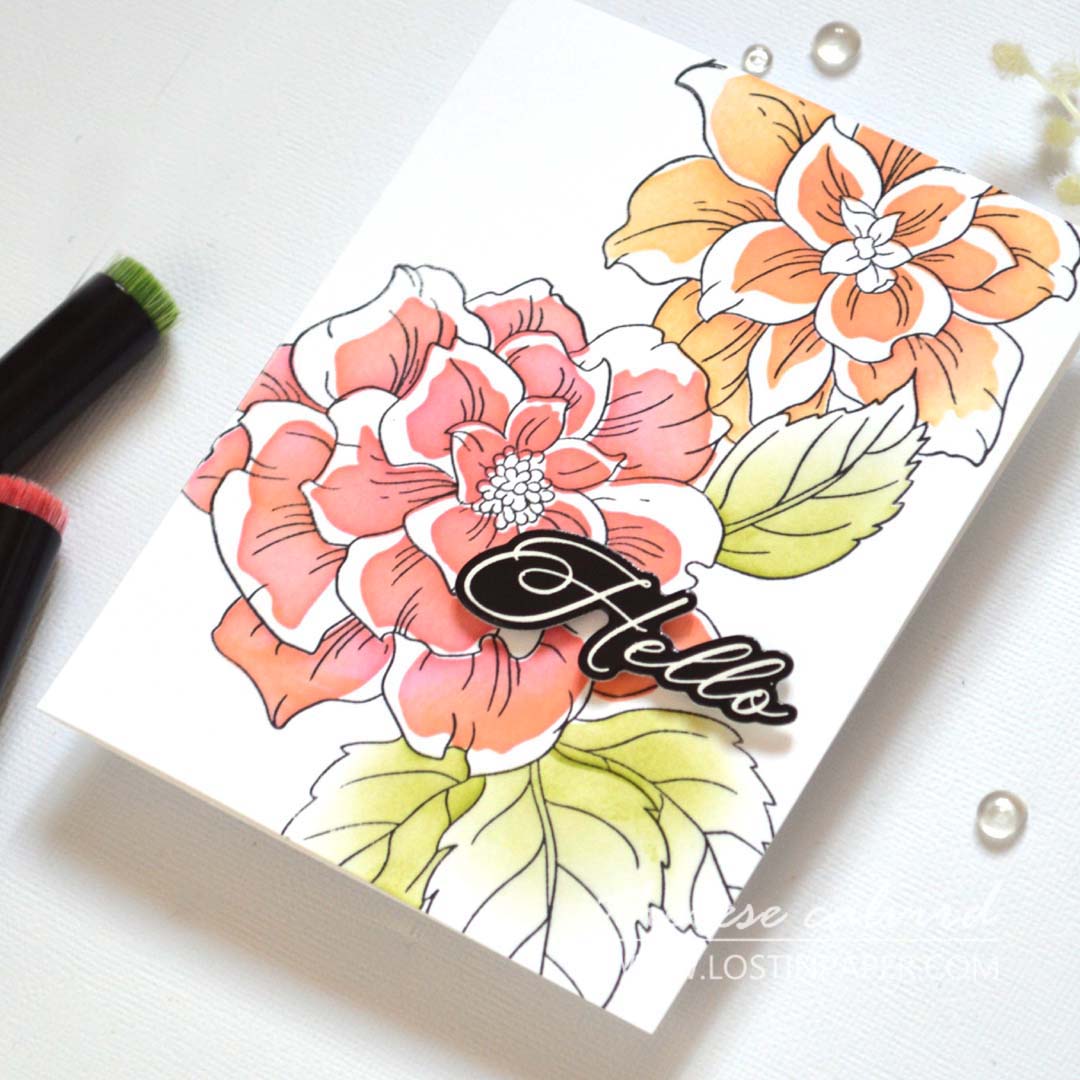
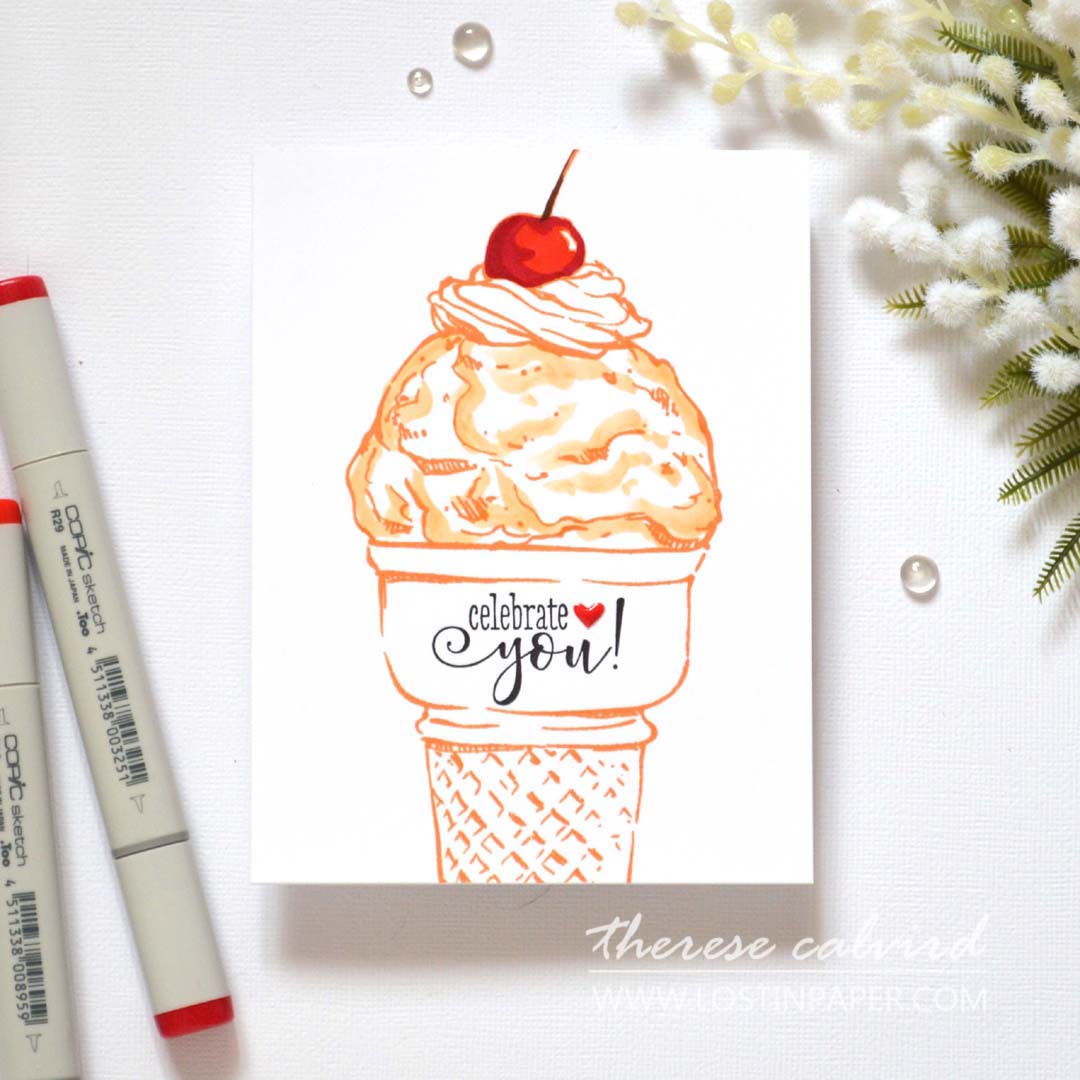
Idea #2 – Large Image & Partial Colouring
Sticking with the theme of ‘large’ stamps, let’s take things up a notch with a quick and easy design that adds impact fast. For this card, I used a large ice cream image, and instead of colouring the whole thing, I focused on colouring just a small part to make it stand out. This method keeps the card simple yet striking!
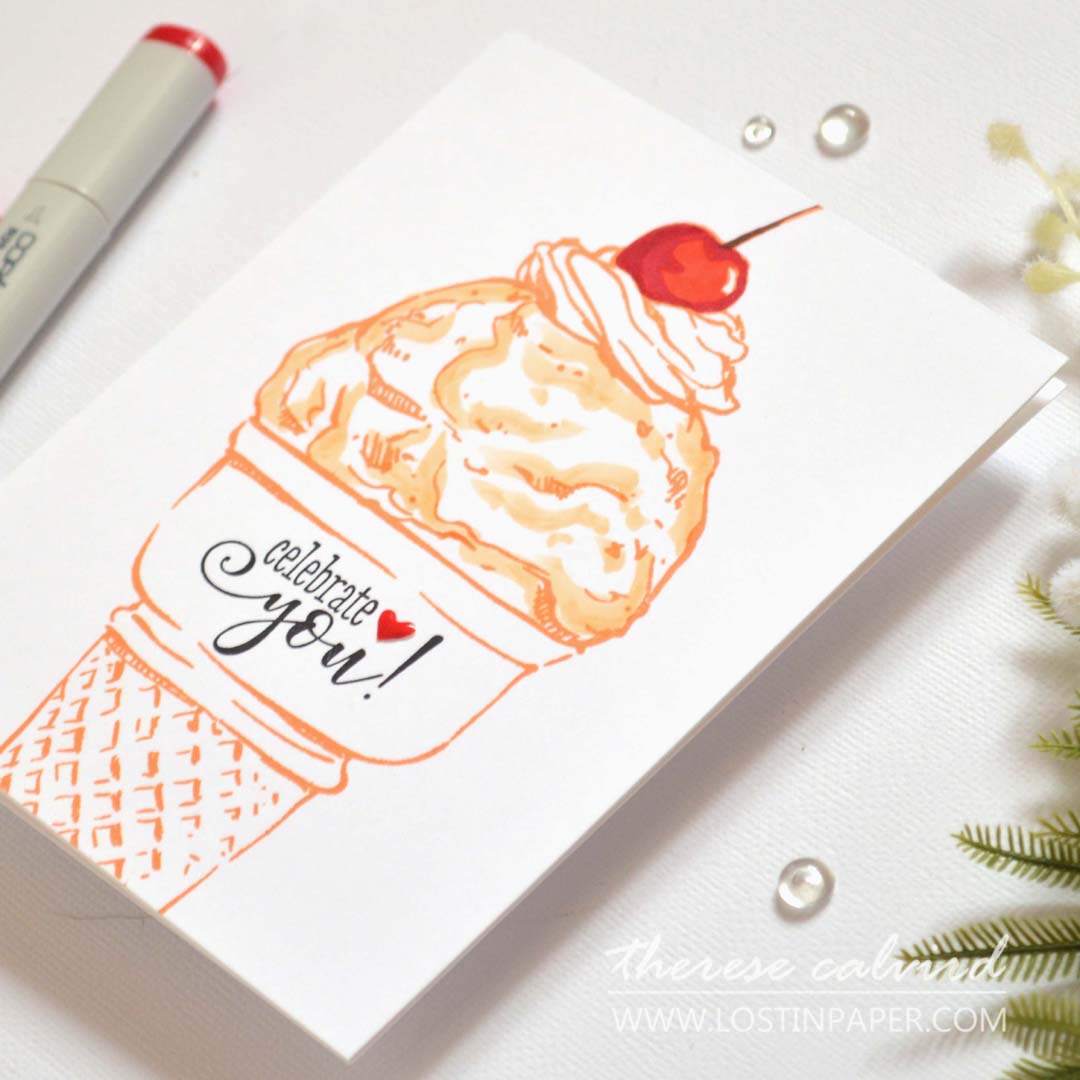
How to Do It:
Let’s switch things up with coloured ink for this technique! I started with an ink color that mimics the look of an ice cream cone – perfect for this fun image. Then, I added a quick focal point of color by choosing one part of the image to stand out. For a fast and simple touch, I used alcohol markers in a “washy” loose coloring style, which worked beautifully for the ice cream image.
Use a Sentiment from the Same Stamp Set: This ensures it coordinates perfectly with the image, making your card come together quickly.
BONUS IDEA: For a modern twist, try stamping a large image in a light-colored ink and use it almost like a background. Then, layer a bold sentiment on top for a sleek, striking look!
Idea #3 – Simple Stamped Bouquet
Creating a bouquet of flowers doesn’t have to involve complex colouring. With solid style stamps, you can add colour in no time.
How to Do It:
Use solid floral images (no colouring required!) to create a bouquet by stamping 3-5 flowers and leaves in an odd number. This trick helps the design feel balanced and visually appealing. You can add filler leaf sprigs to bulk up the bouquet. Layering stamp sets are perfect for this technique as they have multiple levels of stamp layering that can be used to create the look of a flower with only one stamp.
BONUS IDEA: Try using a monochromatic colour palette for a sleek and modern look, or go bold with a black and white version for something a little different!
PRO TIP: Stamp in colour (or multiple colours) to keep the look fresh and vibrant without any actual colouring.
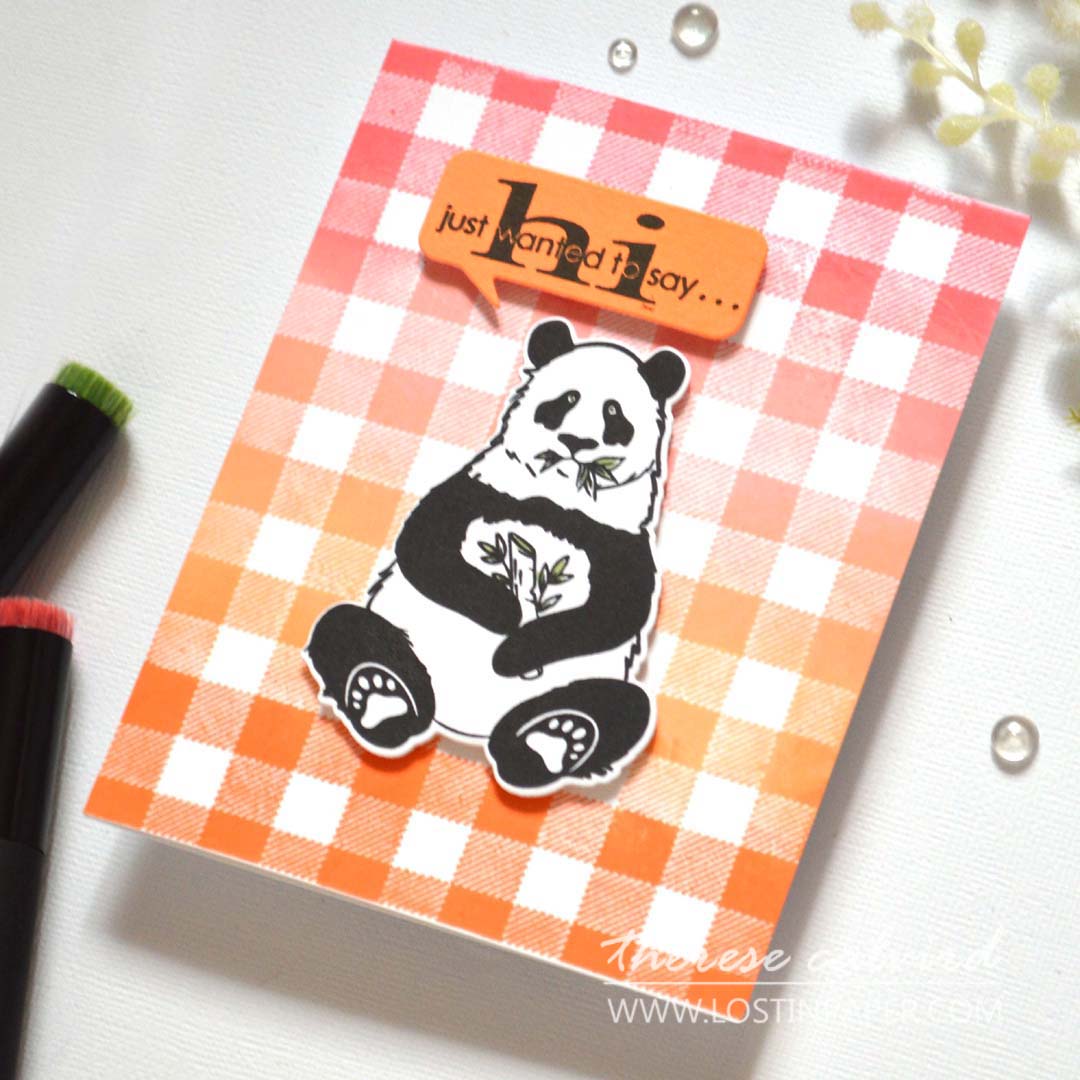
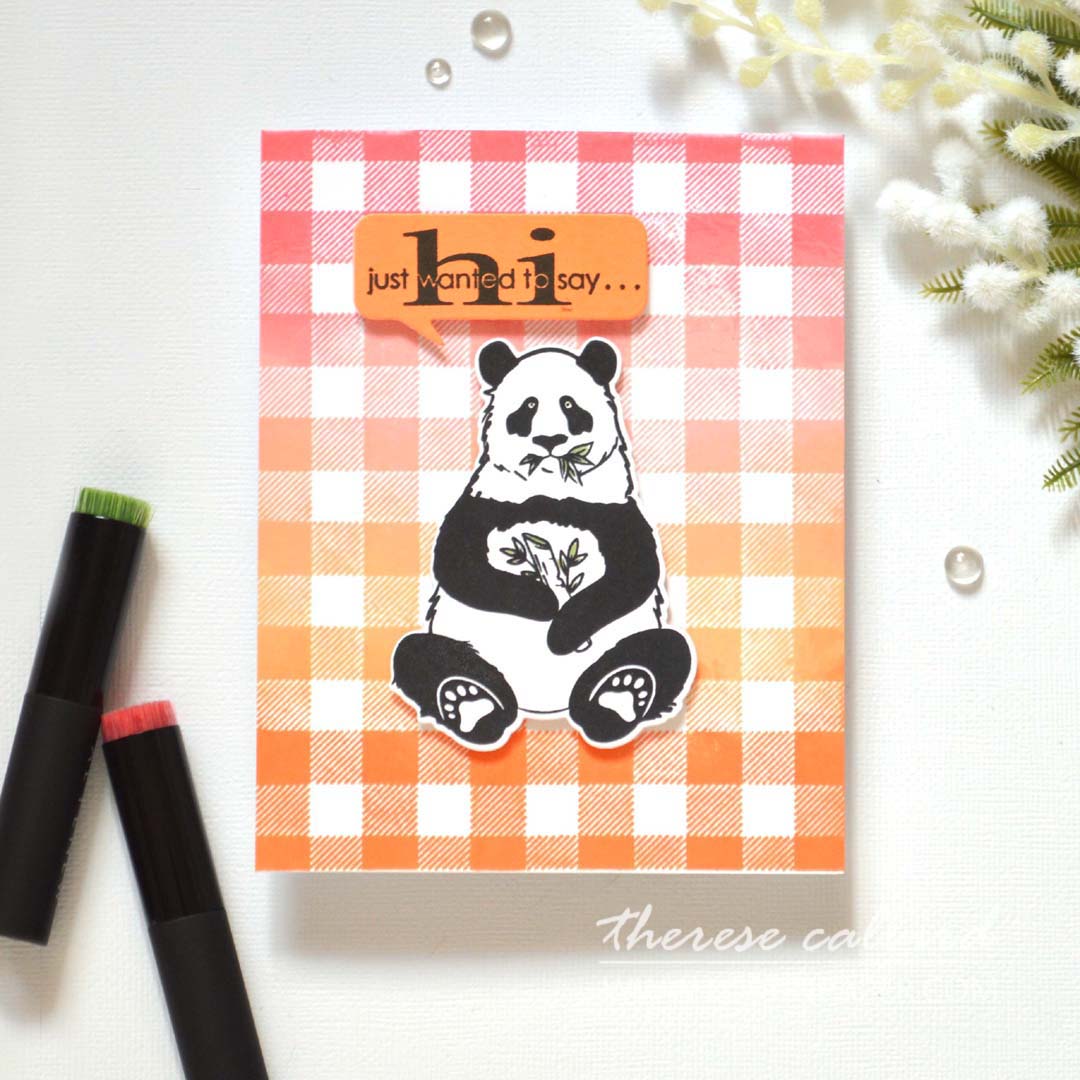
Idea #4 – Stamped Background
Now, let’s focus on making a quick and impactful background. You can stamp it in just one colour but ombre inking takes it to the next level! Ombre inking is not only easy, but it also adds so much depth to your card.
How to Do It:
Start by using a stamp positioner to stamp a background pattern in a gradient (ombre) effect. The stamp positioner makes it easy to layer the ink, so you don’t have to worry about aligning the stamp perfectly each time. Clean the stamp between layers to prevent contaminating the ink pads and use a soft brush to blend the edges of the ink, creating a smooth seamless transition between colours.
Once your background is complete, add a simple line art image on top to create a beautiful layered effect. For even faster results, choose an image with a coordinating die to save time and avoid fussy cutting.
BONUS TIP: Use a UFO (unfinished object) from your stash – like a stamped image or piece you’ve created earlier – and use it to decorate your design quickly.
Bonus Idea – Use Design Paper
Let design paper do the heavy lifting when it comes to colouring. This technique takes advantage of patterned paper to add instant style and visual interest to your cards without the need for extra colouring or layering.
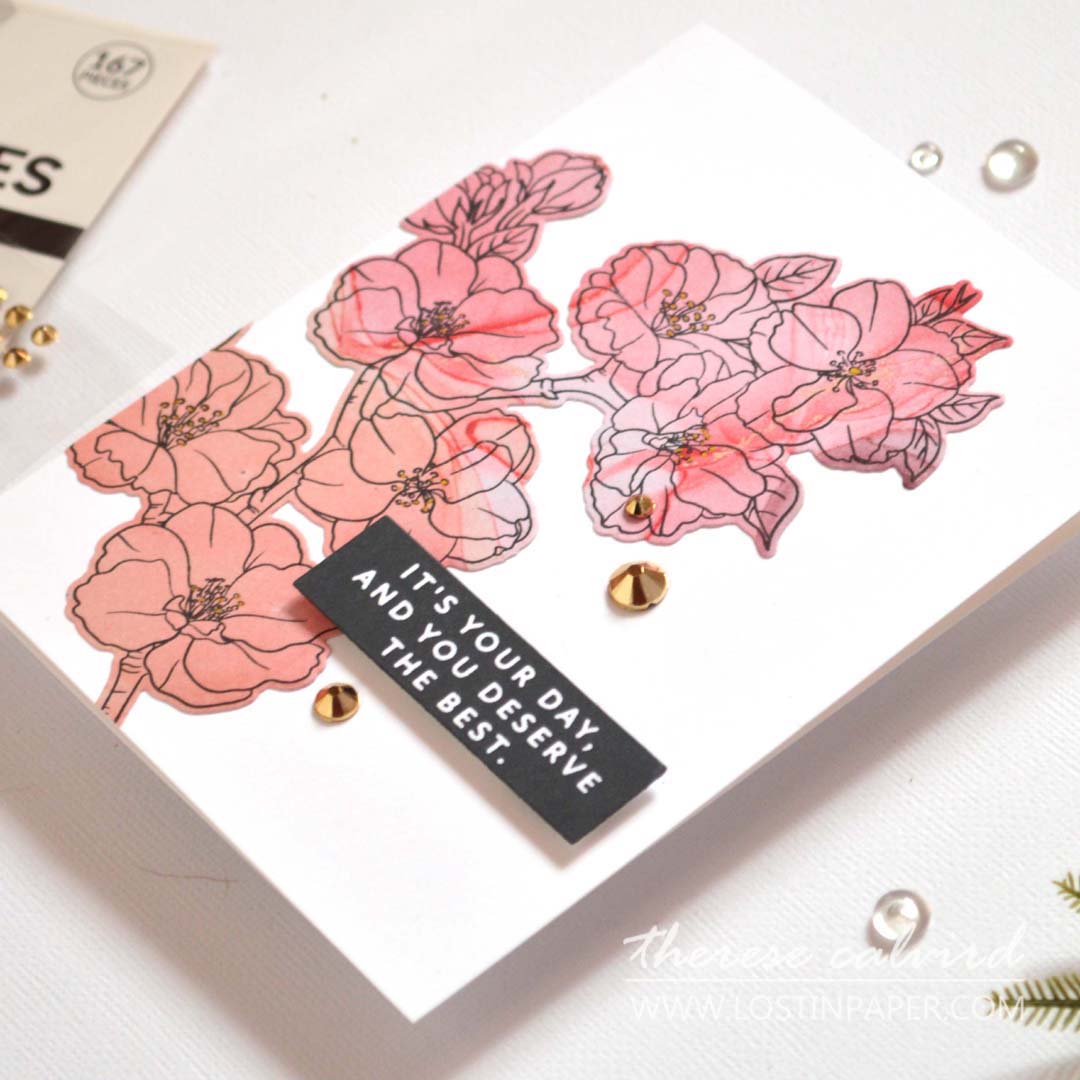
How to Do It:
Choose a design paper that complements your stamped images, but make sure it doesn’t overpower them. For this technique, select a large floral bouquet, that will stand out on the card front. Stamp it with a bold-coloured ink, such as black, and die cut it using a coordinating die.
Next, adhere the floral image directly to the card front – this skips the time-consuming layering and popping up. Finally, use a bold sentiment to ensure it stands out against the patterned paper.
PRO TIP: Pre-prepared card bases, panels, and supplies will save you time! Having everything ready means you can just focus on stamping and assembling.
BONUS TIP: Add some sparkle to your design by using a gold pen to highlight parts of the stamped image, like stamens, or add gold gem sparkles for a touch of elegance (or both 😉).

There you have it – 5 quick and easy stamped card ideas that anyone can try. Whether you’re short on time or just looking for a stress-free crafting session, these tips will help you make stunning cards fast.
I’d love to hear which card is your favourite and which technique you’re most excited to try – let me know in the comments. And don’t forget to tag me on Social Media so I can see your amazing creations!
Sending crafty hugs your way,

Special thanks to my crafty assistant, Chad (aka ChatGPT), for helping me stay on track with my Gemini brain, grammar, and spelling… well, all the things! 😄
P.S. Need supplies? Here are the links to the products I used today (some of these are affiliate links, so I’ll earn a small commission if you make a purchase—thanks for supporting my channel 🥰)!
*Certain content that appears on this site comes from Amazon, this content is provided ‘as is’ and is subject to change or removal at any time. As an Amazon Associate I earn from qualifying purchases.
Stamps: Altenew – Courageous You + Simple Coloring Stencil | Penny Black – Chat Bubbles | Kool Kats
Colorado Craft Company – Sweetest Birthday Cone | Concord & 9th – Plaid Background
Copics: E59 | R14,29 | Y32 | G24.
Prismacolor Pencils: Carmine Red
Pens: Copic – Multiliner 0.3 | Lawn Fawn – Glitter Pen
 Classic Sentiments SSS | ASD |  Garden Rose ALT |  Roaming Pandas ALT | SSS |  Rainforest Leaves ALT | SSS |
 Stunning Sakura ALT | SSS |  One-Go: Solid Sentiment Strips ALT | SSS |  One-Go: Solid Sentiment Strips Die ALT | SSS |  Neenah Solar 110 AMZ | SSS |
Neenah Solar 80 AMZ | SSS |  Ink Drops 12 X 12 – Dusk SSS |  Nocturne SSS |  Tea Party ALT | SSS |
 Warm & Cozy ALT | SSS |  Forest Trail ALT | SSS |  Summer Afternoon ALT | SSS |  Ink Blending Tool ALT | SSS |
 Mini Blending Brush Set ALT | SSS |  Mini Blending Brush Storage ALT |  Metallic Gold & Silver ALT | SSS |  Tea Party Enamel Dots ALT | SSS |
 Jet Black Spray ALT |  Gel Pen ALT | SSS |  Gelly Roll White Pens SSS |  Copic Multiliner SSS |
 Stampwheel 2.0 ALT | SSS |  Stampwheel ALT | SSS |  Bone Folder ALT |  Score Board ALT | SSS |
 MISTI SSS |  Gemini SSS | 9″ Fiskars Paper Trimmer AMZ |  Foam Squares – Black mix SSS |
 Glue Tape ALT | SSS |  Foam Tape NEW sizes! ALT | SSS |  Precision Glue Press AMZ | SSS | Bearly Art Glue AMZ | SSS |
 Satin Masking Tape ALT |
Such fabulous ideas, Therese! and I love your results! If you made me choose a favorite today, I’d have to say ‘you had me’ at Buffalo check and Panda!
=]
Who doesn’t love an ombre background lol. Thank you my friend x
Wonderful tips and inspiration. thank you!
Thank you so very much Dena!
Well, these are all stunning 5 minute inspirations!!! Love a quickie. 😁
Thanks so much Lisa, so glad you liked these because I had a blast making them!
What terrific ideas and results! I have to say that ice-cream card is oodles of fun!
It’s a great stamp, with a huge presence!
Such a wonderful idea for a card making series.
The cards certainly look like more then 5 minutes to craft them.
Love the floral stamped on the marbled card stock.
Crafty hugs
Lisa
Thank you Lisa, they are certainly a fun challenge (usually I fuss about for hours on each design lol.)
Brilliant Therese, I don’t know how you do it, time after time. You’re makes just get better and better! You know I love your work so much. Clever use of design and I love all these stunning cards. Hugs xx
Thank you so very much my friend, you are the sweetest x