
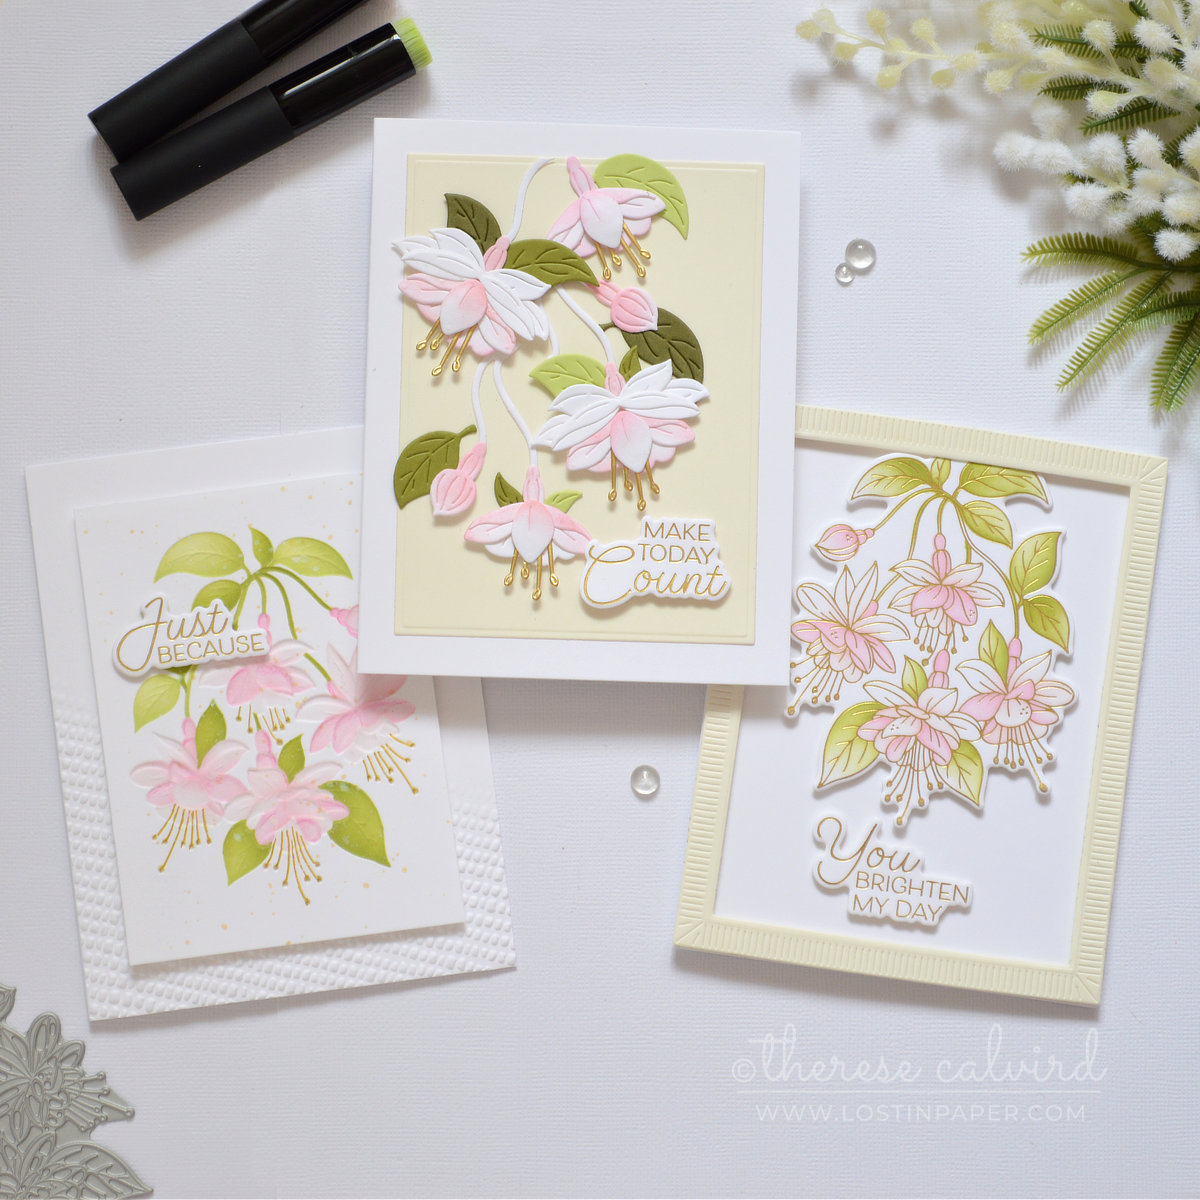
Ink blending on flowers? Oh yes… and today I’m sharing three fun ways to do it.
Today’s projects are all about ink blending floral cards, and I’m using the beautiful Magical Fuchsia collection from the new Spellbinders + Alex Syberia Designs release. This bouquet is a dream to work with because everything coordinates perfectly.
Ready to take a quick look at today’s cards?
This post contains affiliate links. If you choose to click and shop, I may receive a small commission at no extra cost to you. It’s a lovely way to support both me and the crafty shops we all love.
Thanks a bunch 🥰!
For today’s cards, I kept the palette soft and fresh with pale pink flowers, light bright greens for the leaves, and touches of gold for a little elegance.
Each card uses the same bouquet, the same colors, and the same gold accents… but a different ink blending approach. It’s a simple way to get a coordinated set with three distinct looks.
INK BLENDING TIPS FOR FLORALS
- Start with soft, light tones and build the color gradually.
- Use coordinating stencils to add color quickly, then deepen the shading with a darker tone near the center of the petals.
- Leave a little white space for natural highlights on petals and leaves.
- Start with colored cardstock as your base instead of white.
- Combine ink-blended die cuts with die cuts from colored cardstock for subtle variation.
- Reverse the stencils to create a flipped version of the bouquet – perfect if you have a coordinating embossing folder (you’ll see why soon 😉).
- Use the same color palette across different techniques for a coordinated card set – and to save brain power!
The Magical Fuchsia press plate, embossing folder, and layering stencils all line up seamlessly, but they also work independently if you want a simpler design. There’s even a layered die-cut bouquet that isn’t an exact match, but still coordinates beautifully with the rest of the collection.
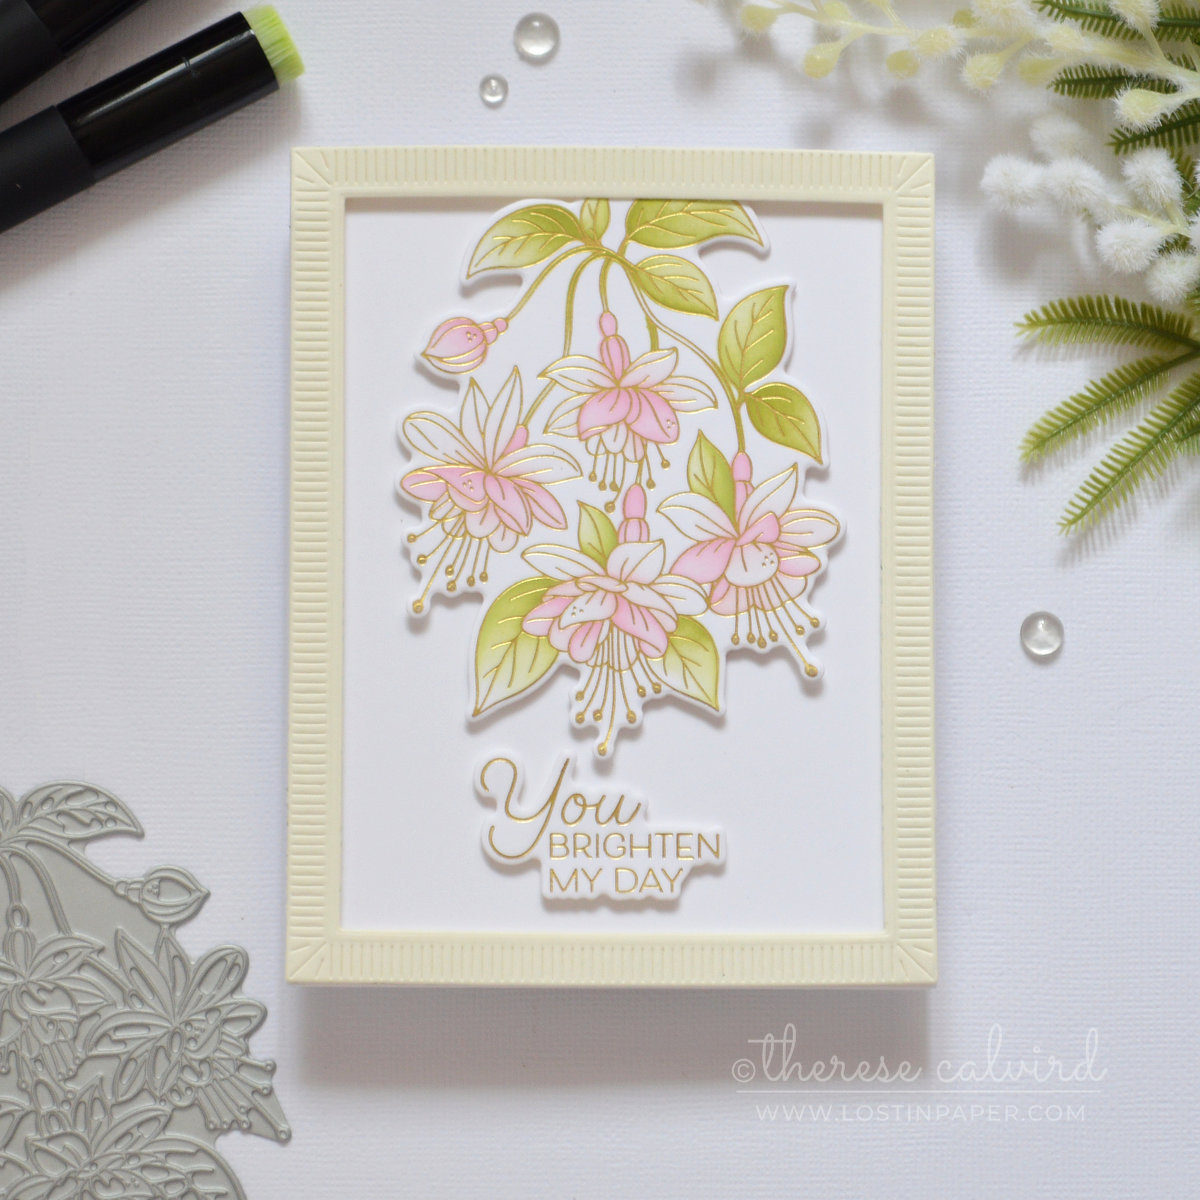
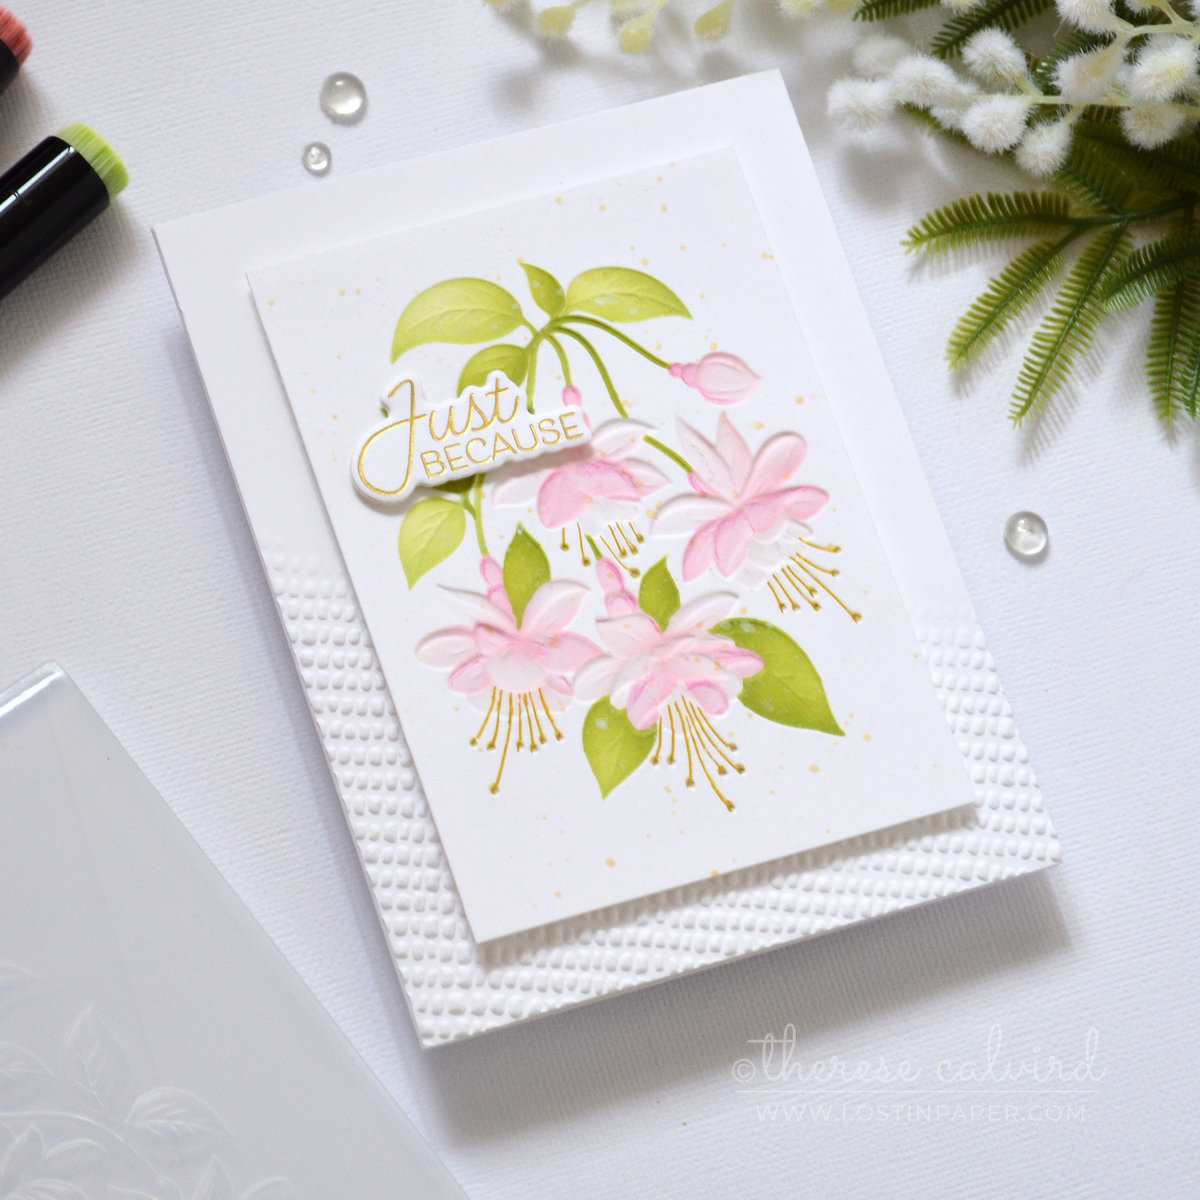
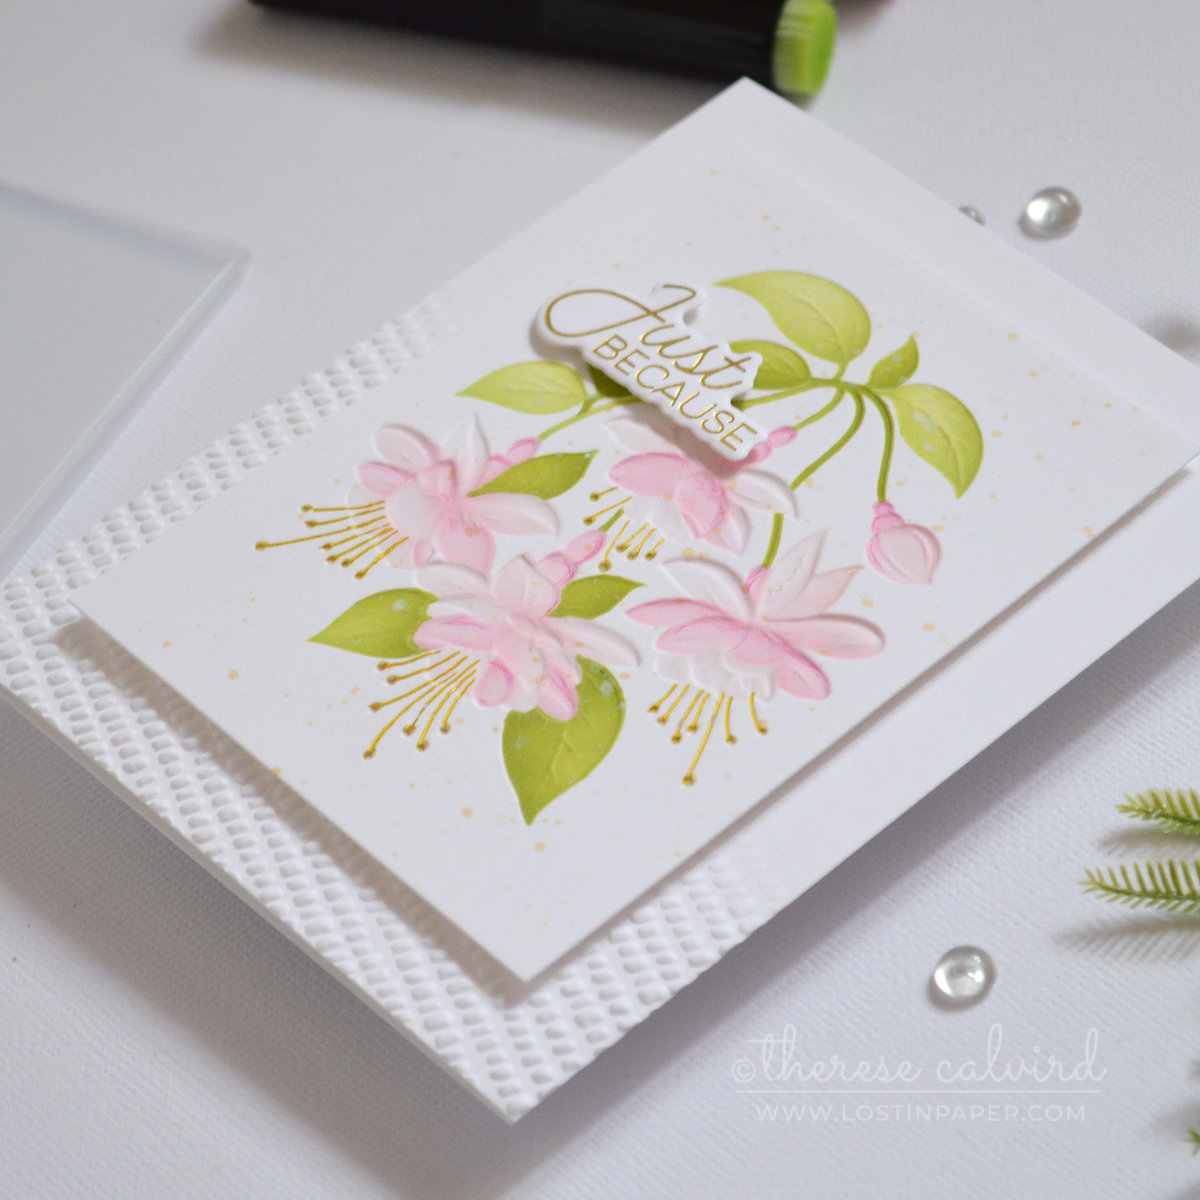
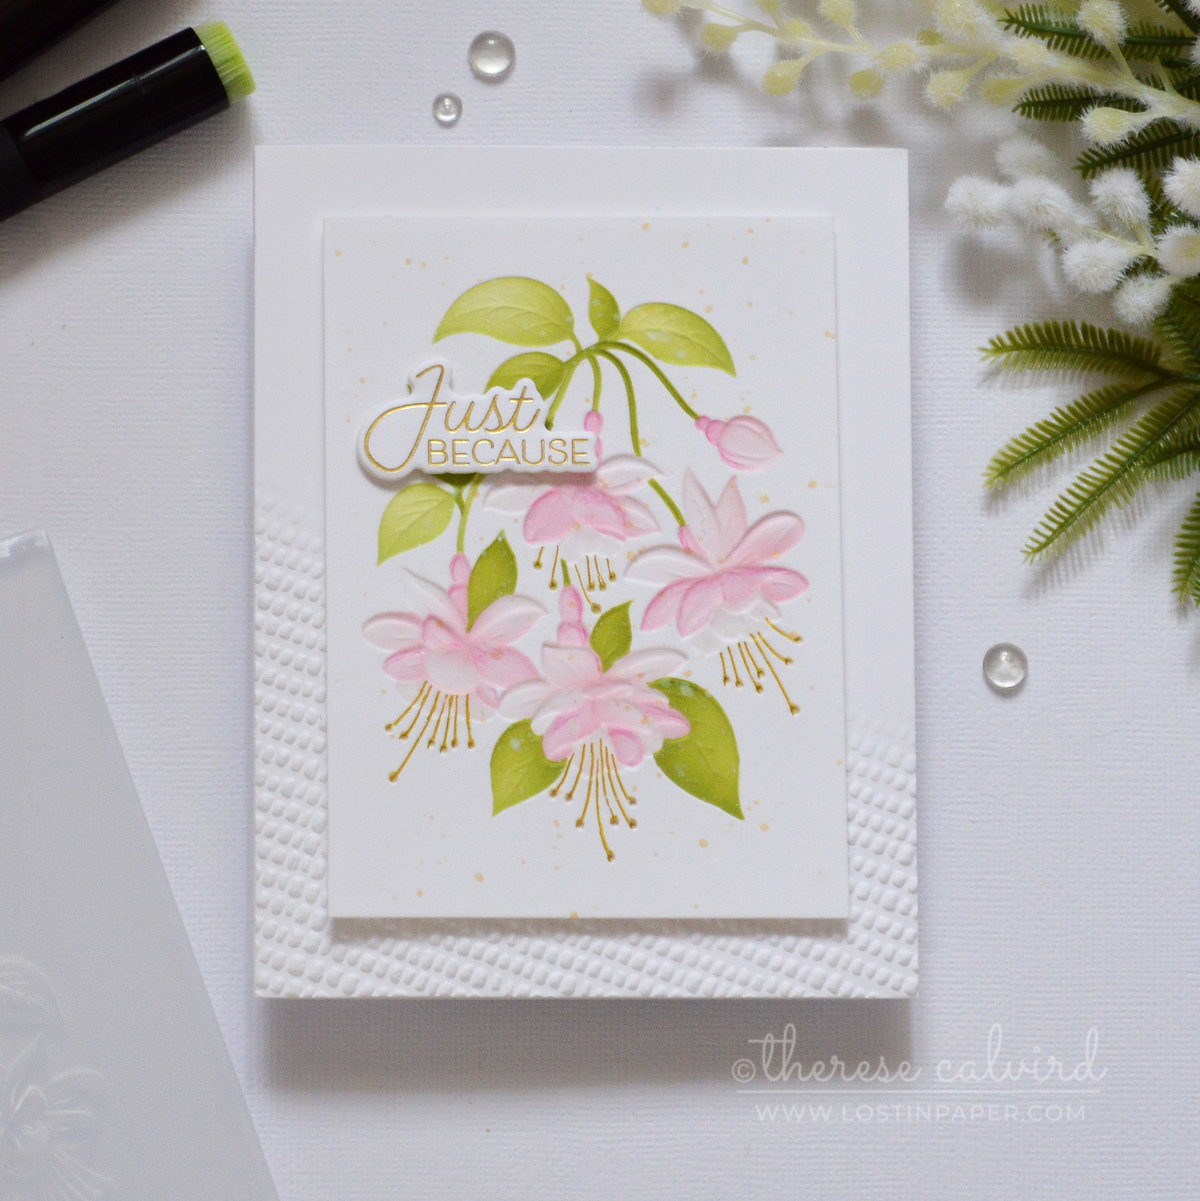
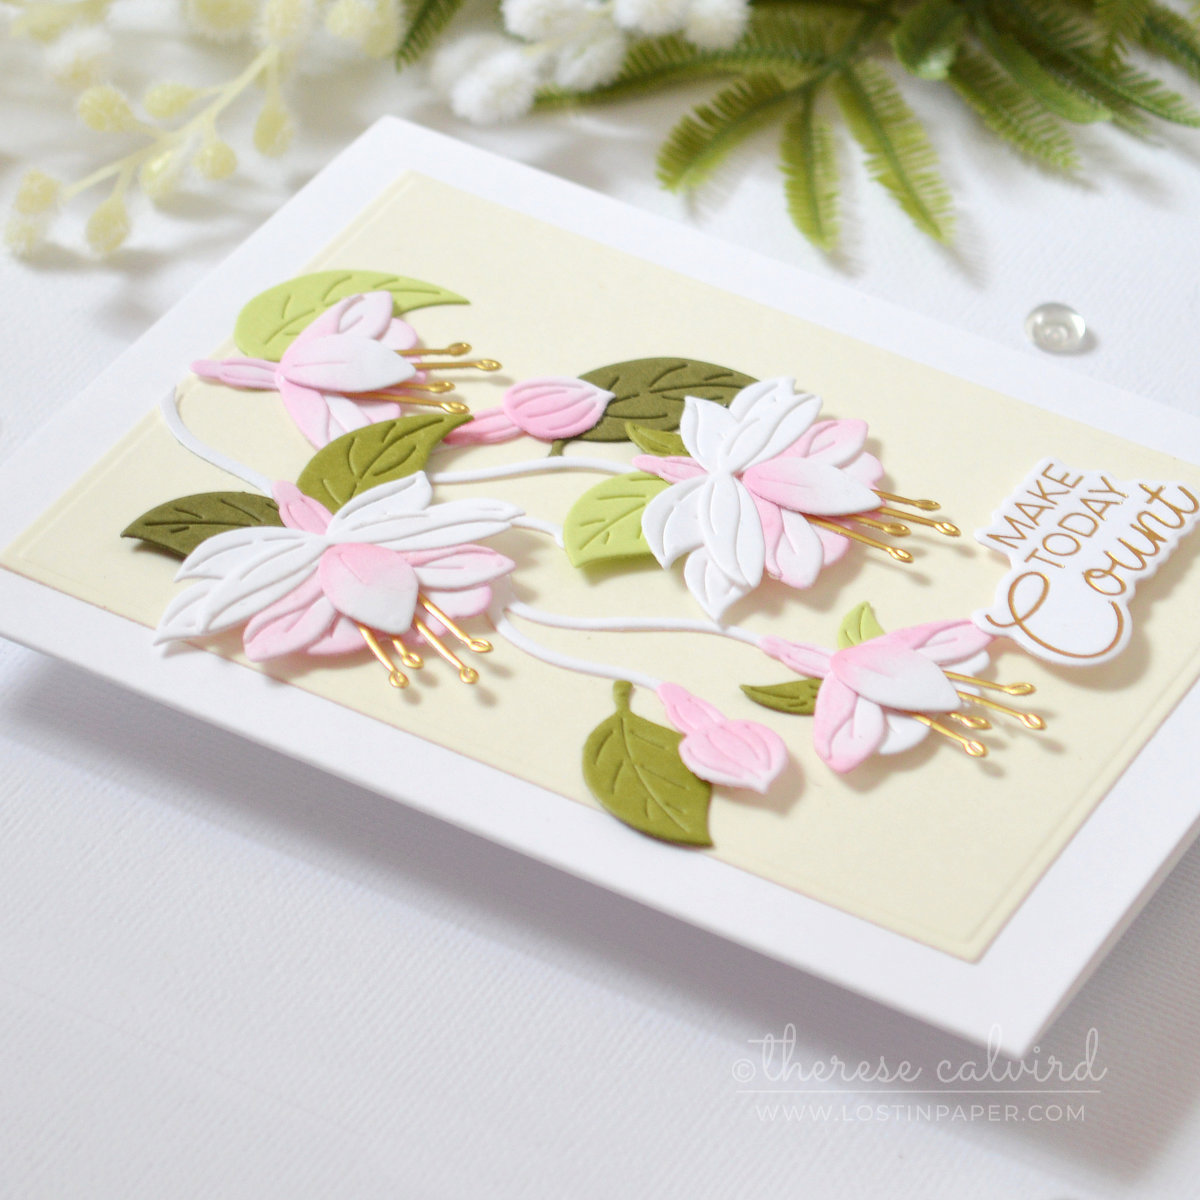
Card #1 – Gold Foiled Bouquet with Ink Blended Color
Did you know that press plates work beautifully in hot foil machines? And that ink blending is a great way to add color over hot-foiled images?
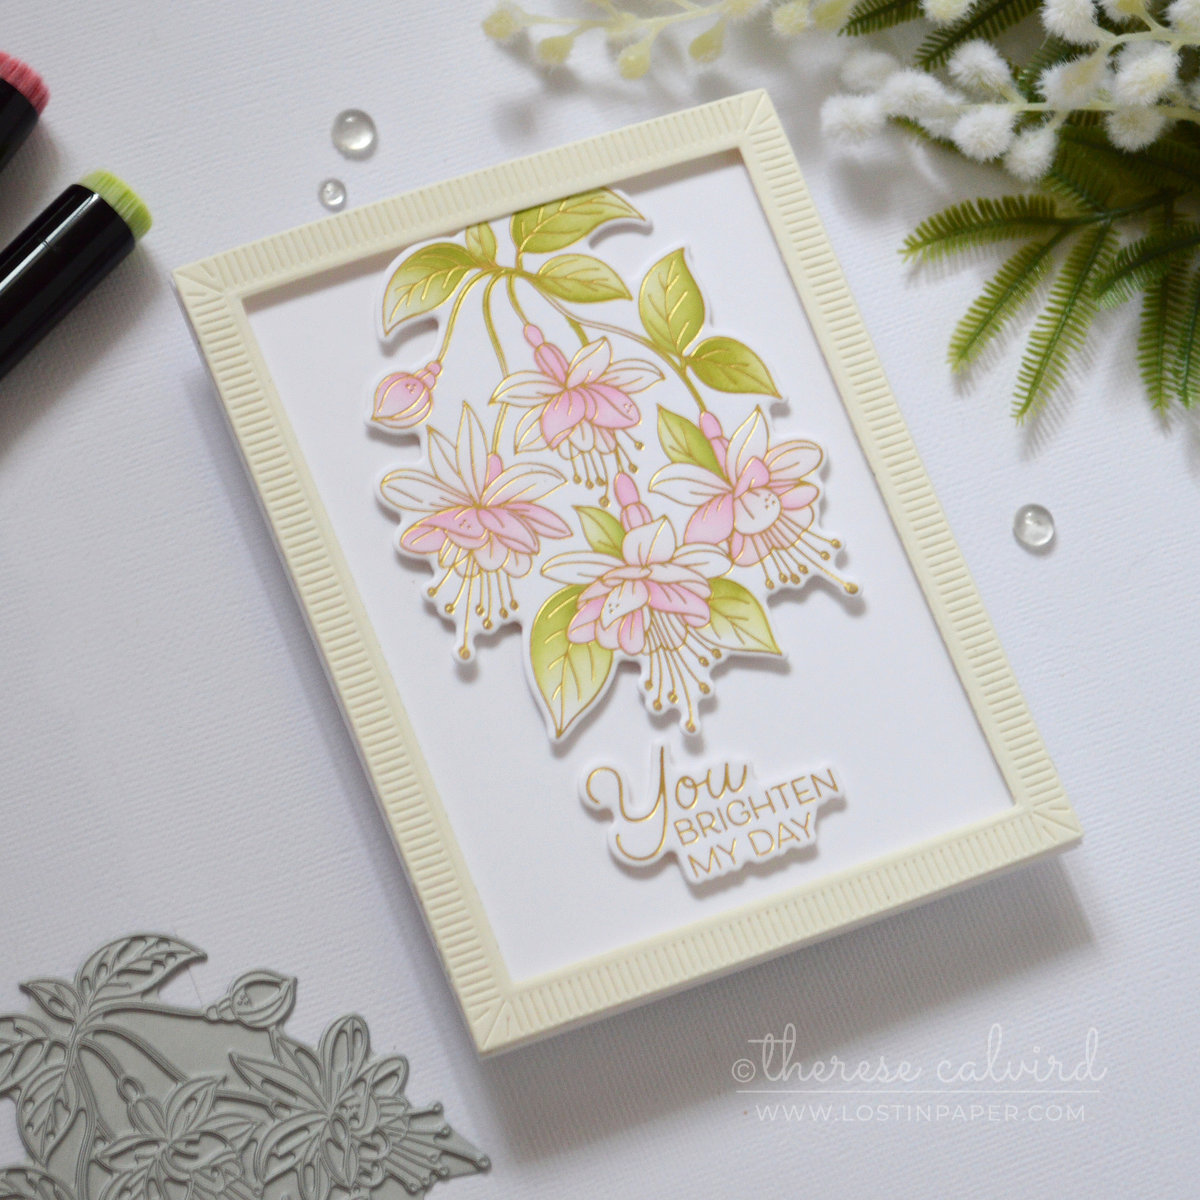
Simply ink blend through the layering stencils as you normally would. If you’re concerned about ink sitting on the foil, just use a soft cloth to gently tap or wipe the image.
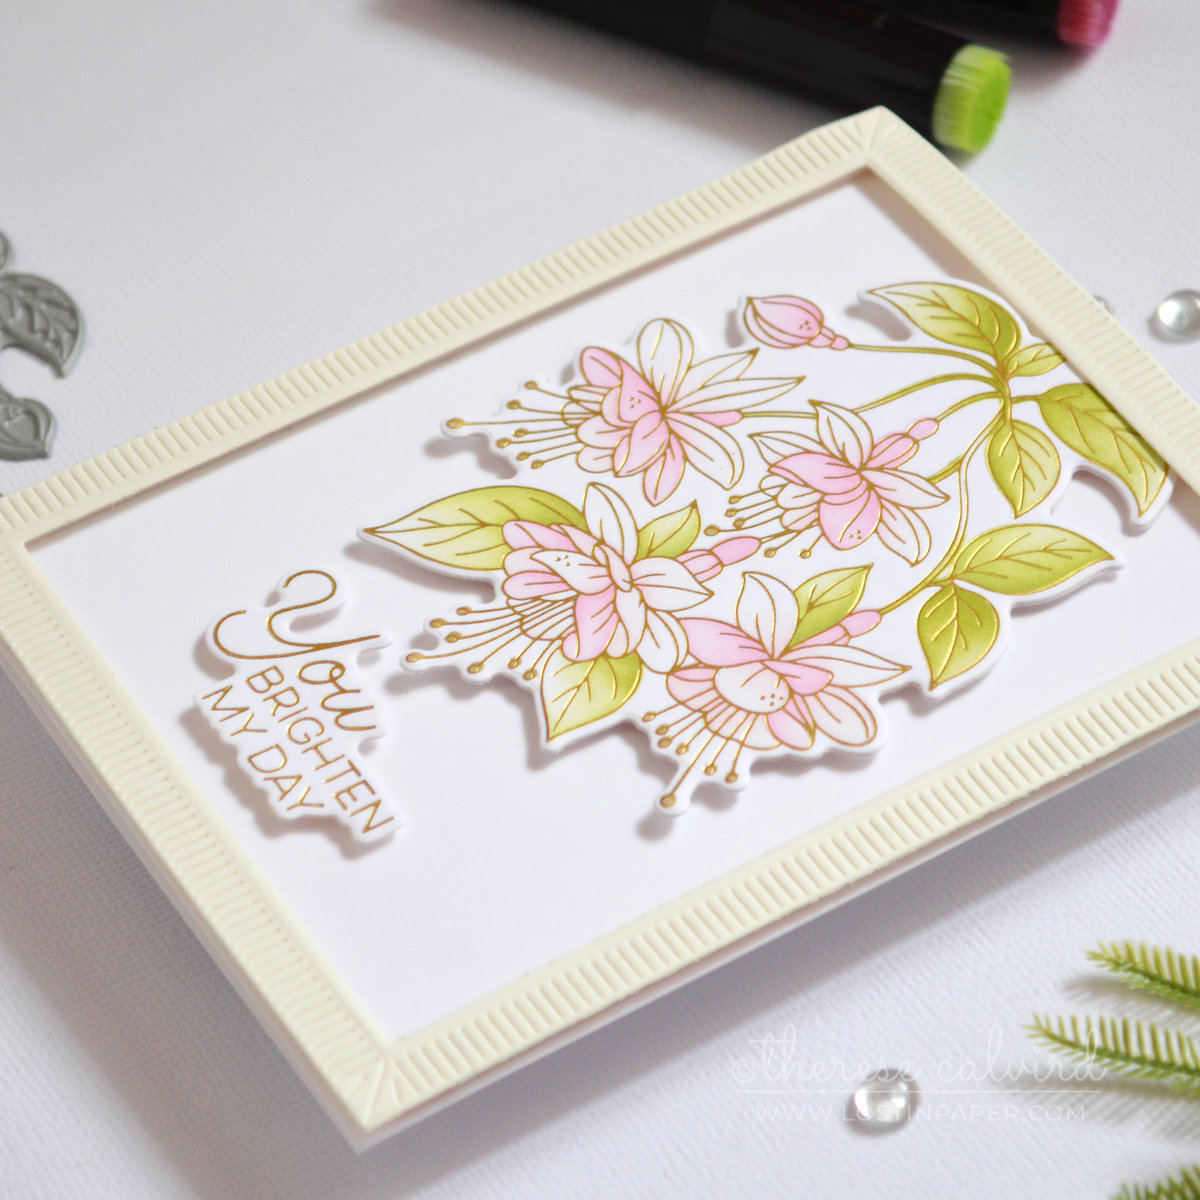
To frame the design, I created an ivory border using the layering rectangle dies. These also leave a subtle debossed detail, which adds just enough texture without overpowering the flowers. And of course, everything is popped up for dimension… because I’m addicted.
Card #2 – Reversed Stencil Ink Blended Fuchsias
Have you ever reversed your stencils? It gives you a flipped version of your image… and opens up some fun possibilities, especially if you have a coordinating embossing folder.
Simply ink blend your floral image as you normally would, but use the stencils in reverse. Then flip the coordinating 3D embossing folder as well. The result is really fun – rather than an embossed finish, the floral bouquet becomes debossed into the panel.
One of the best things about this set of layering stencils is how easy they are to use. Each stencil is designed to sit neatly into the corner of a stamp positioning tool (or something similar), so there’s no guesswork… which is especially helpful when you’re doing things backwards!
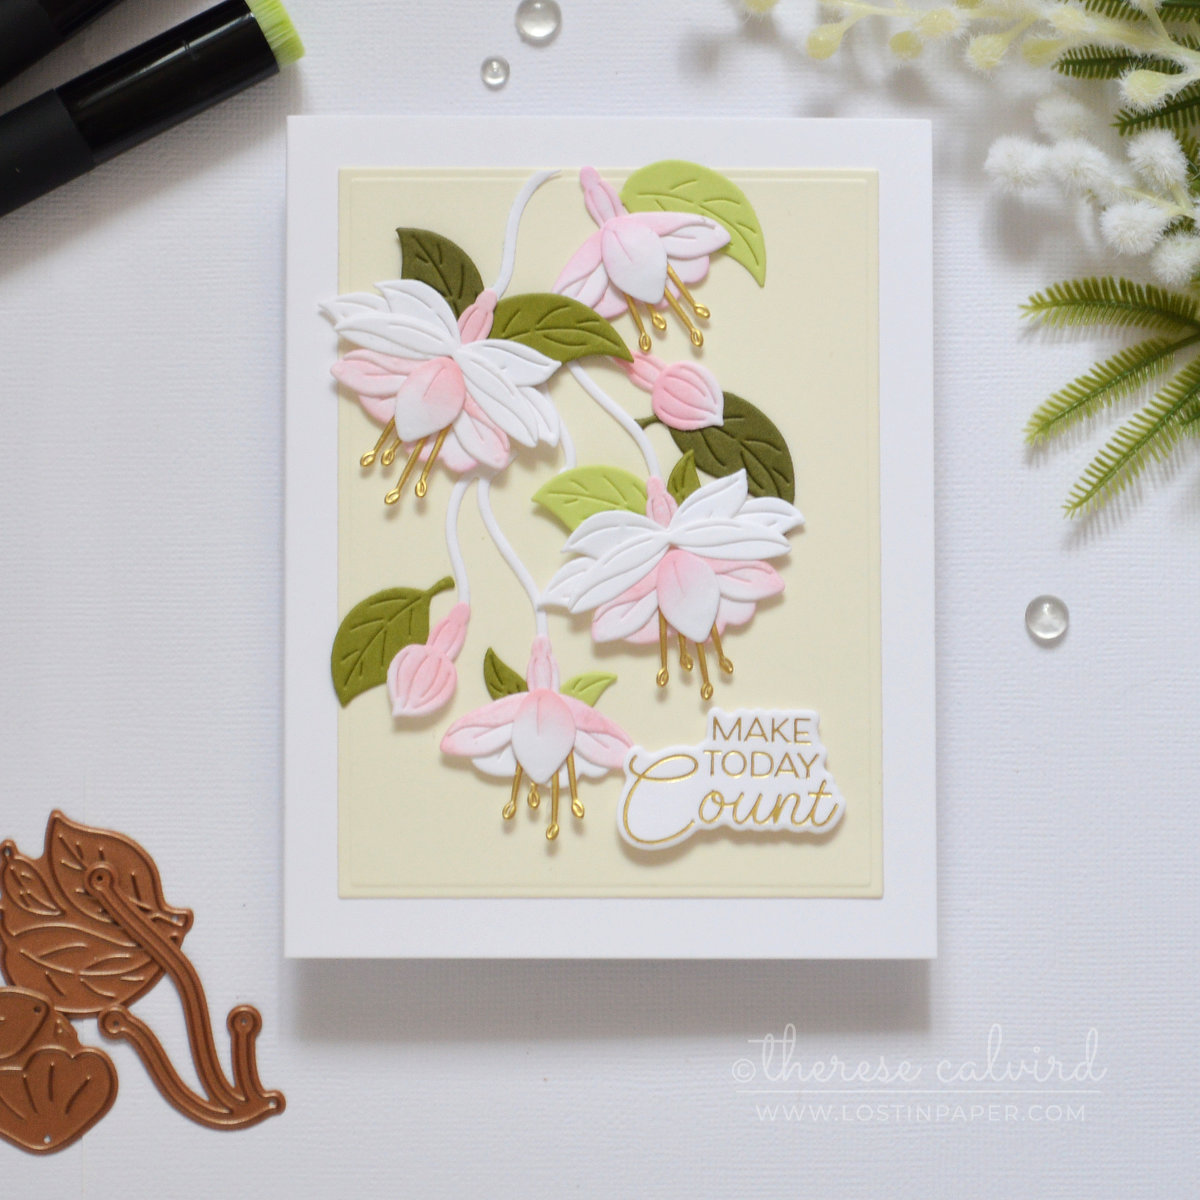
Card #3 – Soft Ink Blending on Layered Die-Cut Flowers
Layered die-cut florals are perfect for adding color with ink blending. They’re easy to batch out too – just die cut a bunch from white cardstock and blend on as little or as much color as you like.
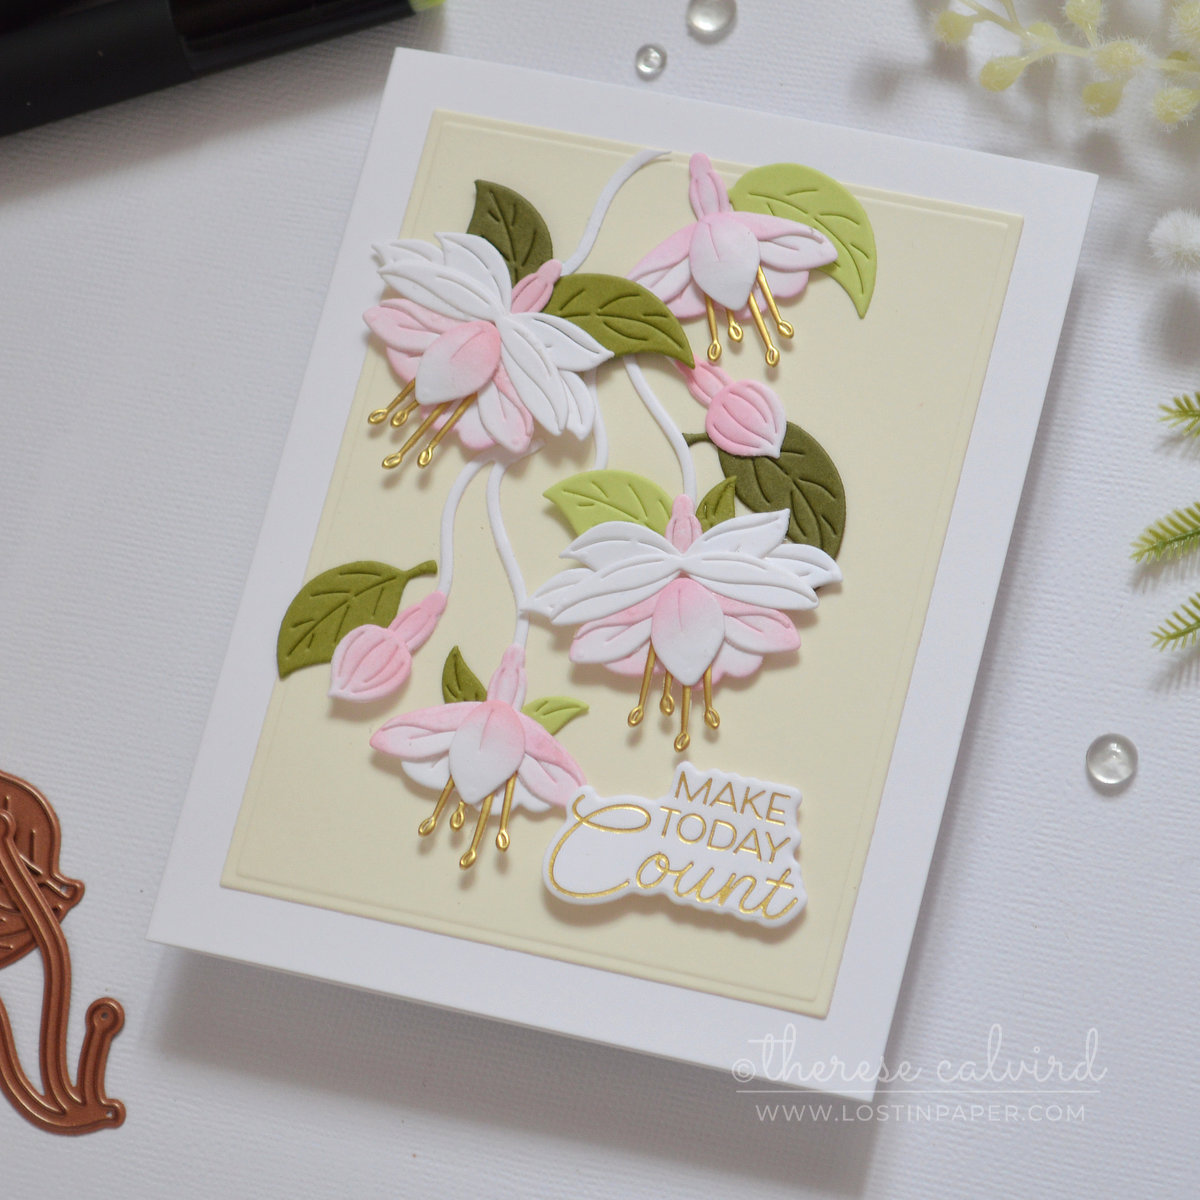
I kept these flowers pale and delicate, leaving plenty of white space for soft highlights. But you could just as easily die cut the pieces from colored cardstock and blend a darker tone over the top for quick shading and a bolder look.
To step this design up, I added stronger, brighter leaves. These were die cut from colored cardstock and arranged into a bouquet on the leftover ivory panel from the framed card.
BONUS IDEA: All of the cards use the same palette and have touches of gold, which helps the designs feel coordinated. Creating cards this way makes it easy to build a set that could even double as a gift set.
Ready for More Inspiration? Head to the Instagram for your chance to HOP along and WIN!
I hope these ink blending floral card ideas inspire you to look at your bouquets a little differently. Whether it’s foiled, embossed or die cut, there’s so much you can do with them.
If you try one of these ideas, let me know in the comments or tag me – I’d love to see what you create!
Happy Papercrafting!

Special thanks to my crafty assistant, Chad (aka ChatGPT), for helping me stay on track with my Gemini brain, grammar, and spelling… well, all the things! 😄
Other Supplies:
Spellbinders: SHOP THE RELEASE HERE US – SHOP UK HERE!
Alex Syberia Designs: SHOP THE RELEASE HERE US – SHOP UK HERE!
Altenew Cardstock: Aloe Vera | Swamp Green | Strawberry | Pink Diamond | Ginger Root.
Hot Foil: Matte Gold
*Certain content that appears on this site comes from Amazon, this content is provided ‘as is’ and is subject to change or removal at any time. As an Amazon Associate I earn from qualifying purchases.
 Magical Fuchsia Bundle SSS | OTH | OTH | SB US |  Magical Fuchsia Embossing Folder SSS | OTH | OTH | SB US |  Magical Fuchsia Press Plate + Die SSS | OTH | OTH | SB US |  Magical Fuchsia Stencils SSS | OTH | OTH | SB US |
 Magical Fuchsia Dies SSS | OTH | OTH | SB US |  Linear Touch Rectangles and Tag SSS | OTH | SB US |  Dimpled SSS | OTH | SB US |  Brushed Gold ALT | SSS |
 Concord & 9th – Cardstock SSS | OTH |  Neenah Solar 110 AMZ | SSS | Neenah Solar 80 AMZ | SSS |  Forest Trail ALT | SSS |
 Cherry Blossom ALT | SSS |  Blushberry Bliss ALT | SSS |  Earth Tones ALT | SSS |  Mini Blending Brush Set ALT | SSS |
 Splatter White SSS | OTH | SB US |  Antique Gold Spray ALT | SSS |  Gel Pen ALT | SSS |  Bone Folder ALT |
 Perfect Picker ALT | SSS |  Tweezers ALT | SSS |  Fine Blade Scissors ALT | SSS |  Score Board ALT | SSS |
Paper Trimmer SSS |  Platinum 6 ALT | SSS | OTH | SB US |  Sticky Grid Mat ALT | SSS |  Platesaver OTH |
 BetterPress SB ALT | SSS | OTH | SB US |  Go Press N Foil OTH |  Precision Glue Press AMZ | SSS | Bearly Art Glue AMZ | SSS |
 Foam Tape ALT | SSS |  Satin Masking Tape ALT |
Oh, Therese! What a gorgeous, beautifully designed set of cards! I’m loving the soft delicate palette and the pretty touches of gold!
=]
You make my heart happy, thank you my friend x