
Do you use colour to change up the look of your stamps? This is something that always amazes me, the 2 cards I share with you today look completely different with a little colour magic😉!
But first, I wanted to let you know that this is part of my Take 2 Series with Altenew and I’m so excited that you are joining me for another video today. Let’s begin with a peek at today’s cards…
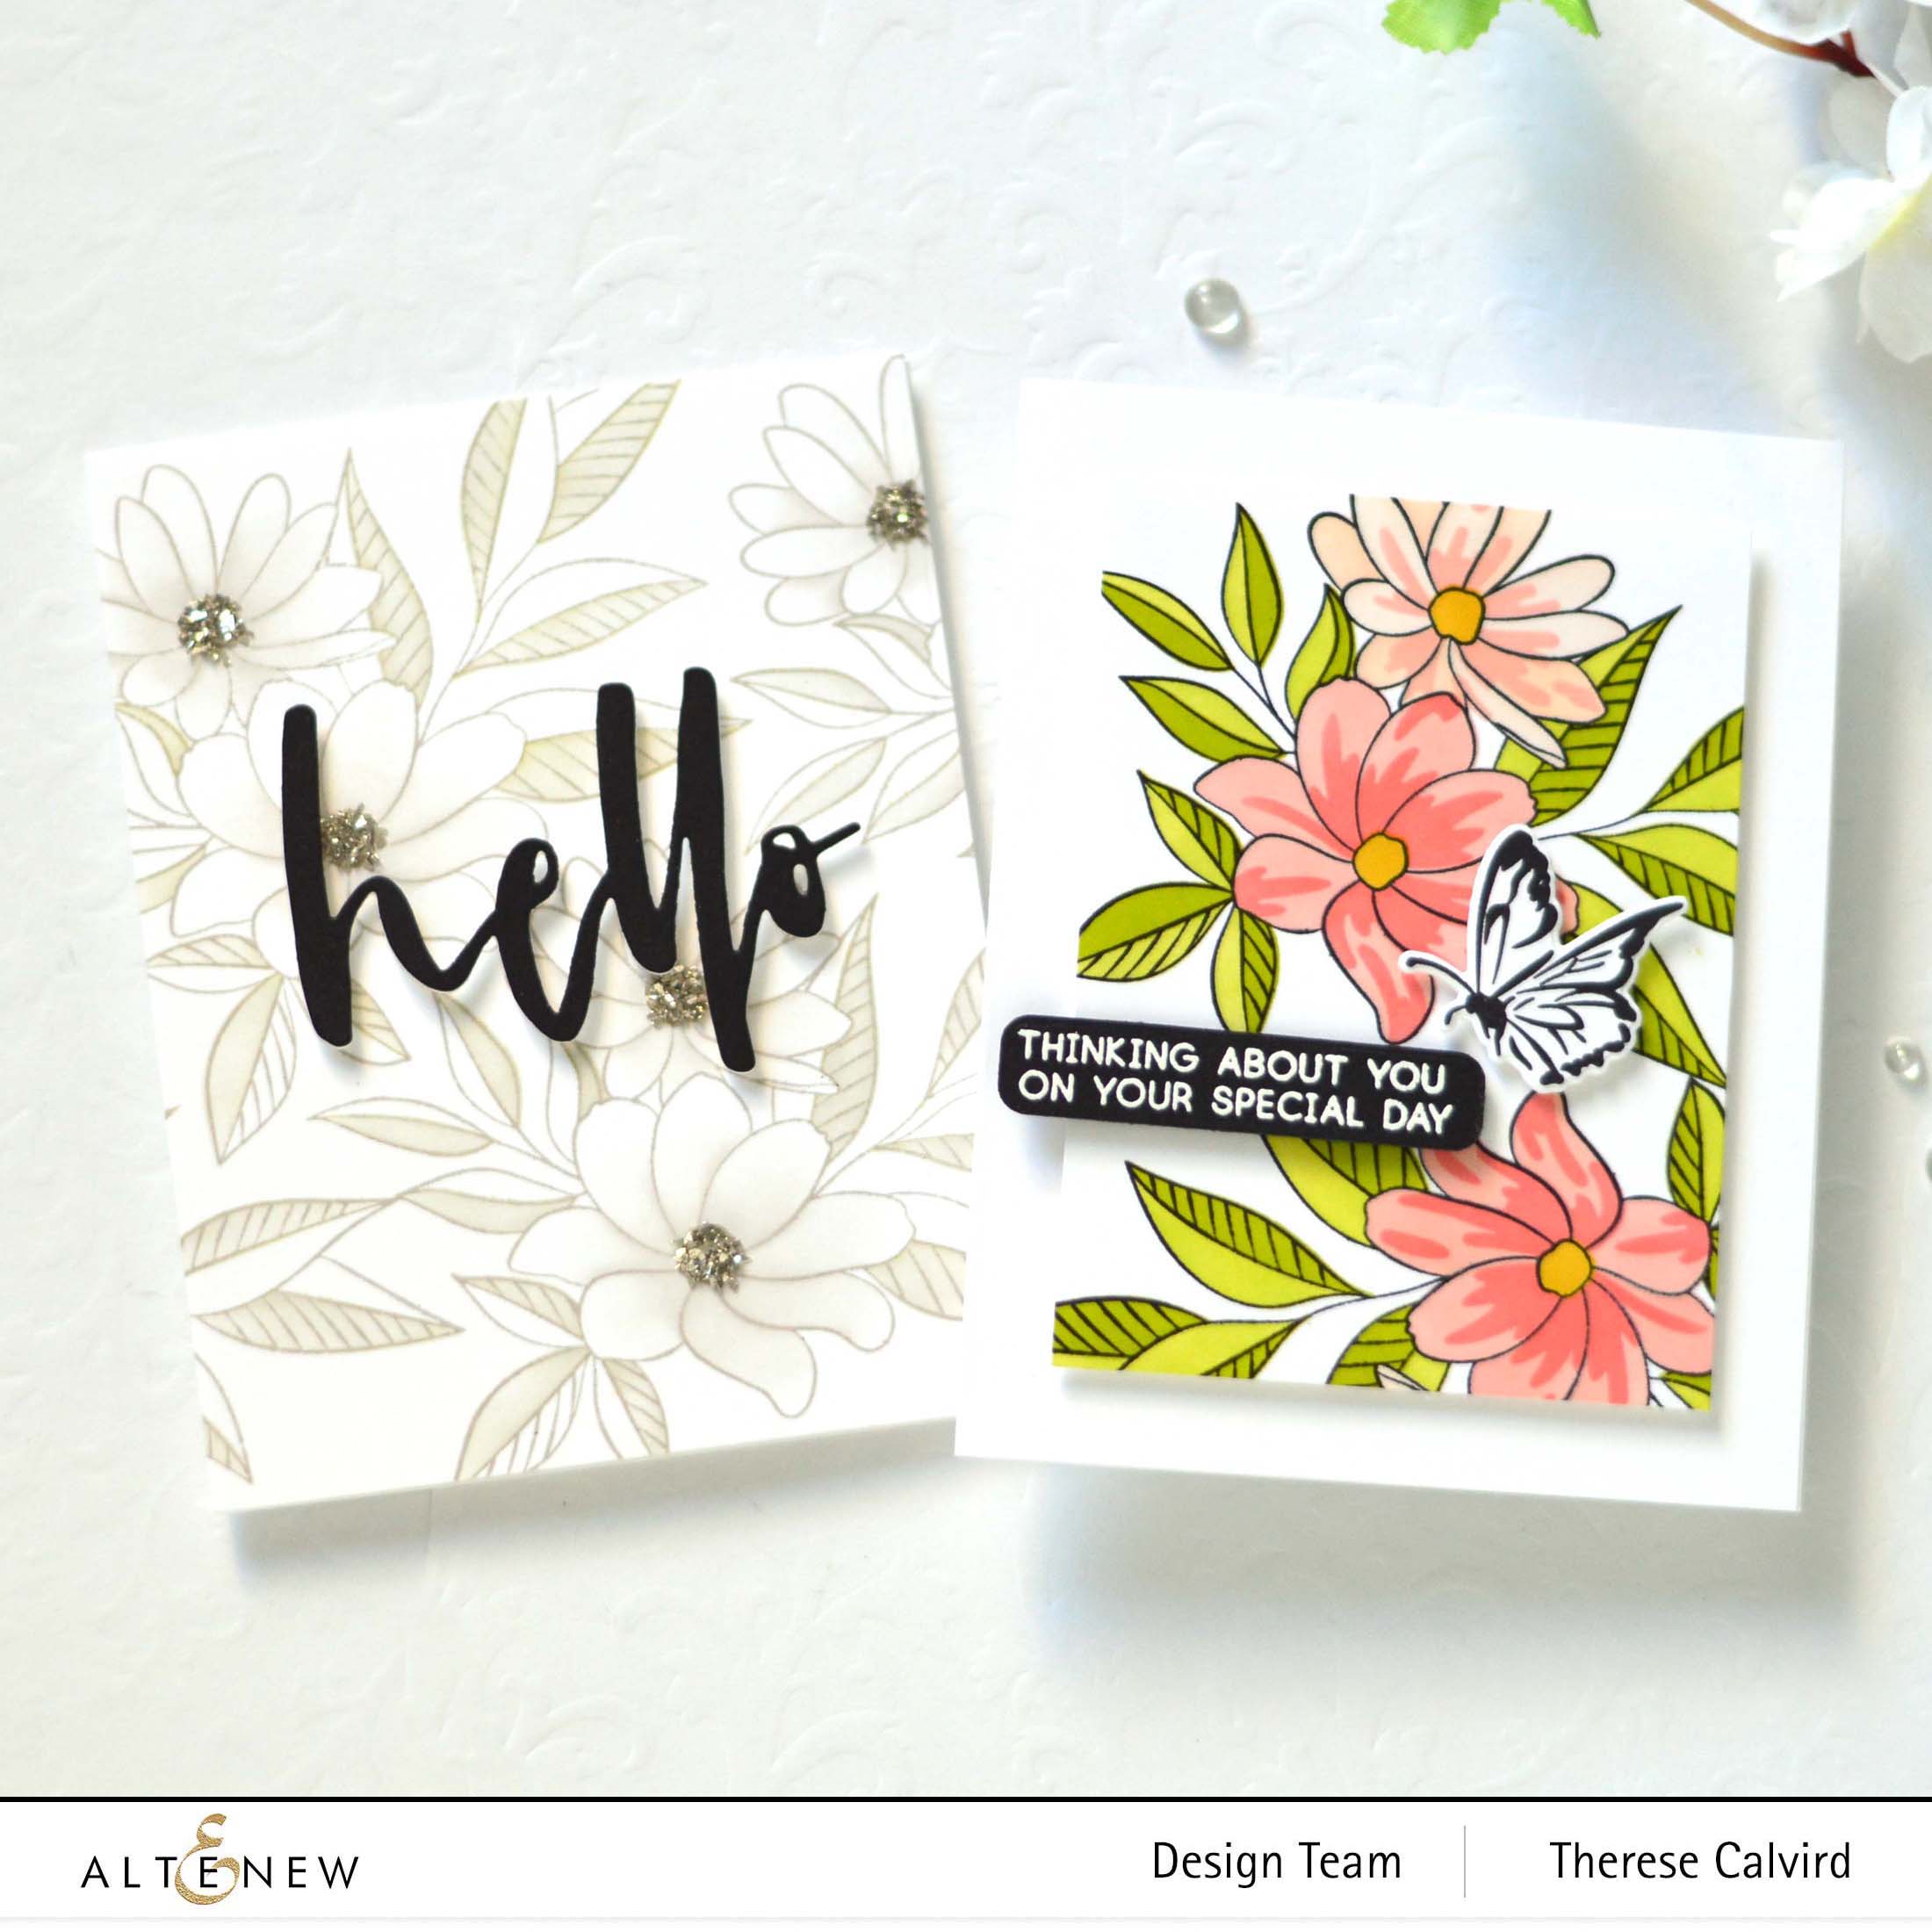
I love a ‘pre-prepared’ bouquet stamp such as this Sweet Bouquet. It makes for some quick and easy cards especially when you can pair it with coordinating stencils. But let’s take it a little step further and get a completely different look for each background!
Idea #1 – Bright & Colourful!
If you know me then you may already know that I am addicted to bright colours. AND I really enjoy mixing up Altenew’s inks to create some unique combos. Today I kept it very simple and stamped out the bouquet twice, enough to create a background panel for this card.

These flowers have 3 layers of blending but I chose to add only 2 of them here. I also like to mix it up a little by adding some lighter and darker flowers, it’s easy to do this by alternating the colours that you are blending. For example the shadow layer of the lighter flower becomes the base layer for the darker flower.
PRO TIP: Why not personalise the design by using the favourite colours of the person who is receiving the card!
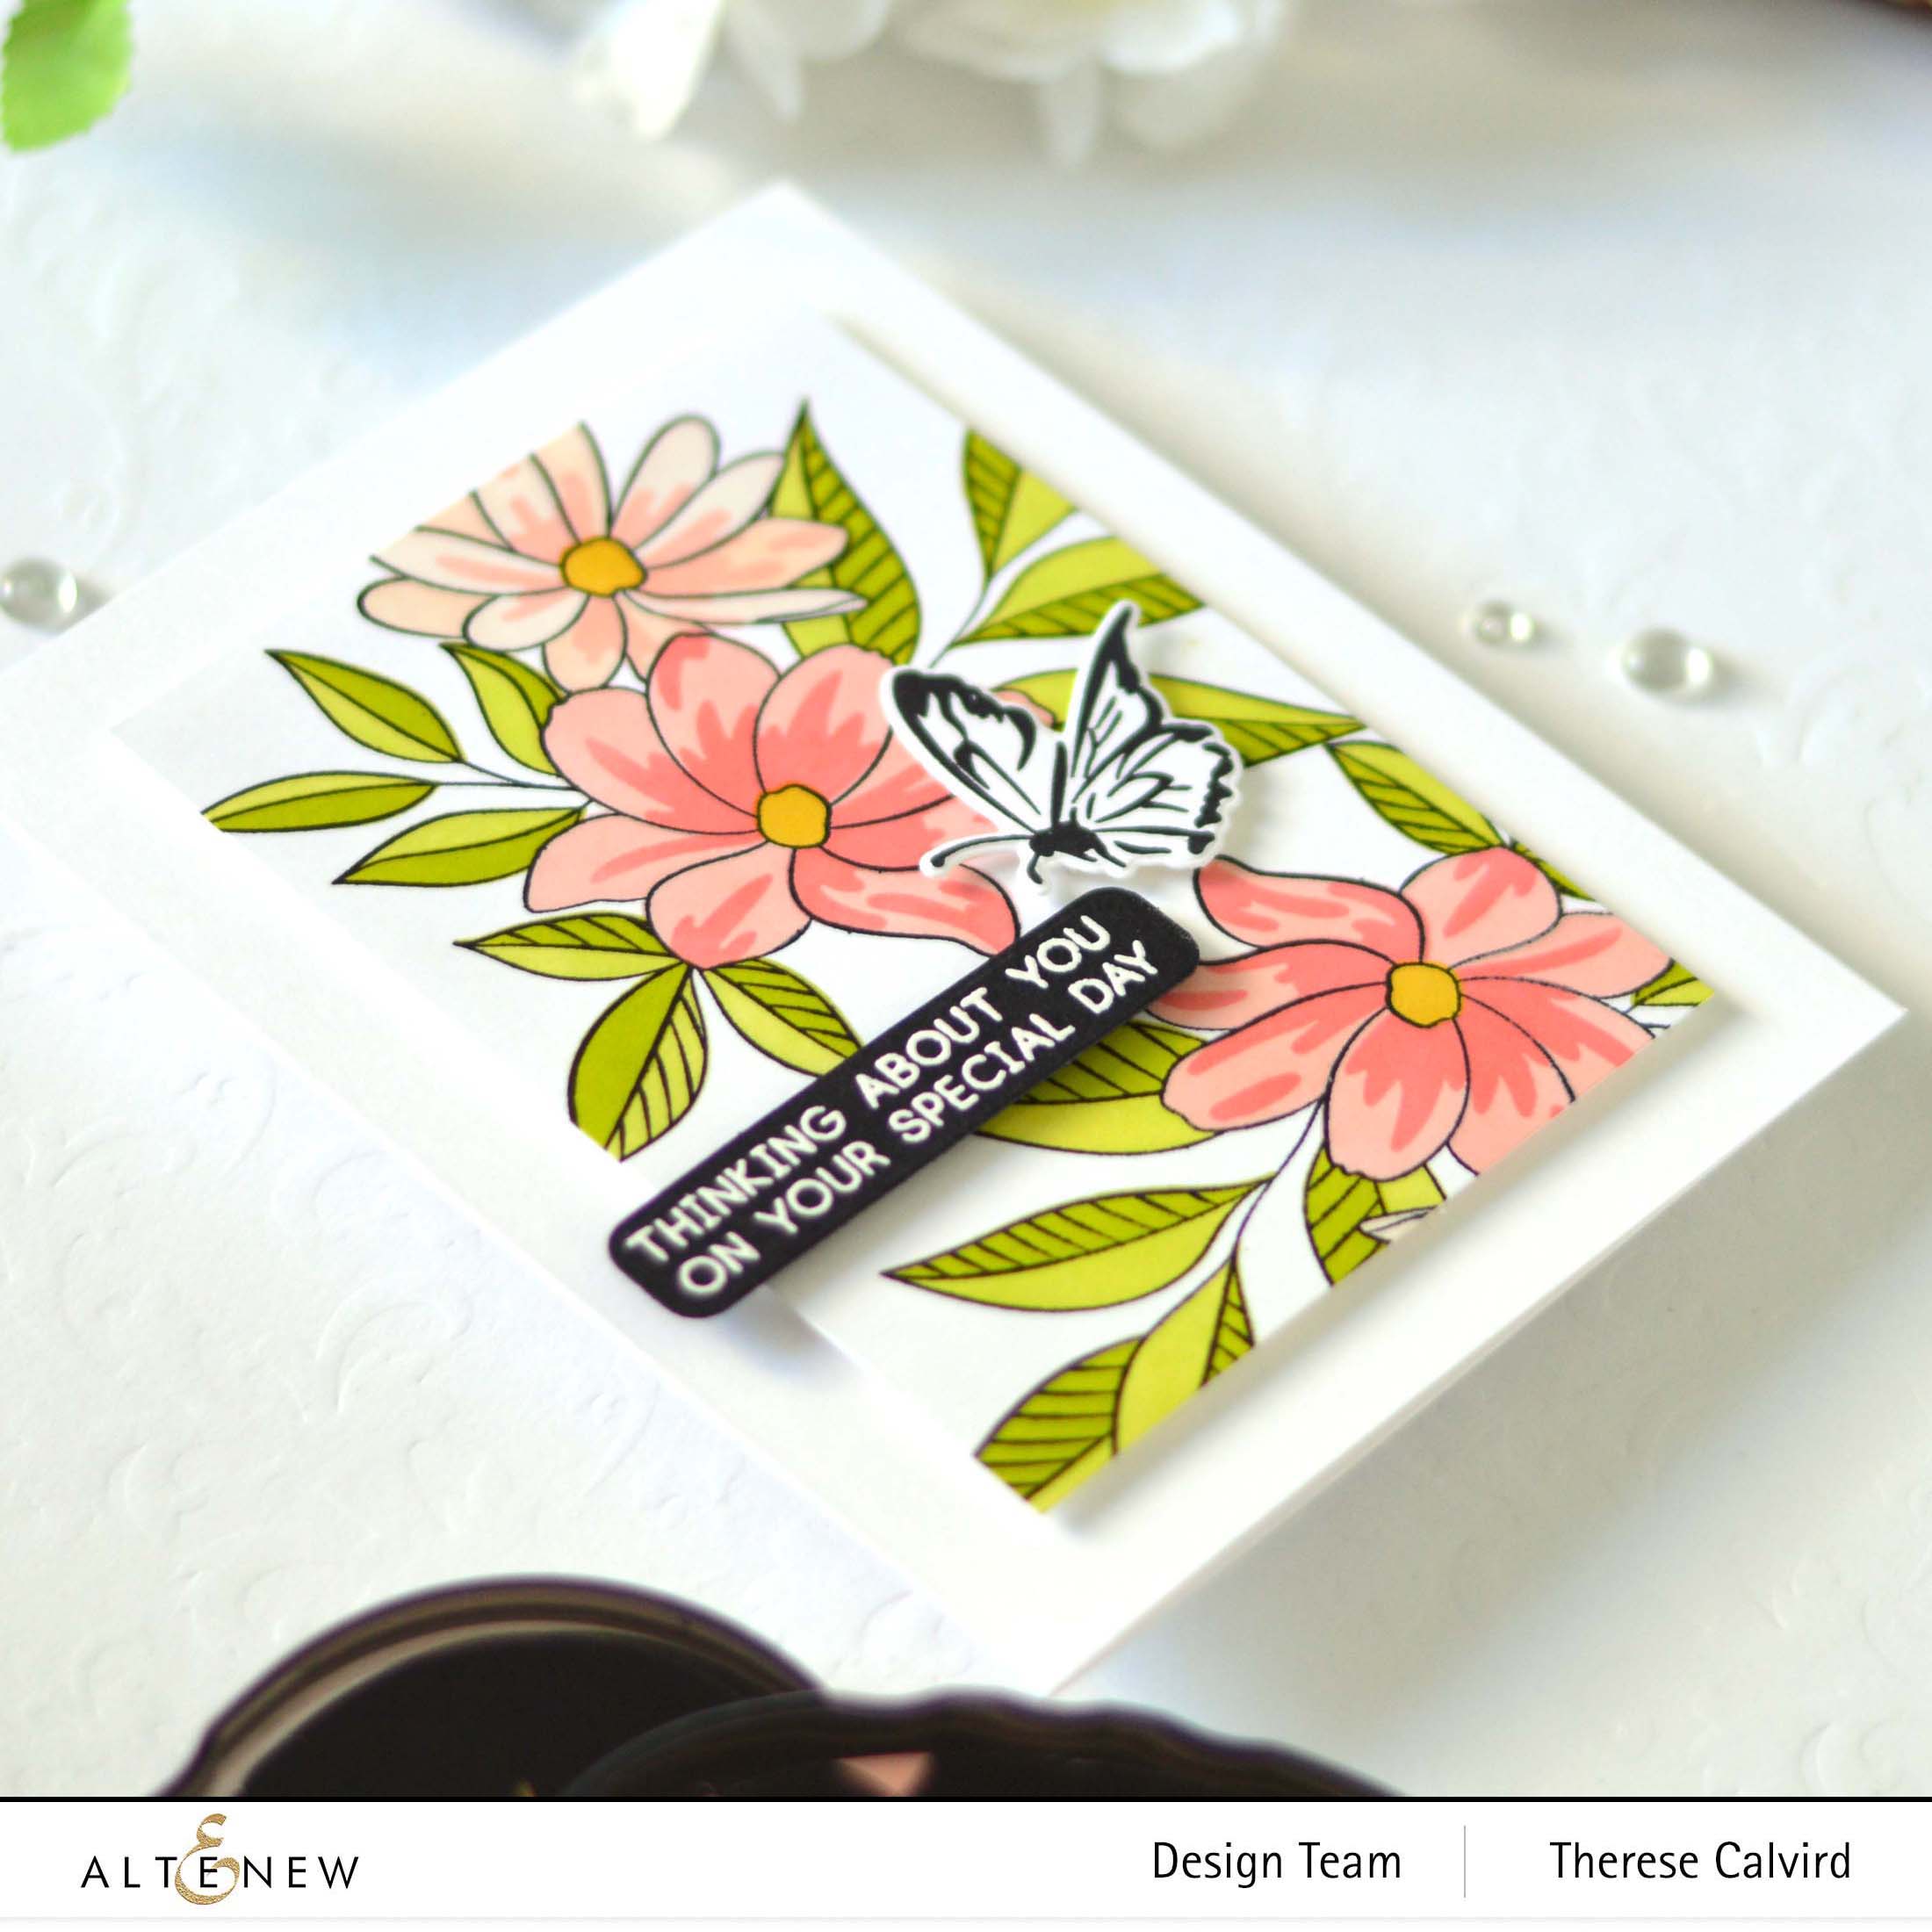
I added a premade sentiment from the One-Go Birthday Greetings set as well as a butterfly.

Idea #2 – Monochromatic!
I decided to create a grey monochromatic background for my second card idea. Stamping the bouquet background in grey ink changes the look of the image, but then adding some simple ink blending (also in the same colour) takes it to the next level.

Imagine a set of gift cards made using this simple design but in a rainbow of colours, how fun would that be!

I added some sparkle to the flower centres and a simple die cut Waterbrush Hello sentiment.

Are you inspired to create a quick and easy vibrant watercolour background? To see just how I made these, watch it right here or in HD on YouTube.
AND have you joined my email list yet? Keep up to date with what has been going on here and what’s coming up too. I have the most amazing group of friends who I know you will love just as much as I do! Join through the link in my sidebar, and you will also get my bonus FREE Floral Colour Combo!
Let me know in the comments below which card is your fave today, thanks for spending your time with me. Crafty hugs,

Also, just in case you want to do a little shopping I’ve added the links below (some of them are affiliate links which means that I will receive a small portion of the sale at no extra cost to you). I truly appreciate your support of my card adventures!
Other Supplies: Glass Glitter – Sterling
 Neenah Solar 110 SSS | AUZ | EH |  Neenah Solar 80 AMZ | SSS | AUZ | EH |  Jet Black ALT | AUZ |  Sweet Bouquet ALT | SSS | AUZ | EH |
 Sweet Bouquet Stencil ALT | SSS | AUZ | EH |  One-Go Birthday Greetings ALT | SSS |  One-Go Birthday Greetings Die ALT | SSS |  Meadow Reflections ALT | SSS |
 Meadow Reflections Die ALT | SSS |  Waterbrush Hello Die ALT |  Permanent Black ALT | SSS | AUZ |  Obsidian ALT | SSS | AUZ |
 Embossing Ink ALT | SSS |  Orange Sorbet ALT | SSS |  Pink Pearl ALT |  Coral Bliss ALT |
 Honey Drizzle ALT |  Parrot ALT |  Bamboo ALT |  Morning Frost ALT |
 Evening Gray ALT |  Frozen Delights Cubes ALT | SSS |  Tropical Forest ALT | AUZ |  Warm Gray ALT | AUZ |
 Ink Blending Tool ALT | SSS | AUZ | EH |  Mini Blending Brush Set ALT | SSS | AUZ | EH |  Pure White ALT |  WOW Heat Tool AMZ | SSS | AUZ | EH |
 Powder Tool SSS | AUZ | EH |  Scissors SSS | AUZ | EH |  Spring Scissors SSS | AUZ | EH |  Bone Folder Altenew ALT | SSS | AUZ | EH |
 Stampwheel ALT | SSS | AUZ | EH |  Score Board ALT | SSS | AUZ |  Tool") Chuckie (pressure) Tool OTH |  Paper Trimmer SSS | EH |
 Gemini Junior SSS | EH |  Gemini Double Cutting Plates SSS | AUZ |  Turntable AMZ |  Satin Masking Tape ALT | SSS | AUZ |
 Bearly Art Glue SSS | AUZ | EH |  Glue Tape ALT | SSS | AUZ |  Foam Tape ALT | SSS | AUZ | EH |
Of course, I have to choose the grey tones as my favorite, Therese! and guess what… I still have lots of that glass glitter [black and sterling!] I had to have the first time I saw you use it sooo many years ago!
Two gorgeous cards using this sweet stamp, Therese! Off I go to watch your magic…
=]
Yes, I totally hear you, that glass glitter is hoarded with love and I really must use it more… and the black!!
The monochromatic version is elegant and the colored version a more playful card. Two beauties, Therese! It’s a wonderful way to show us how to stretch our stamps too!
I’m always about the stretch lol. Getting more bang for our hard earned dollar and knowing that I can use a product in similar ways but the finished result looks different makes me happy! So glad you like them Lisa!
For this particular stamp set, I am WOWED by the monochromatic version!!!! Elegant for sure!
And so easy to create too Jan! Thank you x
Your MONOchromatic is da’ bomb! Simple and elegant, and lets the sentiment shine- PERFECT!
I held out for as long as I could, but I am sold on the Meadow Reflections stamp set. Those butterflies are perfect!
hahaha I agree, it’s the butterflies that make my heart smile from that set and just a little one added here and there… I really do need to stamp out a bunch more lol.
Quick and beautiful is right! I love the difference just adding color makes. LOVE them both!
Thank you Lisa, it always amazes me too how much colour can really change up the look of an image or finished design!
I am so happy I found you and your blog. You’re so inspiring,Therese. It is a pleasure to watch you make such tremendous cards. I love the “Bright†version. It really POPs.
Yay! Thank you Lalla, hope you are inspired to create!
I love them both, but the monochromatic one is bold and stunning!
Both cards are beautiful and soooo different,I couldn’t choose as they are both fabulous and so inspiring.
Marie
Love the monochromatic!
It’s been a while since I visited my bloggy friends – hope to catch up today!
Awesome thank you my friend x