
Do you like interactive cards? What about DOUBLE interactive cards? Yes, you saw it here first 😉card making in real-time and in the company of friends!
But first, I want to say SORRY in advance to whoever gets this Christmas card as I think the battery will be flat… I can’t stop turning the lights off and on again 🤣! Thank you for joining me and helping me shake this ‘light up’ adventure on my Live video, it was such FUN! Scroll down to see the tweaks I made to finish the card…
#DOUBLEINTERACTIVECARD
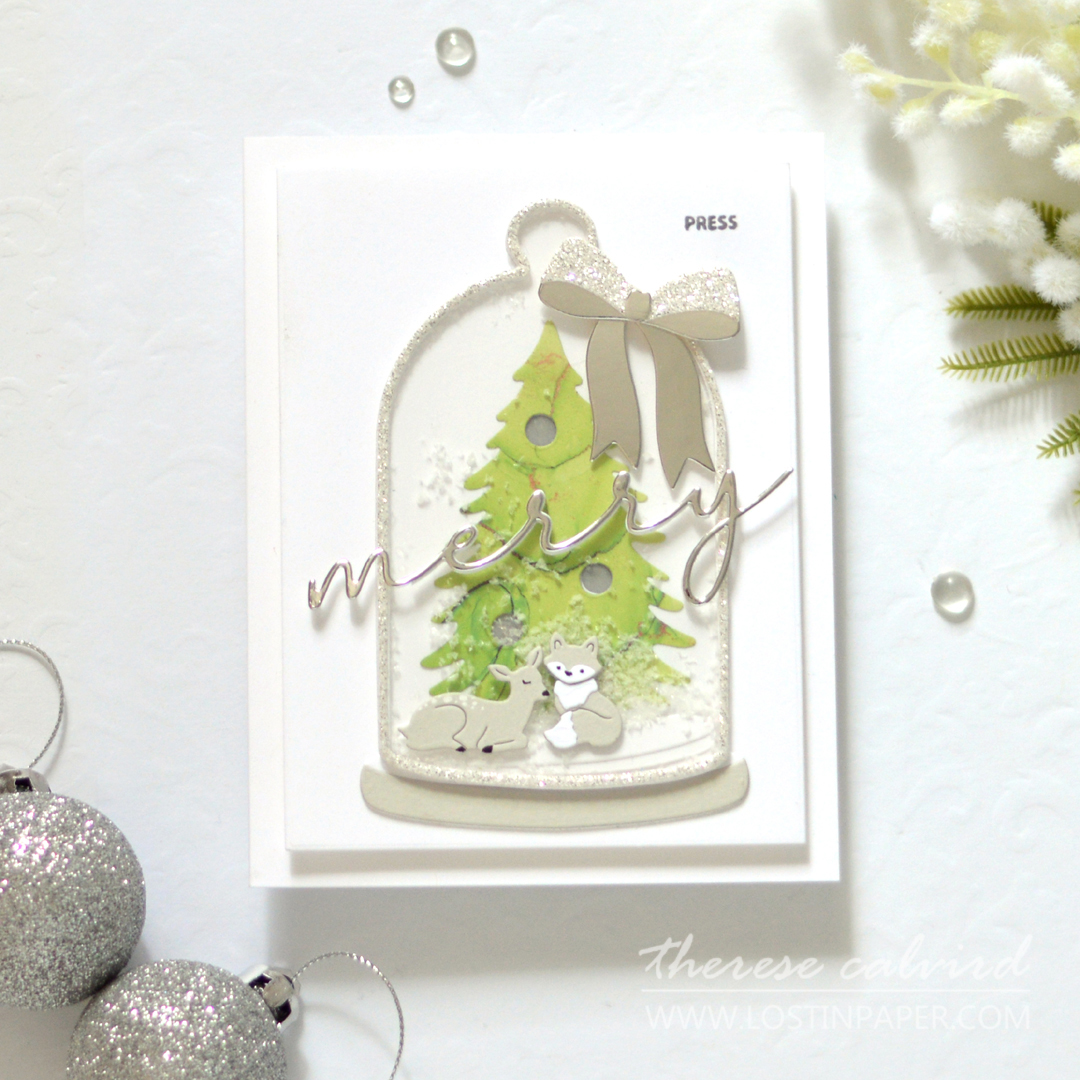
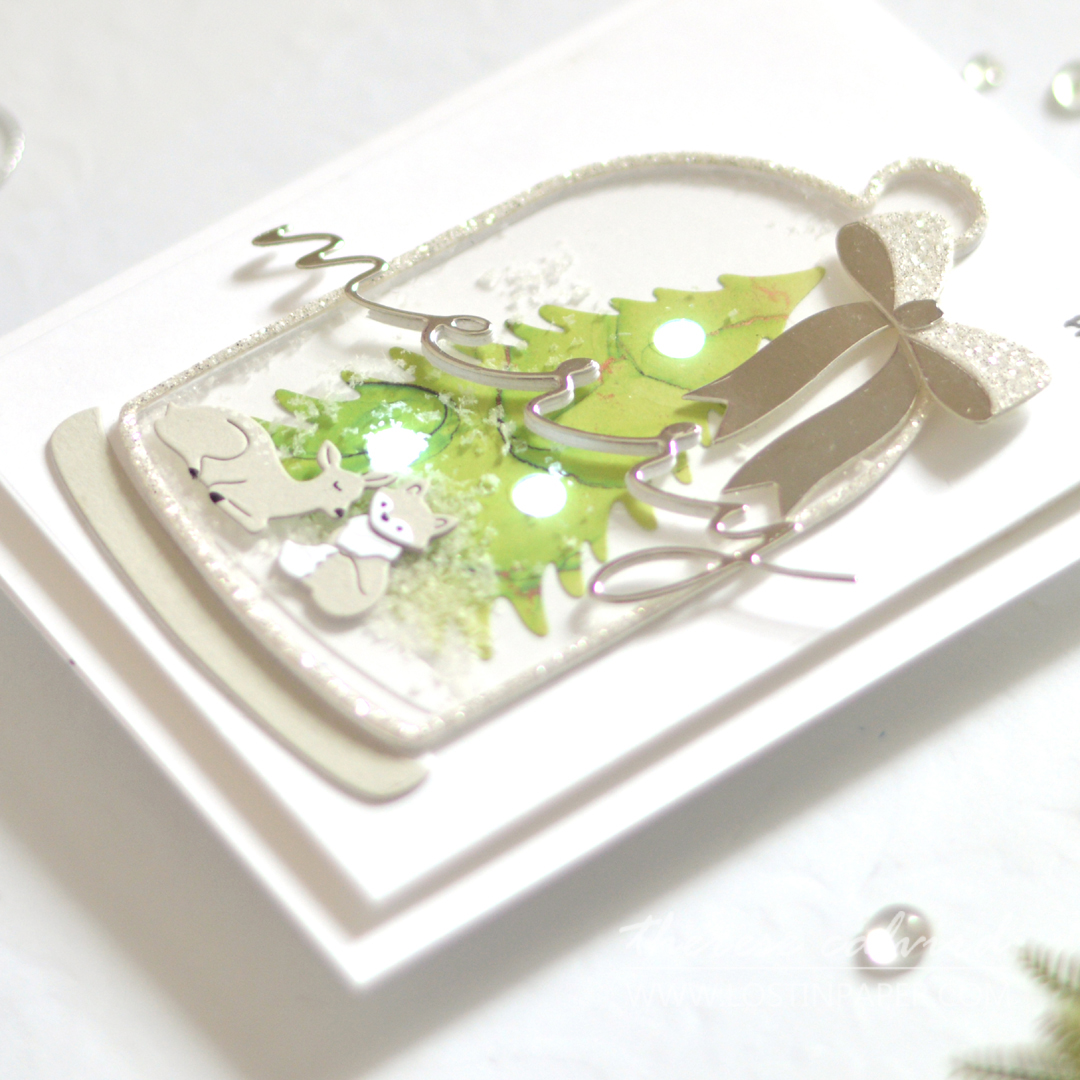
Interactive cards are always a joy to receive, so why not make it double the fun! Today I created a shaker card which was also a light-up card… sound difficult? It wasn’t really.
I know that Interactive cards can feel intimidating, but putting them together with a little thought and forward planning is actually not that difficult. My card is a Christmas design but this idea can be stretched in so many ways, create a starry night scene, light up some birthday candles, or even add some headlights to a car, the possibilities are endless.
Where to buy the Lights?
Finally, an affordable option here in Australia to buy LED card lights! Auzz Trinklets and Krafts sent me these to try and now I am going to buy the pack of 10! I have an affiliate LINK HERE if you would like to use it (at no extra cost to you).
In the US? Don’t worry, you have many options with the fab lights from Pear Blossom Press and I also have an affiliate link with Simon Says Stamp and you can get those RIGHT HERE.
TIPS & TRICKS Light Up Cards!
- The card will need dimension to ‘hide’ the battery and cords for the lights.
- Use a panel of heavyweight cardstock and die-cut where you would like the lights to shine through.
- If you have multiple lights and would like to use only one, then you can cut away the others and tape these so they do not touch each other and ‘short out’.
- Assemble the lights with the battery if needed and test to ensure that they light up.
- Position the panel over the card front and make a mark through each of the holes, then adhere each light onto these marks.
- Now adhere vellum behind the die cut holes in the card front panel.
- Next, adhere the battery in a position that will work well with your card design. Sometimes this can actually be a part of the image or off to the side (as I did with mine).
- Lay the card panel over top and press the battery button, make a mark with a pencil and then stamp or write ‘press’ or ‘push’ here.
- Attach the panel to the card front. I doubled up the foam tape (total of 4mm) to allow enough space to ensure the light is not accidently pressed ‘On’ by the cardstock.
- Decorate the front of your card, and I made mine a shaker!
WARNING: Pressing the battery is addictive, I suggest making 2 cards, one to play with and one to send!

Okay, so what did I change? Not much really, I brought in some mirror silver cardstock and made a quick bow (this set really has everything)!
BONUS IDEA: Want a little more colour? Simply use an alcohol marker such as a Copic to colour the vellum, or why not try adding some gems or rhinestones to the tree!

And instead of a black sentiment, I changed it up to the mirror silver as well. I also added layers of die-cut cardstock behind the sentiment so that I could adhere it to the front of the cloche for added support.
Check out these lights (insert the sound of a choir singing)!!

Let me know in the comments below if you are going to challenge yourself to create an interactive card… maybe even light something up! I am truly glad that you shared your time with me today, sending crafty hugs your way!

I use affiliate links which means that I will receive a small portion of the sale at no extra cost to you).
I truly appreciate your support of my card adventures!
Other Supplies:
 Neenah Solar 110 AMZ | SSS | AUZ |
 Neenah Solar 80 AMZ | SSS | AUZ |
 Concord & 9th – Cardstock SSS | AUZ |
 Ink Drops – Organic SSS | AUZ | OTH |
 Acetate SSS | AUZ |
 Foam Sheets AMZ | SSS |
 Vellum SSS |
 Chritsmas Cloche SSS |
 Open Here OTH |
 A2 Layers Die SSS | AUZ |
 Tuxedo Black SSS | AUZ |
 Nocturne SSS | AUZ |
 ATK LED lights AUZ |
 EZ Light SSS |
 Copic Markers SSS |
 Fairy Jewels SSS | AUZ |
 Gelly Roll White Pens SSS | AUZ |
 AUZZ Pokie Tool AUZ |
 Tweezers ALT | SSS | AUZ |
 Scissors SSS | AUZ |
 Bone Folder Altenew ALT | SSS | AUZ |
 Mini Score Board SSS | AUZ |
 Stampwheel ALT | SSS | AUZ |
 Mini MISTI SSS | AUZ |
 Magnets OTH |
 Perfect Align Tool AMZ | AUZ |
 Cutting Mat ALT | SSS |
 Paper Trimmer AMZ | SSS |
 Bigshot SSS |
 Gemini Junior SSS |
 Gemini Double Cutting Plates AMZ | SSS | AUZ |
 Turntable AMZ |
 Thin Foam Squares SSS | AUZ |
 Foam Squares – Black mix AUZ |
 Satin Masking Tape ALT | SSS | AUZ |
 Bearly Art Glue SSS | AUZ |
 ATG SSS |
 Glue Tape ALT | SSS | AUZ |
 Foam Tape ALT | SSS | AUZ |
This card is stunning and THEN it lights up! OMG, you are brilliant! 💡😘
I know right, it’s the gift that keeps on giving lol.
Therese, you light up our lives in such beautiful ways! What a gorgeous Christmas card, and fun time watching you put it together!
=]
Thank you my friend, it was so lovely to have you there with me x
What a treat this is Therese! I love the little animals nestled under the lighted tree! Fabulous card!
So glad you liked this, it was such fun to make!
What a beautiful card, extra special with the lights, love it!
I am going to get more of these lights, they are such fun!
The changes you made to the card from your video are perfect. And so classy. While I love the merry (the font is gorgeous), thin word dies like this one are such a pain to work with.
I agree, I decided to layer the thin die up and adhered it directly to the acetate to make it stronger (I hope this makes sense).
Stunning! You are amazing.