
Why are greeting cards a great place to start Watercoloring? You bought the paints, the brush, and the paper… but have you tried it yet?
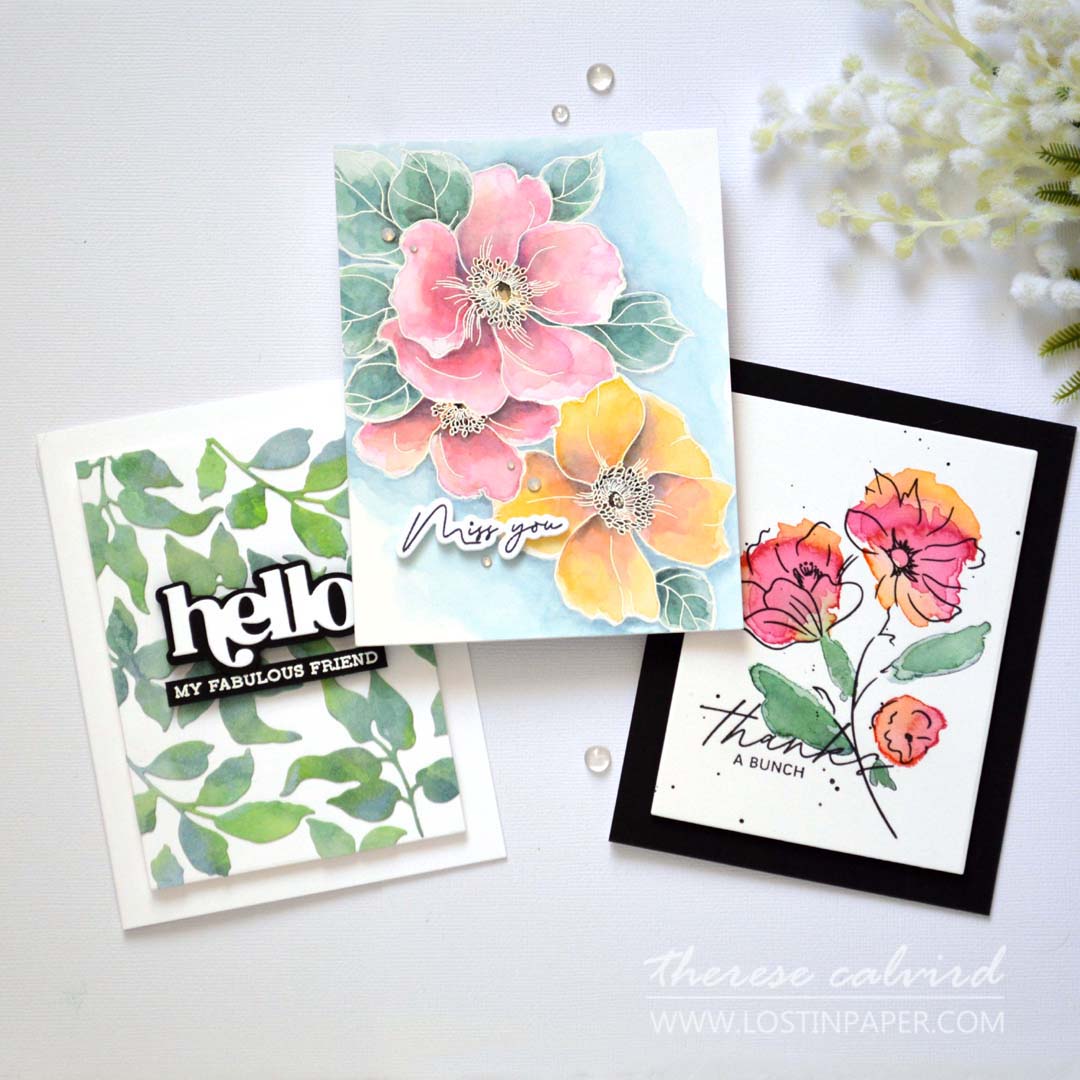
I am back with more Same But Different inspiration and today I am sharing 3 Ways to Use Watercolours on Cards. I have a video walking you through the techniques with a lot of tips, tricks, as well as a BONUS Unboxing of Paul Rubens YouLan Artist Watercolor Paint Set. Scroll down for 10% Discount Code!
These affordable artist quality pans are stunning colours and beautiful to paint with, but, you could try these techniques with any watercolour paints that you may have.
Would you like to see today’s cards?
You can watch the video here or in HD on YouTube right HERE.
This post contains affiliate links (which means that I will receive a small portion of the sale at no extra cost to you). I truly appreciate your support of these card adventures!
Painting with watercolours doesn’t have to be scary, I have 3 ideas to create beautiful watercolor effects on cards and one of them is so easy that ANYONE can do it, and I mean it, YOU can do this!
#WATERCOLORING
But why cards?
If you have visited here before you may already know that I have an addiction for watercolouring on card designs. And, I do not believe that you need to be an accomplished artist to achieve beautiful results.
These are the reasons #WHY greeting cards are a great place to start when you are learning to watercolour.
- The surface/design area is typically much smaller than a canvas.
- There is not a permancy with cards, they are given freely knowing that they will be disposed of (although we all have those special friends and family who will keep and cherish them).
- If you do make a mistake, it is literally a piece of paper that is discarded… and the time spent colouring, although this can also be chalked up as learning.
So let’s see what techniques I decided to focus on today to start you on your watercolouring card making journey.
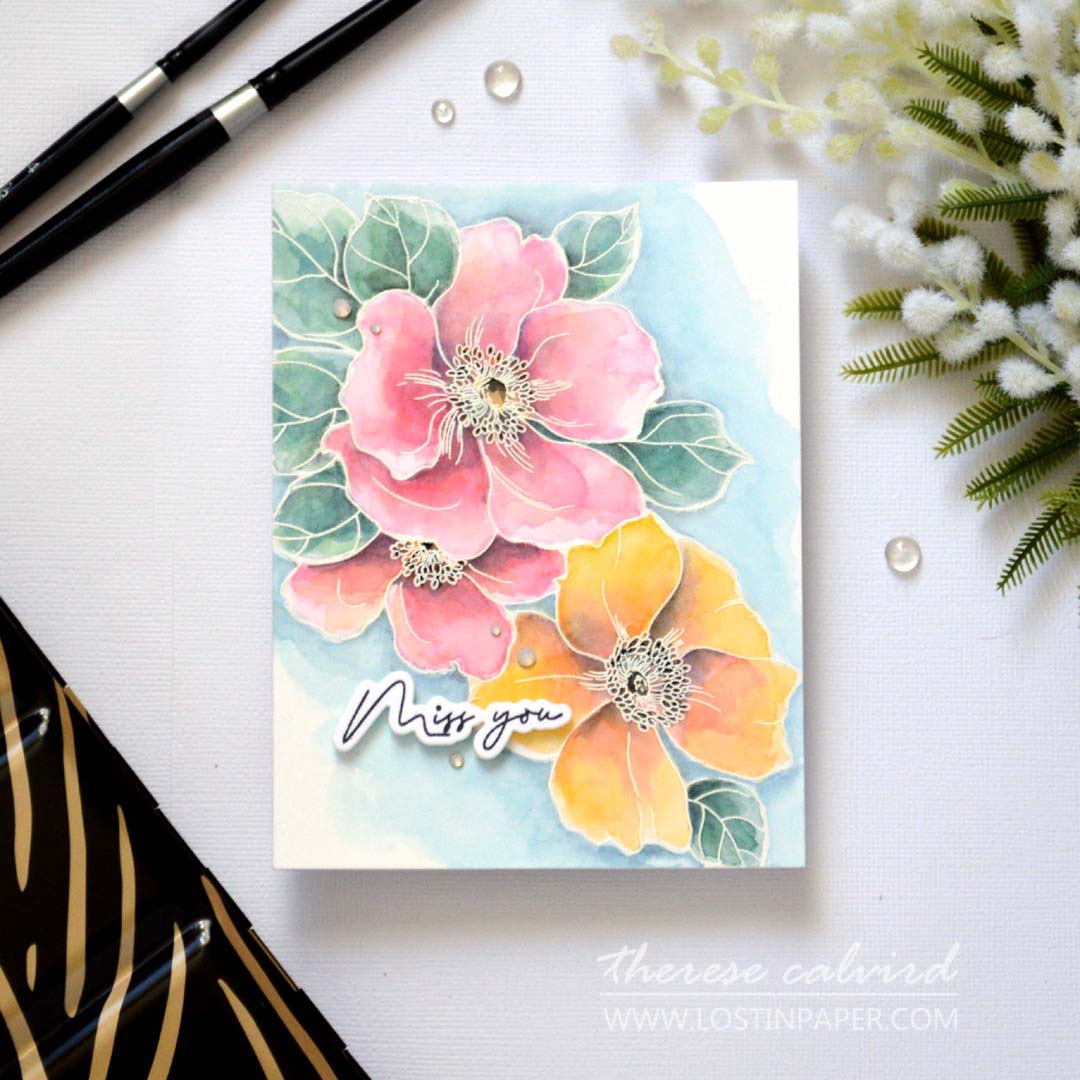
Technique #1 – Heat Embossed Image
A brilliant way to ‘cheat’ and speed up the process of watercolouring. Typically when colouring petals or leaves that are beside each other require waiting for the paint to dry before colouring each section as the wet paint will absorb the colour beside when it is still wet. Therefore, embossing the edges of the image will speed up the colouring process as it creates a ‘well’ and each section can be painted without waiting for the section beside it to dry.
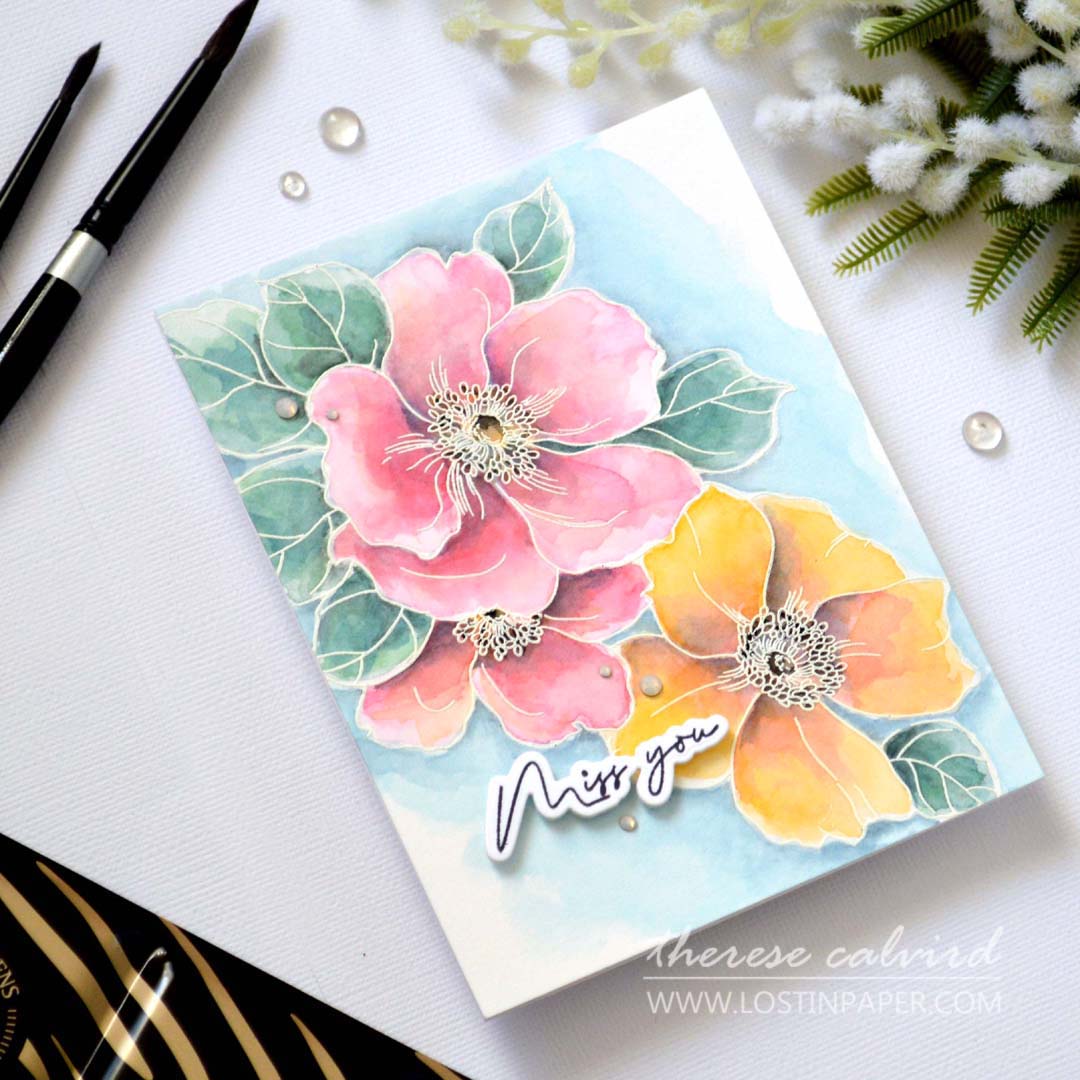
These flowers look amazing heat embossed in white, but don’t forget that you can change it up, use black, gold, silver or even coloured pigment ink with clear embossing powder for a different look.
BONUS IDEA: Don’t limit yourself to floral designs, this technique looks just as fabulous on stamped backgrounds or even graphic patterns!
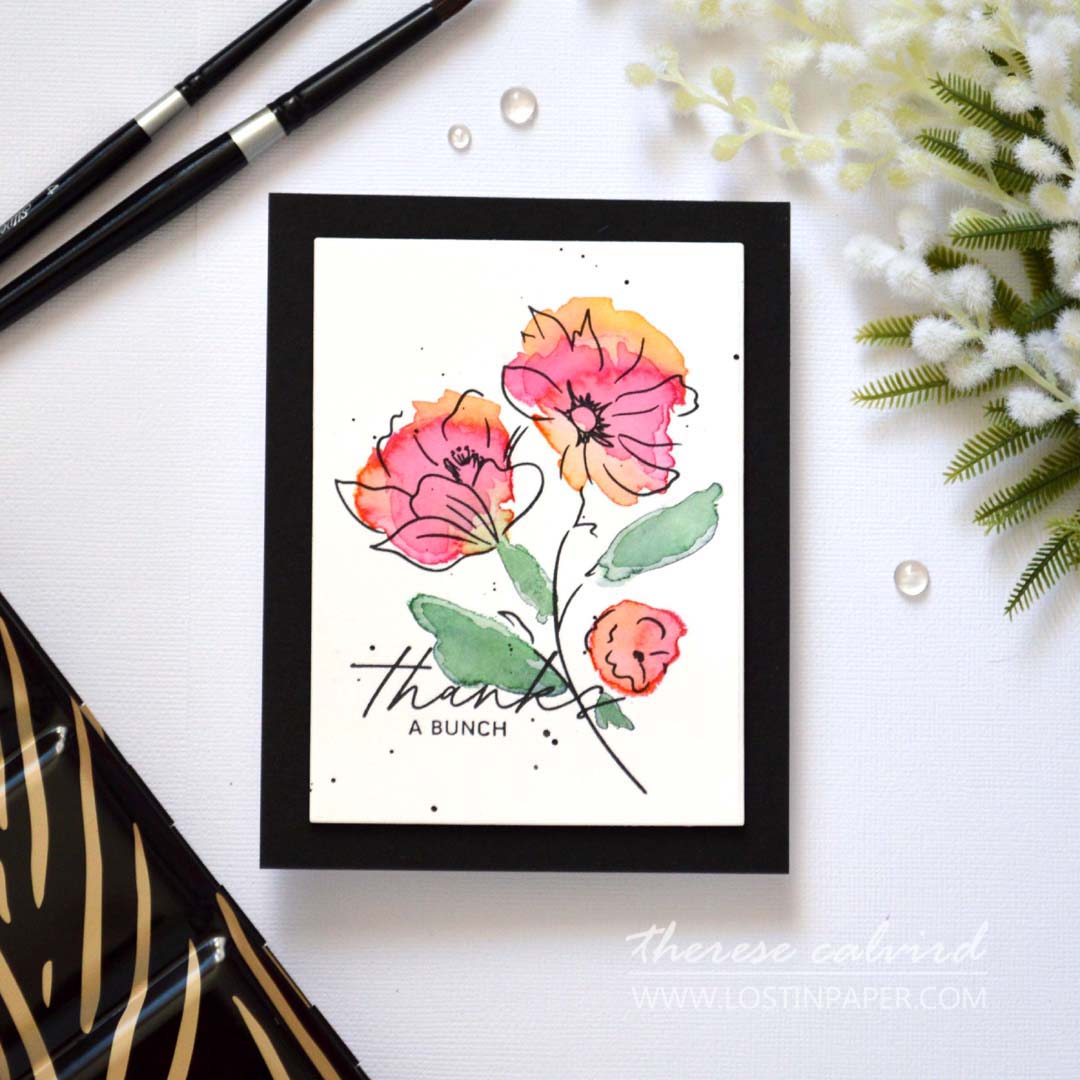
Technique #2 – Splash of Colour
I planned a basic layout for these blooms and used a wet-on-wet* technique to drop some paint onto a piece of watercolour cardstock. I allowed the colours to mix while they were still wet and then set it aside to dry. Typically colours will dry lighter, so to obtain brighter/deeper colour I will add a second layer of colour and then set it aside to dry again. You can always speed up the drying process using a heat tool.
Once the paint was completely dry I then stamped the images using black pigment ink and a stamp positioning tool (just in case I needed to restamp on the watercolour cardstock). If you prefer, you could flip the process and stamp the image first then loosely paint overtop. Personally I like to paint first, otherwise I find that I start trying to keep inside the stamped lines 😄!
* this is a watercolour technique that uses wet paint against wet paint or wet paper.

PRO TIP: Loose ‘line’ images such as these flowers, work perfectly for this technique but you could definitely try any floral images that you have in your stash.
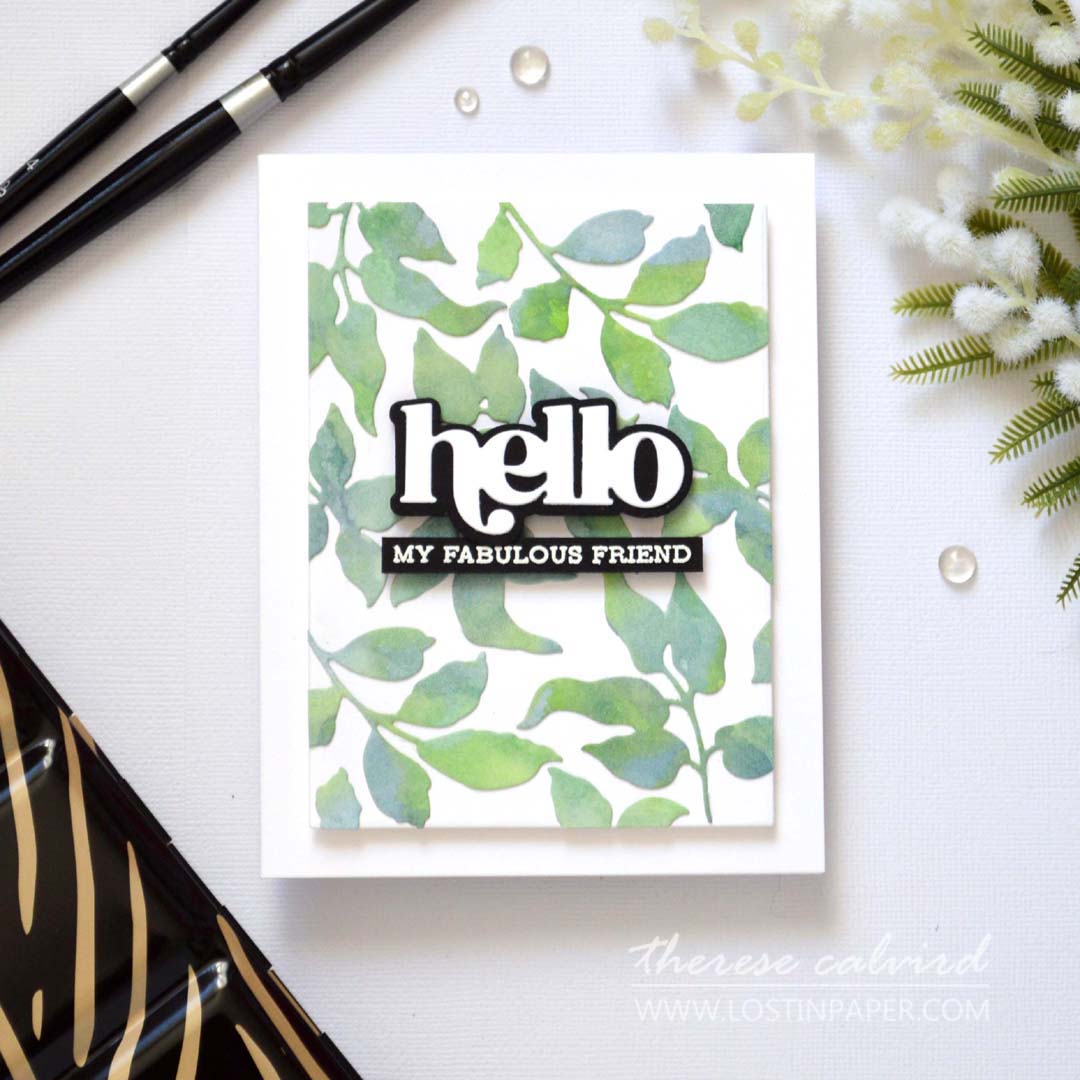
Technique #3 – Die Cut Images
This is the easiest technique I’m sharing today! And, it’s a great place to start if you have never tried watercolouring in cardmaking before. I used a wet-on-wet technique to lay down paints onto a piece of A2 watercolour cardstock. This allowed the colours to blend together as they dried.
This technique is perfect for learning how colours combine and getting comfortable using a paint brush. I chose a few analagous colours today (colours that sit beside each other on the colour wheel), so I knew that they would play well together and not create a ‘muddy’ result. If you are not sure how your colours will mix, practice on a test piece of cardstock, or check on a colour wheel to see what colour results when combining them together. There are free versions of colour wheels available on the internet.
Once the panel was dry, I then die cut some different leaf images and adhered them to a panel of cardstock to create a dimensional background watercolour leaf pattern. You can change up the colours or the images to anything that you have in your stash, or even use a background cover die instead!
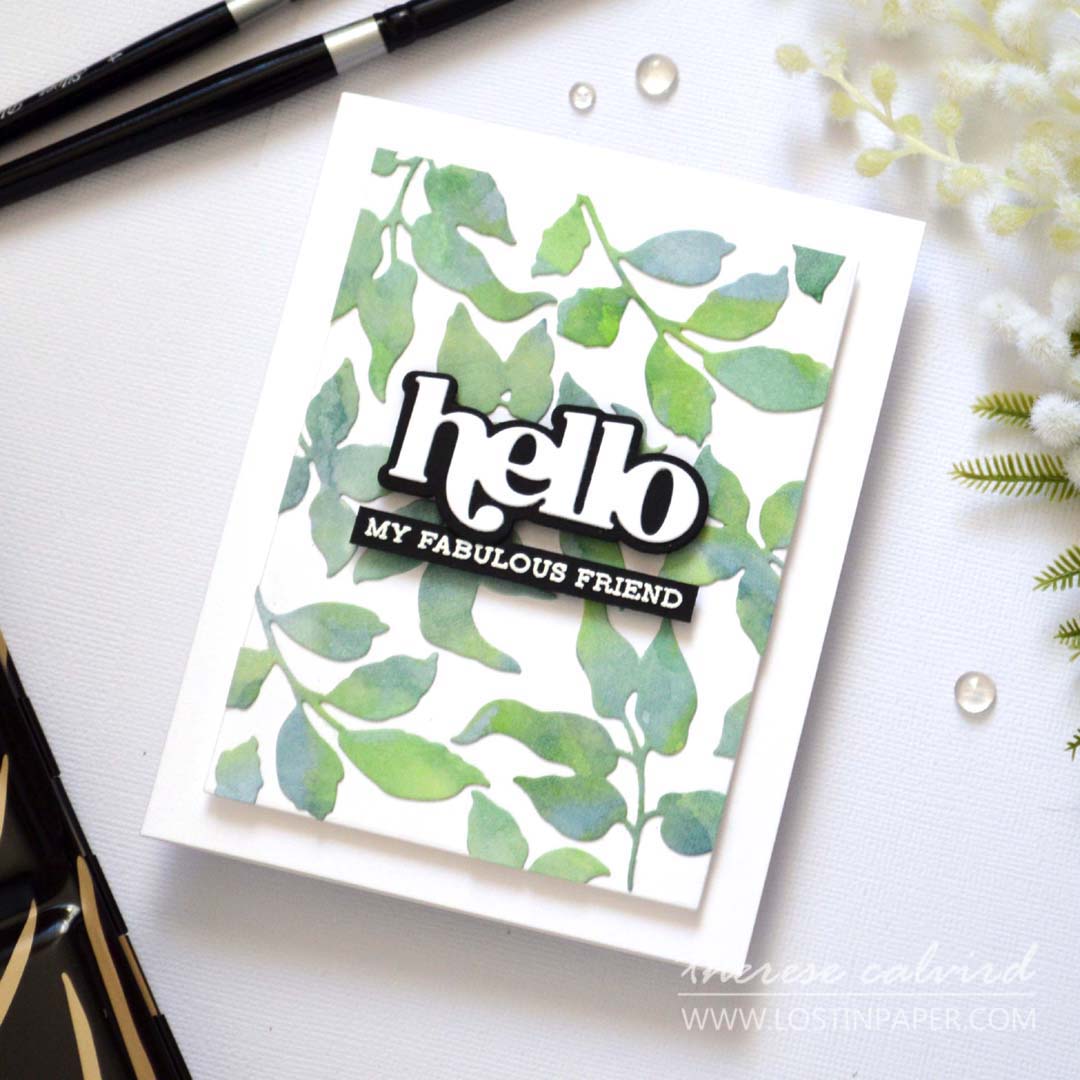
PRO TIP: This is also is one of my favourite ways to use ‘left-over’ paint on the palette.
***For a full review of these beautiful watercolours see The Frugal Crafter Lindsay Weirich’s video HERE.
Have you been inspired to try some Watercolouring on your Cards? Let me know in the comments below if you are going to try any of these techniques and if so, I’d love to see what you have created, so don’t forget to link me on Social Media!
Thank you for spending your time with me today, sending crafty hugs your way!

I use affiliate links which means that I will receive a small portion of the sale at no extra cost to you).
I truly appreciate your support of my card adventures!
Supplies:
Paul Rubens – YouLan 24 Artists Watercolor Solid Pan Set: Amazon US | Amazon CA | Amazon UK | Aliexpress
10% DISCOUNT CODE FOR AMAZON ONLY (valid until 1st May): JIF5QPM8
Altenew – Watercolor Paper Set | Bilowing Peonies | Elegant Sayings | Sketched Florals | Just Leaves Die | Timeless Sentiments Die Set | Sentiment Strips 2| Crystal MIx Gems | Stampwheel
Paint Brushes – Silver size 4 | 8
Adhesive – ATG
 Neenah Solar 110 SSS |  Neenah Solar 80 SSS |  Watercolor Paper Set ALT |  Billowing Peonies ALT | SSS |
 Elegant Sayings ALT | SSS |  Sketched Florals ALT | SSS |  Just Leaves Die ALT | SSS |  Timeless Sentiments Die Set ALT | SSS |
 Sentiment Strips 2 ALT | SSS |  A2 Layers Die SSS |  Versamark Ink SSS |  Nocturne SSS |
 Large Palette ALT | SSS |  Crystal Mix Gems SSS | SB |  WOW Heat Tool SSS |  Opaque Bright White SSS |
 Powder Tool SSS |  Color Wheel SSS |  Scissors SSS |  Bone Folder Altenew ALT | SSS |
 Stampwheel ALT | SSS |  Stampwheel Square Grid Flip Plate ALT | SSS |  9X12 Ultra Sticky Mat: Grid ALT | SSS |  Mini MISTI SSS |
 Score Board ALT | SSS |  Paper Trimmer SSS |  Gemini Junior SSS |  Tape 1″ SSS |
 Gemini Double Cutting Plates SSS |  Turntable AMZ |  Satin Masking Tape ALT | SSS |  Bearly Art Glue SSS |
 Glue Tape ALT | SSS |  Foam Tape ALT | SSS |
Such a gorgeous trio of water-colored cards, Therese! A friend recently asked me to help her achieve better results… those ‘walls’ created through heat-embossing was my very first tip for her! I’m always happy with the results. Though that one is my favorite today, I’ll look forward to trying both your artistic and ‘leaf-y’ beauties soon!
=]
All three of these cards are beautiful! Thanks for the explanations, too, those are helpful.
So glad you liked these x
Three fabulous cards, Therese! While they’re all beautiful, the first one is magnificent!
Thank you Lisa x
Love them ALL! To choose a favorite, would be asking which is your favorite child! Thank you for making these techniques so accessible.
So glad you liked these!
I vote for the beautiful leaves. The simple design allows the watercolour to be the star.
Yay to the leaves my friend x
This is a fantastic video! Thanks so much. I love the use of “same but different” to showcase ways to use watercolour. While I am drawn to the loose watercolour technique as I want to try this more, I just can’t ignore the first one as it is perfection!
Thank you so very much Deb, you have made my day!!
So gorgeous!!! Love that heat embossed one – it is so dreamy.
Thank you Lisa, you are the BEST!
Well now, I like them ALL….each has a quality that is delightful!
So glad you like them, thank you Jan!
You make watercoloring look so easy, Therese. The first card is spectacular!
Thank you so much Bobby, so glad you like these!
These are all gorgeous! Such fabulous tips to jog my memory. It’s been ages since I coloured anything!
I know you will find a minute to colour in your busy days lol.
So very lovely! Your cards are always some of m very favorites.
Thank you so very much!
All three are beautiful, Therese, and your use of the Paul Ruben’s will definitely thrill them. I love all three, thank you for sharing
Yay! Thank you so much!
The flowers look amazing! I’m have to give it a go 😊
Hope you have fun colouring!
All three are gorgeous and I must try each technique. The loose watercolor is the hardest for me.
Absolutely, that is acutally the hardest one to do, so I try not to ‘think about’ it too much and walk away lol.