
Do you like die cutting? Today I share some fun hacks to step it up, so join me, to make an interactive Christmas card!
You can see the video below or watch it HD at YouTube.
I use affiliate links, this means that if you click on a product that is linked to an affiliate shop then I will receive a small portion of the sale at no extra cost to you).
This is a great way to support me as well as the shops that we love 🥰!
Today I have 5 TIPS to Step-Up you Die Cut Images!
Die cutting has become a HUGE part of our card making arsenal and there are a few things that you can do to make sure you get a polished look as well as get the most out of your dies.
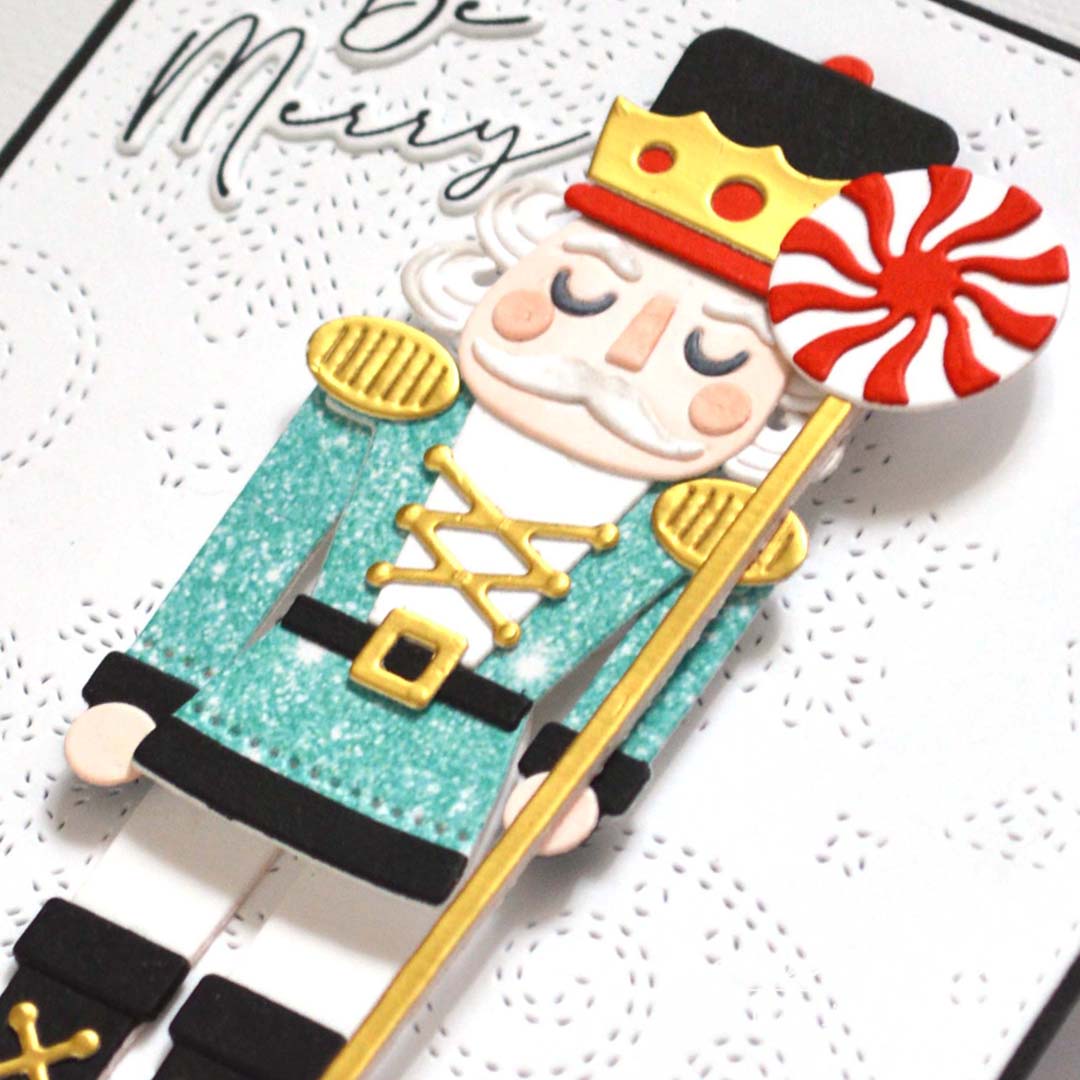
Today I will walk you through my favourite die cutting TIPS using this sweet die, Dancin’ Nutcracker Fritz and make an interactive card!
TIP #1 – Pre plan
It will save you a LOT of time if you pre plan your design. For example it is much easier to ‘batch it out’, did you know that you can not only die cut multiple dies at a time, but also multiple colours at the same time? So, if you know in advance what colours you will be cutting then this will be a great time saver… especially if you are planning to make multiple cards.
I also like to die cut ‘extras’, this will give me more options, such as an extra piece to add stability to a die cut if needed. Or, if not, then I can make a bonus card design OR store them in a zip lock bag in the packet ready for a speedy next project!
TIP #2 – Get the BEST Cut
My confession… I have more than one die cutting machine 🙈. And I have found that if I am cutting images, especially those that have debossing (impressions) on them, I get a much better impression using my manual die cutting machine. My theory is that this may happen because my Gemini Jr. (electric die cutting machine) feels like it puts too much pressure as it passes the dies through the machine, even though it cuts perfectly.
My suggestion is to test your machine, if you have more than one, run through the same die with the same weight cardstock and take a close look at the results. Look at how crisp the cut edges are, as well as the depth of any debossing. Also try different cardstocks, I find that a lighter weight cardstock (such as an 80lb Neenah or coloured card) seems to have a better result than heavy weight.
PRO TIP: If you need to add more pressure to get a better cut, try adding a thin shim of cardstock to your sandwich.

TIP #3 – Glue?
Not all glues are created equal. When I am assembling a complex image such as this one, I prefer to use a liquid glue which has a fine tip applicator. I can hold the small pieces with a pair of tweezers and use just small dabs of glue. DON’T overglue! (says me 😉).
Find a glue that works well for you, some glues can work better depending on the climate you live in, extreme cold and humidity can affect how they perform (and store). I like to use a glue that adheres quickly but still allows a small window of ‘wriggle room’ so that I can adjust the placement of a die cut piece slightly if needed. Once you have your piece aligned, try not to move it again as this can affect the strength of the glue, as the hold becomes stronger as it dries.
Also, choose a matt glue that does not leave a ‘shiny’ edge when it dries. If you add too much glue to a piece, simply tap it onto some scrap paper before adding it to your project. Also, remove any excess glue as quickly as possible, I use the edge of a craft knife or my tweezers to do this.
MY FAVE Non-Shiny LIQUID GLUES: Bearly Art – Precision Craft Glue (my current go-to) and Ranger – Multi Medium Matte. I have used both of these for many years and love the results!
TIP #4 – Tools
Use your tools to help you, I like to use a non-slip grip mat, this helps to hold the smaller pieces in place when assembling or colouring. Fine tip tweezers are a game changer, these stop ‘sticky fingers’ which can add smudges and marks to cardstock… usually where they are least wanted 😂.
Another great tool for small fiddly die cut pieces is a ‘picker tool‘, the wax end on this tool can help to pick up tiny pieces of cardstock too!

TIP #5 – Cardstock
Not all cardstocks are created equal. Some die cut better than others, for example I will often die cut with a lighter weight cardstock as the cut may be ‘better’. But to make sure that the image is sturdy enough to survive the post I will die cut a second piece and layer it together for added stability.
A great way to step up your cardstock is to use a small blending tool and an ink in a slightly darker colour than the cardstock and blend the edges. This is a quick and easy way to add some interest and the look of dimension.
Don’t forget that you don’t need ALL the colours of cardstock. If you don’t have a colour you need, then it’s easy to create your own by colouring it. You can use any mediums that you have, I often go to alcohol markers because they are quick, easy and fast drying. But a swipe of dye ink on some white cardstock will work just as well.
PRO TIP: Ensure that ‘inked’ cardstock is dry before die cutting… or if you coloured it with markers, then wait a minute for it to dry before adhering.

BONUS TIP: Don’t be afraid to do a little ‘card surgery’. I was easily ablle to alter this HUGE 6 1/2″ die to fit onto an A2 cardfront with a little help from my scissors. BUT, don’t forget that you can also use other techniques such as partial die cutting to alter a die to suit your project.
I hope you are inspired to add some die cutting in your life today! If you do, don’t forget to share them on social media with me, I’d love to see what you make!
Sending crafty hugs your way today,

Also, just in case you want to do a little shopping I’ve added the links below (some of them are affiliate links which means that I will receive a small portion of the sale at no extra cost to you). This is a great way to support me and the shops that we love 🥰!
Other Supplies:
Cardstock: Concord & 9th – Poppy | Black
Adhesive: American Crafts – This to That 3mm Foam Dots (retired)
Copics: E000 | E11 | C7 | W2 | 0
 Dancin’ Nutcracker Fritz SSS | SB |  Stitched Winter Swirl Background OTH |  Festive Poinsettia SSS | OTH |  Festive Poinsettia Dies SSS | OTH |
 Neenah Solar 80 AMZ | SSS | Neenah Solar 110 AMZ | SSS |  Concord & 9th – Cardstock SSS |  Teal Glitter 6 X 6 OTH | OTH |
 Brushed Gold ALT | SSS |  Nocturne SSS |  Copic Markers SSS |  Tweezers ALT | SSS |
Reverse Tweezers AMZ | SSS |  Perfect Picker ALT | SSS |  Scissors SSS |  Bone Folder Altenew ALT |
 Sticky Grid Mat Ultra ALT | SSS | SB |  Mini MISTI SSS | 9″ Fiskars Paper Trimmer AMZ | SSS |  Bigshot SSS |
 Multi Medium Matte SSS | Bearly Art Glue AMZ | SSS |  Foam Tape ALT | SSS |  Satin Masking Tape ALT |
Therese, I have a confession to make – even though I love all your tips and tricks for the best die-cutting experience and can see that your cuts are a ‘cut above’ … Nutcrackers are scary to me! Like clowns are to others! Am I weird? lol
=]
There is nothing scary about a clown… just ask the clown in ‘IT’ lol. I do get it though and NO you are not weird, because you are my friend, you are PERFECT!
I so enjoyed these tips. Especially about how different glues work better in different climates. The glues you mentioned – are they by chance good for humid climates?
Hi Jan, I live in the sub-tropics and it’s quite humid here in the Summer (dry in the Winter) and I use these glues without a problem. Hope this is helpful, Crafty hugs, Therese
Fabulous tutorial. Love the nutcracker die. Was interested in your glue chat.
I’ve tried a few with varied results.
I sometimes use the doubled sided sticky sheets for die cuts. I’m very fond of Altenews sheets.
Cheers
I agree Lisa, those double sided A4 sheets are such time savers! But when it comes to the ‘intricate’ stuff like this, it’s the liquid glue I turn to every time, though I have made a mess sometimes lol.
I agree with Michele I too am scared of clowns and nutcrackers but thank you for all of your tips and agree I with them all .I have to say though that your nutcracker looks amazing !!
Marie
He is a pretty happy little nutcracker, even though I chopped his legs off 😉.
I hope you gave him something for the pain
Was it a bottle of whiskey or local aneasthetic… I can’t remember!
Cute nutcracker, not scary at all.
I don’t think so either lol.
That is such a detailed die! Beautiful card!
It’s a lot of fun to assemble too!
I like the way you’ve dressed this dapper fella and the peppermint staff you’ve given him! Fabulous card and tips, Terese!
I’m so glad you liked him, I think he’s a lot of fun too!