Do you have any background panels? Then, this simple embossing technique is for you!
But first, I wanted to let you know that this is part of my Take 2 Series with Altenew and I’m so excited that you are joining me for another video today.
Would you like to see today’s cards?
You can see the video below or watch it HD at YouTube.
I use affiliate links, this means that if you click on a product that is linked to an affiliate shop then I will receive a small portion of the sale at no extra cost to you).
This is a great way to support my channel as well as the shops that we love 🥰!
The Embossing Highlight Technique!
If you love creating background panels, but never know how to use them on your card designs then today’s simple and fun technique is for you. Combining beautiful backgrounds with a 3D embossing folder and a swipe of ink, can really take those panels to the next level.
This technique was inspired by Debby Hughes (from a few years ago now lol.) but more recently by Tiffany Solorio. I would recommend a visit to these two incredible card makers, you will not be disappointed!
#TECHNIQUETIP
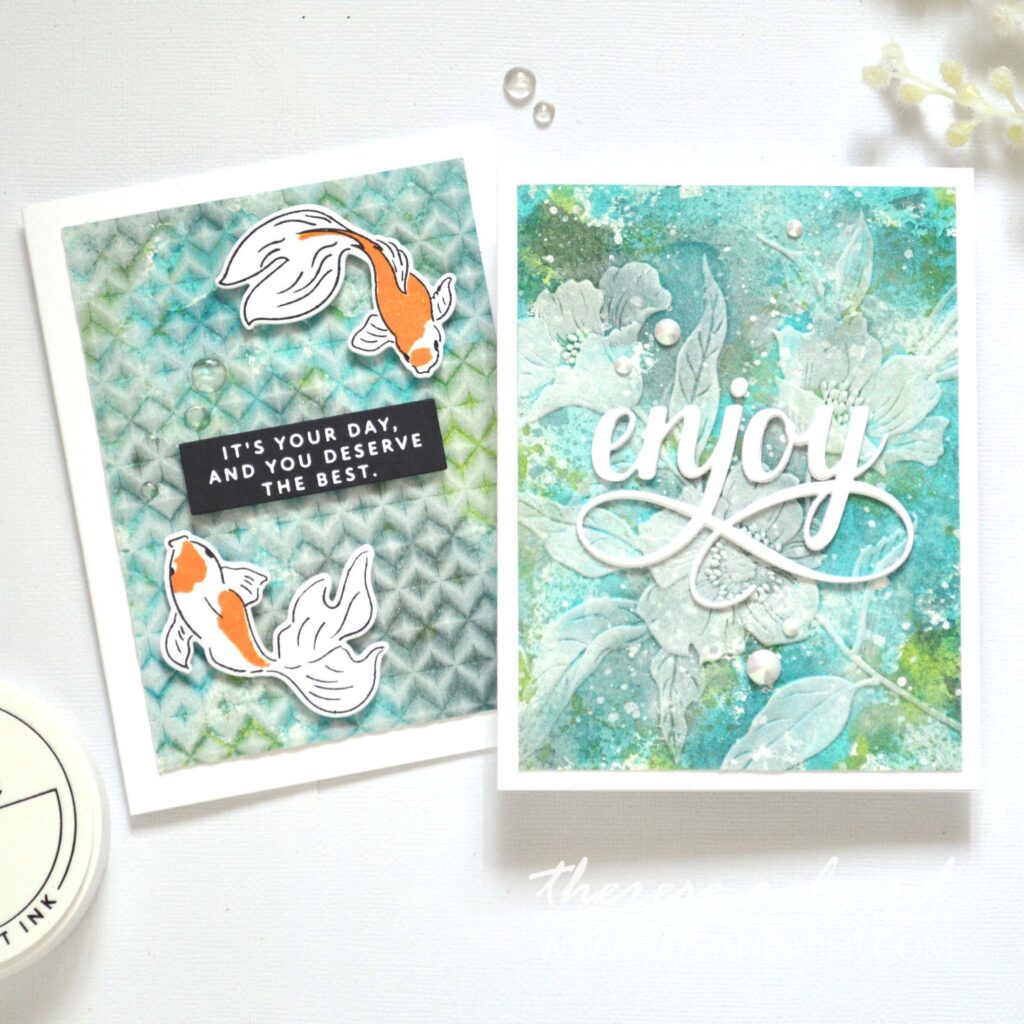
If you have inked backgrounds ready to go, then you are halfway there, so, start by grabbing one of your favourites! Choose a 3D Embossing Folder, it can be anything, a floral design looks amazing, but then… so does a graphic pattern. I decided to share an example of each today.
I decided to create a washy watercolor look background using/smooshing Ink Sprays. But you could also use ink pads (smooshing), watercolor paints or even acrylics!
You can either cut the panel down to size before or after embossing. Just remember that if you cut it after to use a paper trimmer, as using a rectangle die may ‘flatten’ the embossed image when running it through the die cutting machine.
Next, swipe a white pigment ink over top of the raised sections of embossing. Other options here are to ‘sand’ the image back a little first to help grab the ink, or use a finger dauber or detail blending brush to add the details. Allow the image to dry and add it to the front of your card and decorate as desired! I found that white or gold splatters, as well as pearls and rhinestones, suit these backgrounds beautifully!
Idea #1 – Floral Image
My first example uses a gorgeous 3D floral embossing folder. The image looks quite subtle but the softness of the white pigment ink works like magic to bring out the details.

PRO TIP: Pigment ink pads require reinking more often than dye ink pads, typically I will buy the pigment reinker when I buy the pad so that I can keep it ‘nice and juicy’ which is what is needed for techniques such as this.

I added some white ink splatters, but if you don’t have a spray you can create the same look using a white water based paint or gouache and add a little water and splatter it with a brush instead. You may also notice some sweet little Gem Sparkles too…

Idea #2 – Graphic Pattern
I wanted to stretch this technique a little and, this time I used a 3D graphic style pattern. The busy pattern covers more of the original background once it is swiped but it is still easy to see the variations of colour in the ‘debossed’ sections.

To me, this felt like a more masculine ‘look’ and I always need some of these for my stash so I kept it simple and brought in the fish. AND, this fab sentiment, it’s acutally a ‘Press Plate’ and creates multiple sentiments in one swipe!

Does this card look familiar to you? It’s a very similar design to THIS CARD (and video) that I shared using a different kind of fish.
BONUS TIP: Remember, that you do not always have to reinvent the wheel. You are allowed to have ‘go-to’ layouts and designs, because, you can always change it up with the elements and sentiments that are added.

I hope you are inspired to create using the Embossing Highlight Technique on your next handmade card project! If you do, don’t forget to share them on social media with me, I’d love to see what you make!
Sending crafty hugs your way today,

Also, just in case you want to do a little shopping I’ve added the links below (some of them are affiliate links which means that I will receive a small portion of the sale at no extra cost to you). This is a great way to support me and the shops that we love 🥰!
Other Supplies:
Ink: Altenew – Caramel Toffee
 Hello Beautiful Project Kit ALT |  Fancy Enjoy Die ALT | SSS |  Angled Mosaic ALT | SSS |  One-Go: Solid Sentiment Strips Bundle ALT | SSS |
 Goldfish Pond ALT |  Goldfish Pond Die ALT |  Watercolor Paper Pad ALT |  Neenah Solar 80 AMZ | SSS |
 Neenah Solar 110 AMZ | SSS |  Obsidian ALT | SSS |  Cloud White ALT | SSS |  Summer Afternoon ALT | SSS |
 Jet Black Spray ALT |  Pure White Spray ALT |  Frayed Leaf ALT |  Dusk ALT |
 Ocean Waves ALT |  Sea Glass ALT |  Mother of Pearl ALT | SSS |  Crystal Clear Enamel Dots ALT | SSS |
 Tweezers ALT | SSS |  Fine Mister Spray ALT | SSS |  Fine Blade Scissors ALT | SSS |  Perfect Picker ALT | SSS |
 Bone Folder Altenew ALT |  Stampwheel 2.0 ALT |  9″ Fiskars Paper Trimmer AMZ | SSS |  Bigshot SSS |
 Bearly Art Glue AMZ | SSS |  1″ Tape ALT | SSS |  Foam Tape ALT | SSS |  Satin Masking Tape ALT |

Your own words say it all, Therese! MIND BLOWING! what a little swipe of white ink can add! I love the floral embossing so very much – but guess WHO has both of these?? tee hee…
=] M
I hope you give it a try, it’s a ton of fun!
Such a classic technique with STUNNING results!
I know! I love how it looks on the floral designs!
Who knew white ink could be as useful as this! Beautiful cards, Therese!
I know right Lisa!!
Thank you for this technique. I have seen similar but not with white. It is stunning! Thank you!
The white definitely gives it another edge!
Beautiful cards – I need to try this
It’s such fun Gab, you will love it!
What a difference a little swipe of white can make, Therese. I have a number of panels I don’t know what to do with so I’m pulling them out and giving this a try. Thanks for the inspiration.
Yay! I hope you have fun with it Bobby!!
Those florals are lovely in white. With design paper and yupo maybe sanding might substitute?
I think you are right Christine, that would look great!
Fantastic technique . I have Panels I have embossing folders all I need now is white ink and I’m ready to go. Your cards are amazing and the white really lighlights the embossing against those gorgeous panels.
marie
It’s amazing how a quick swipe of ink can change a look!