
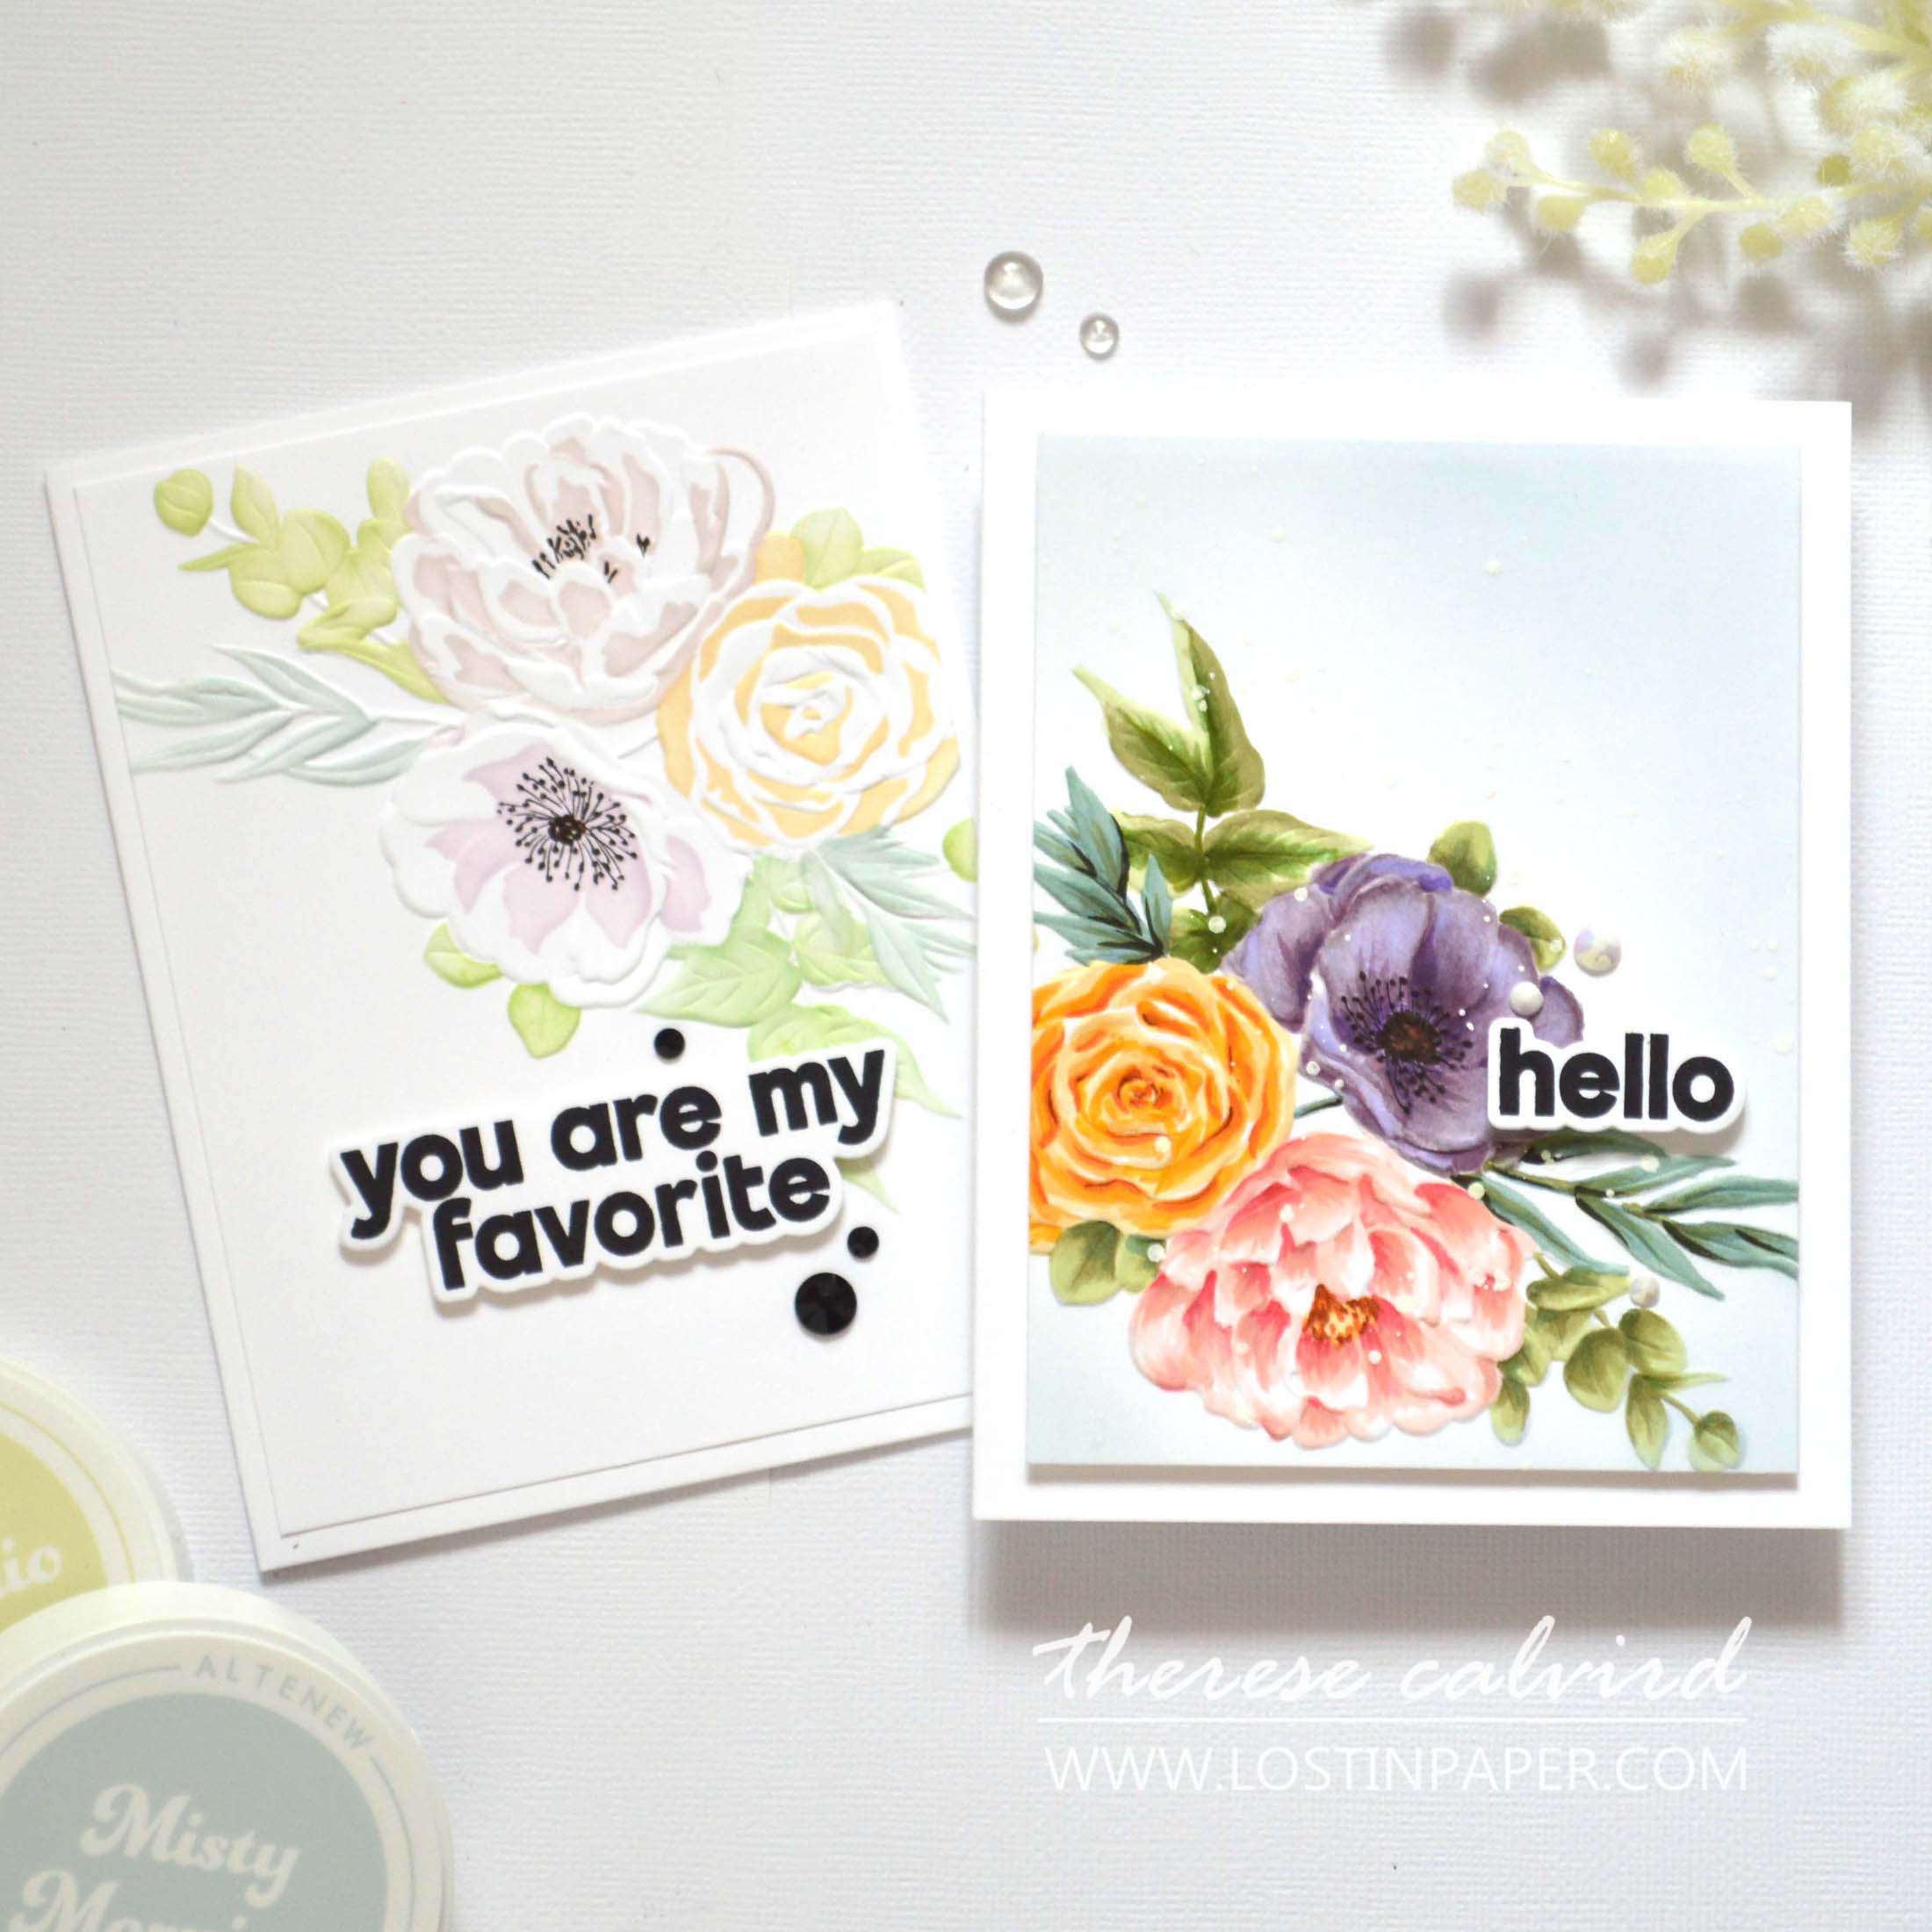
Put your hand up if you have any 3D embossing folders… and if so, grab them out because I am sharing 2 fun ways to add some colour to your world!
But first, I wanted to let you know that this is part of my Take 2 Series with Altenew and I’m so excited that you are joining me for another video today.
Would you like to see today’s cards?
And you can see the video below or watch it HD at YouTube.
I use affiliate links, this means that if you click on a product that is linked to an affiliate shop then I will receive a small portion of the sale at no extra cost to you).
This is a great way to support my channel as well as the shops that we love 🥰!
Let’s Add Some 3D Colour to your World!
There are many different ways to take 3D Embossing Folders a step further. Today’s technique involves adding colour to the embossed image, I’ve got 2 different ideas and a video which will walk you through the process step-by-step.
These folders are addictive, so, if you want MORE 3D embossing folder inspiration check out my ‘Easy Background’ video right HERE. I’d love to see what you make if you try this technique, let me know!
#TECHNIQUETIPS
- Choose a 3D embossing folder with an image such as a bouquet (and if possible, one that has a co-ordinating stencil).
- Emboss a cardstock panel placing the image in your prefered position (try not to hang the cardstock outside of the folder as this may leave ridges when embossed).
- If you are using a thicker cardstock or watercolour cardstock, you may need to give it a ‘light spritz’ with water prior to embossing to help prevent the cardstock from cracking.
- Choose the medium you prefer. I used both alcohol markers and ink blending for my examples.
- You can change up the medium, but be aware that if the paper becomes ‘wet’ it may lose some of the sharpness to the embossed areas. So, try not to overwork an area, or add too much water if you are watercolouring.
- PRO TIP: You can always re emboss the panel once it is coloured and has dried. Simply align the image back within the folder and run it through your die cutting machine a second time.
- Markers | Pencils | Watercolors – I like to start in the centre of the petals/leaves with a darker colour and then blend it out with a lighter version of the same tone. You may also notice that I added some of the darker colours to the tips of some of the petals/leaves as well as left some white space. Both of these techniques add highlights to the image.
- Ink Blending – Use the co-ordinating stencil to add as many layers of colour as you like.
- If you decide to cut the panel down, use a paper trimmer instead of a rectangle die in a die cutting machine, as this will put pressure on the image and flatten it out.
- Use a strong adhesive to attach it to the card, as there is less surface area touching the card front in the embossed areas.
- LINK for the Universal Plate System Compatability Embossing Folders Guide right HERE! Use the correct sandwich for your die cutting machine.
I have linked the Spellbinders Platinum 6 guide, but many machines work using different brands of folders, test first if needed but never force the machine, if it feels too tight, stop and check your ‘sandwich’.
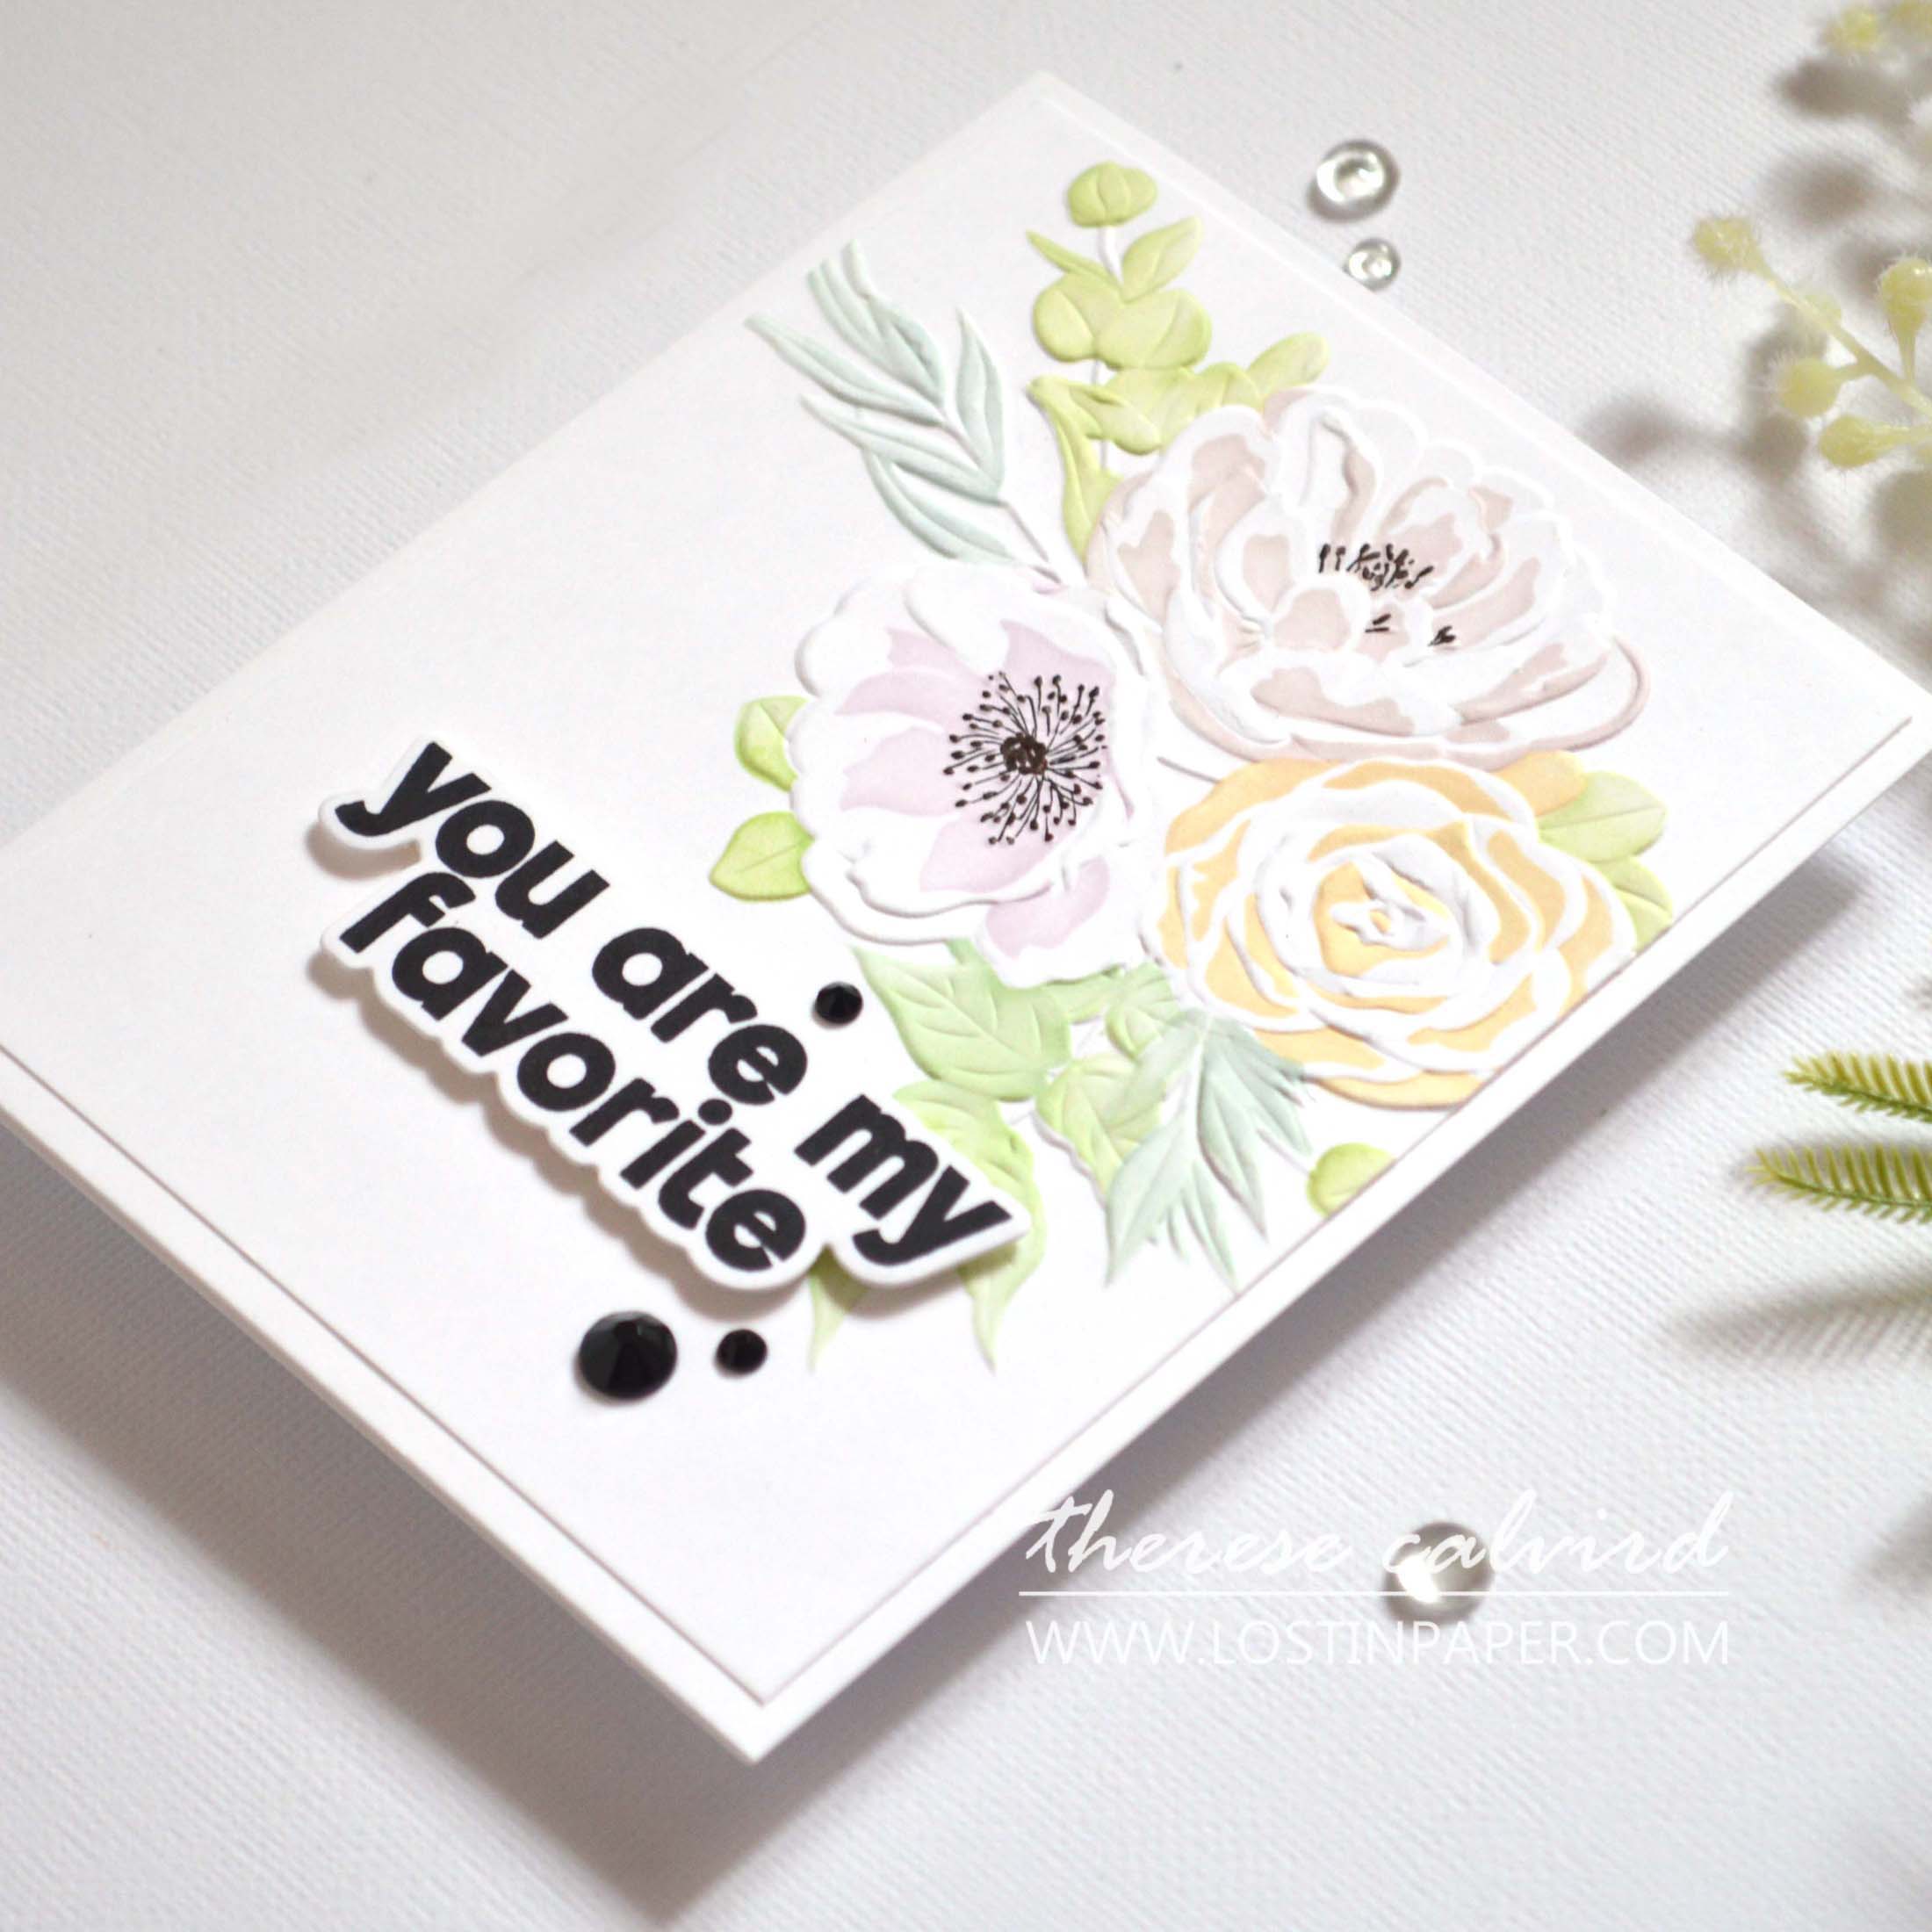
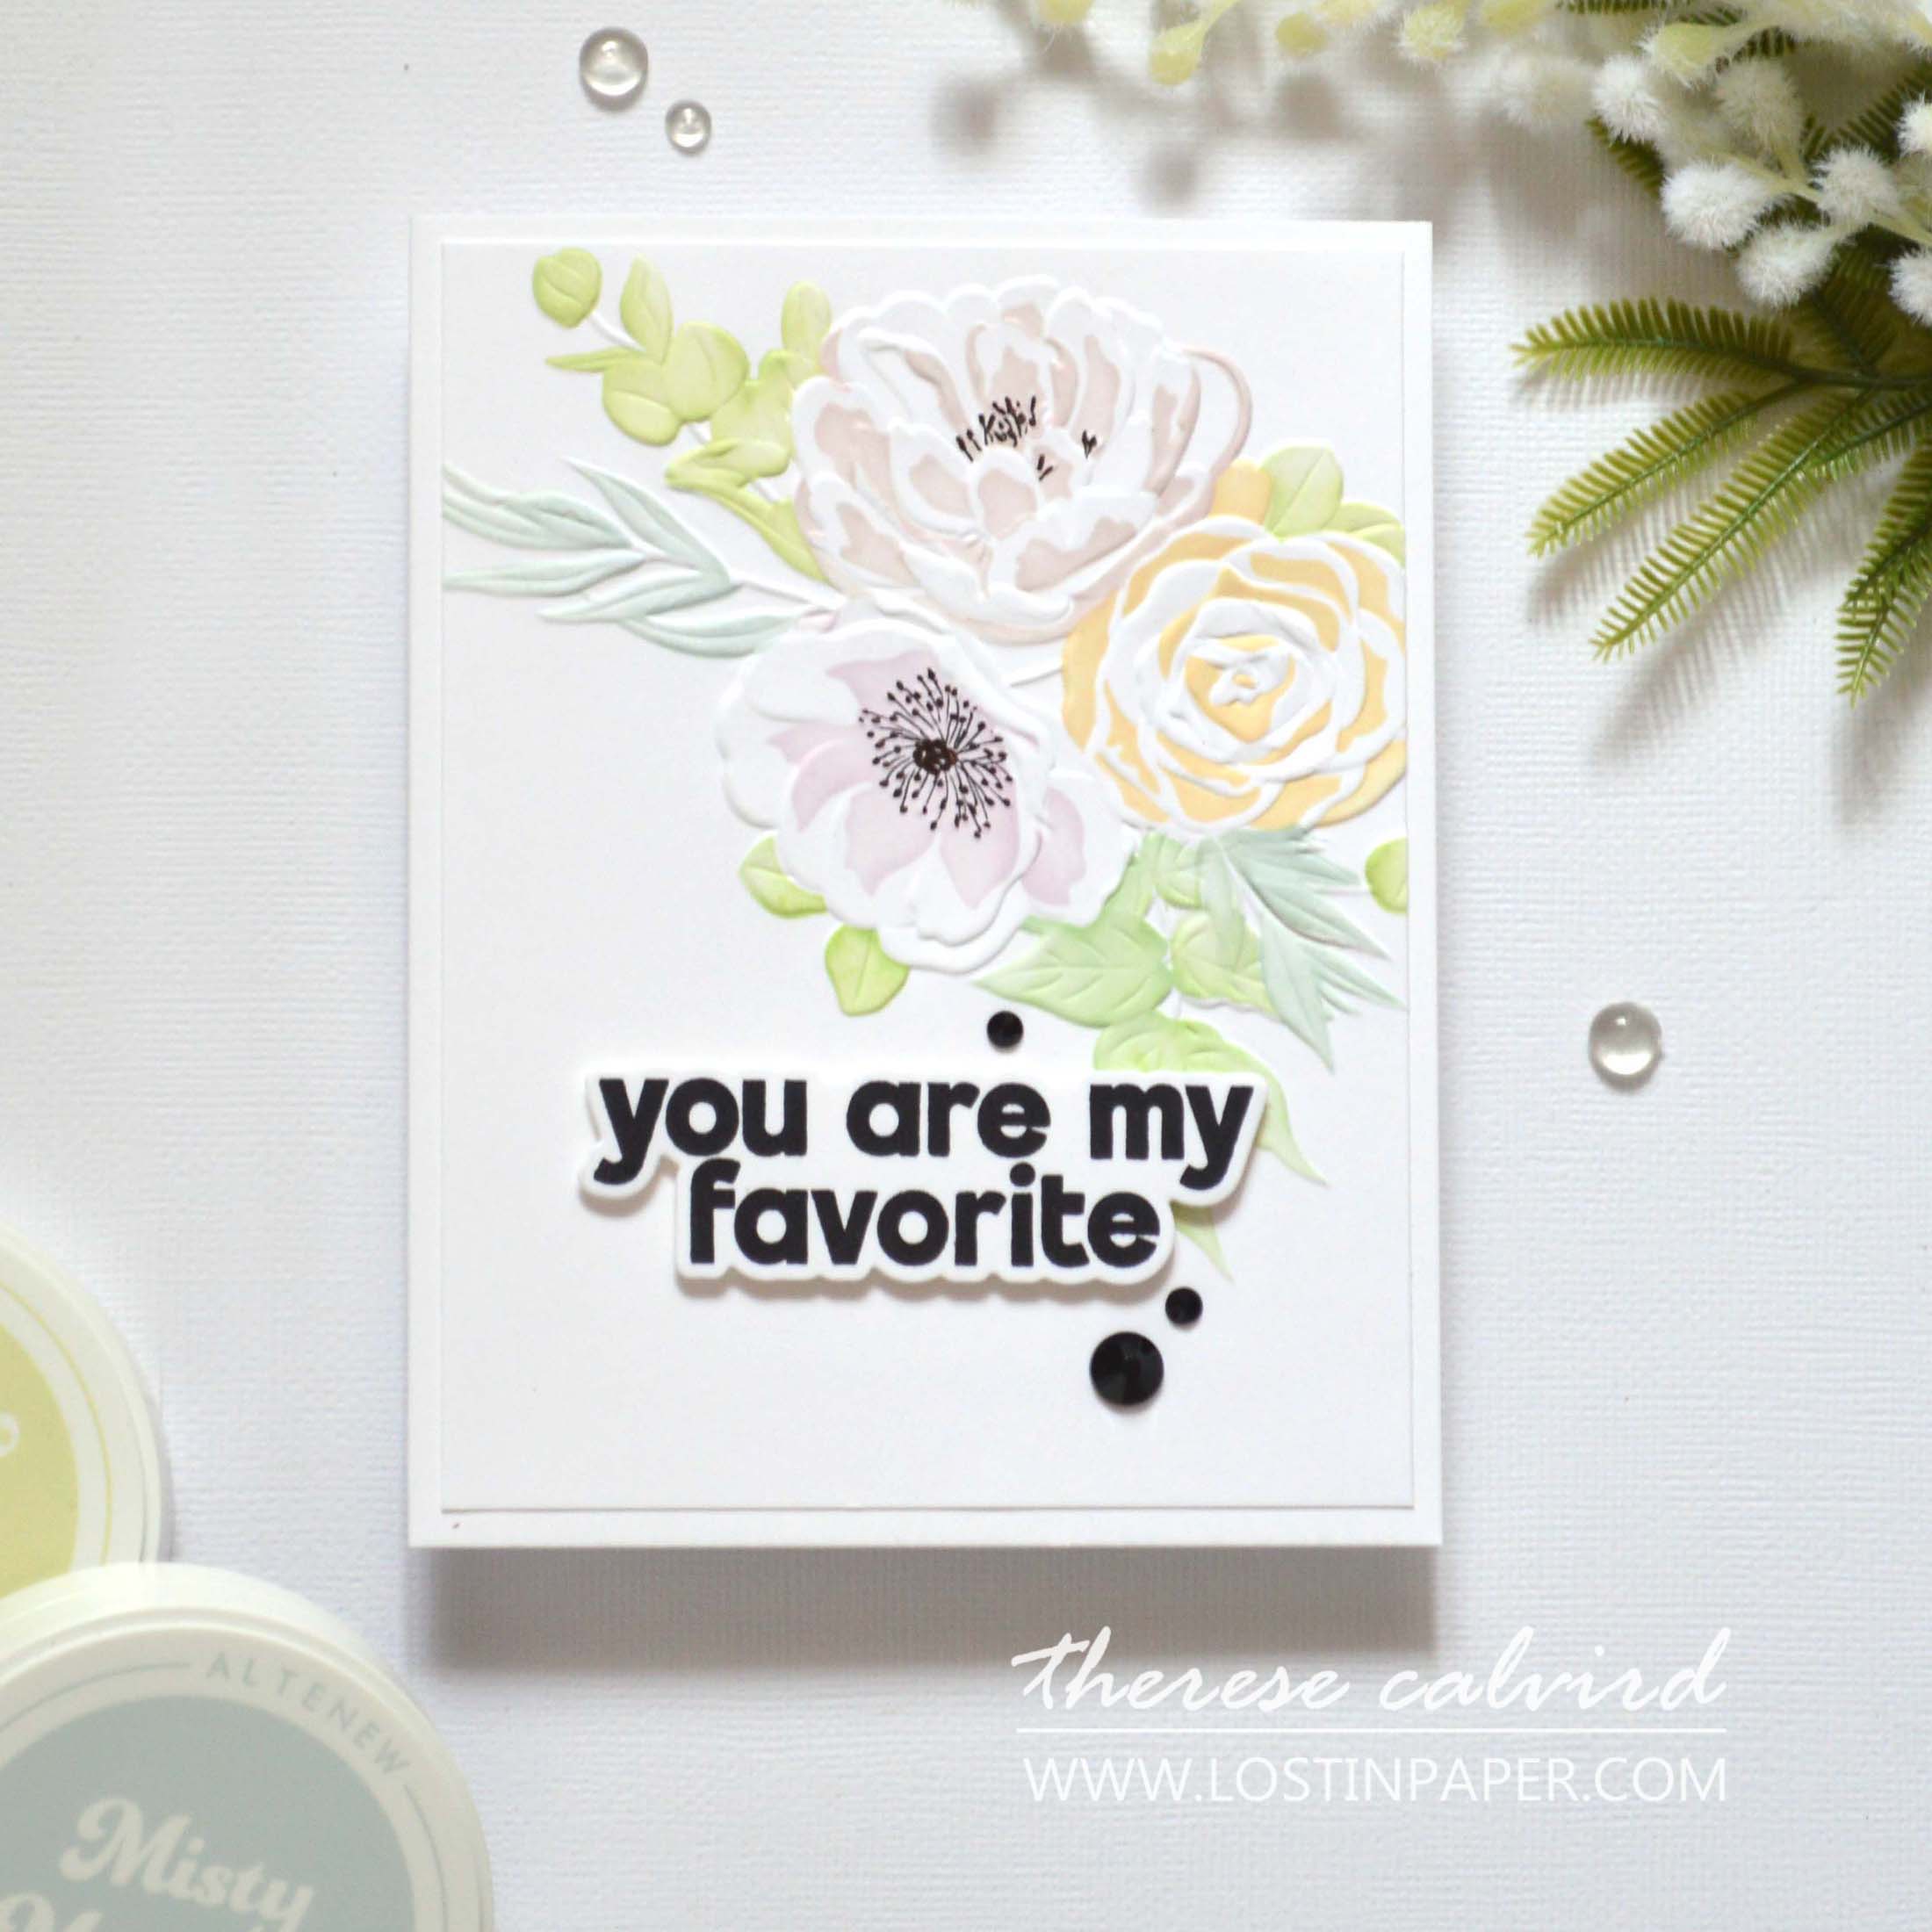
Idea #1 – Alcohol Markers
This process does take some time, I won’t lie. But, it you like to colour (and I do 😉) then, that is part of the joy. I walk through the technique in the video, but bascially I use the embossed image as a guide. I coloured with the alcohol markers directly on to the petals and leaves blending them as I usually would when colouring a ‘flat’ image.
I used this beautiful 3D floral embossing folder on both designs, but any bouquet or even a single large bloom would look amazing.
PRO TIP: Having trouble seeing the pattern? Check the product packaging, the shopfront will also have detailed images of the finished design OR if you have a co-ordinating stamp and stencil set, create it ‘flat’ to use as a guide.
I added some white ink splatters, but if you don’t have a spray you can create the same look using a white water based paint or gouache and add a little water and splatter it with a brush instead. You may also notice some sweet little sparkles too…
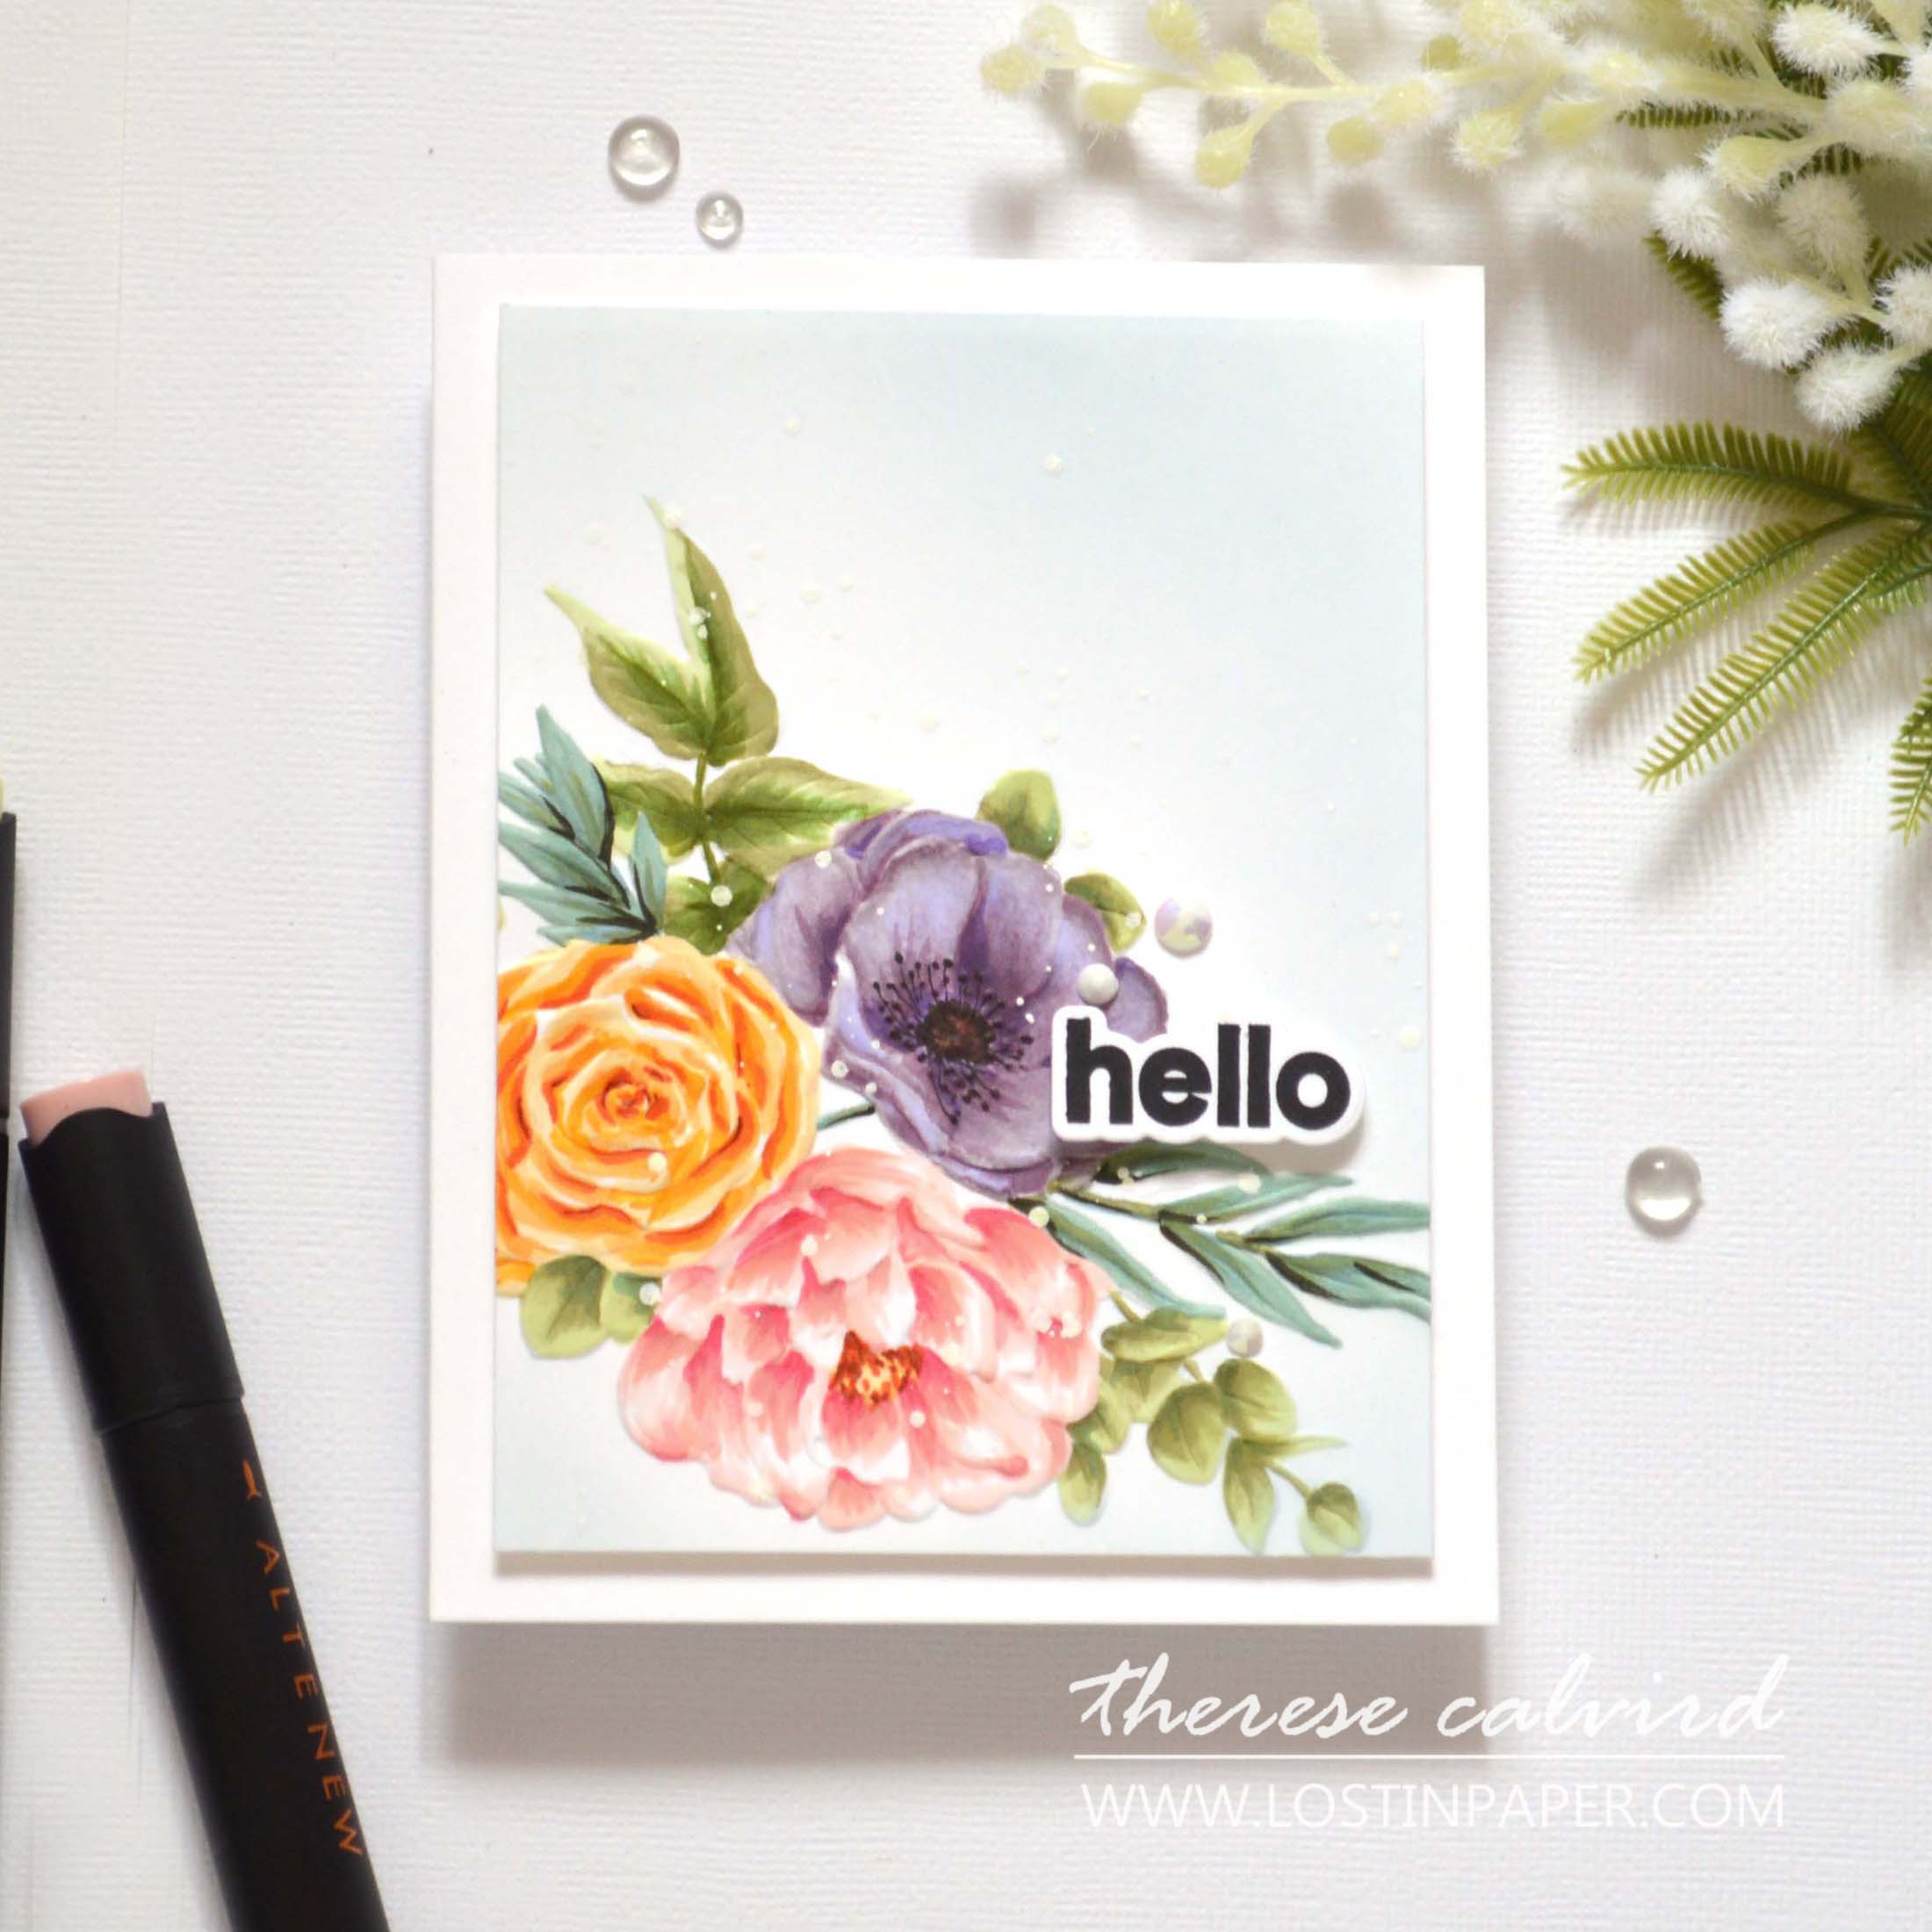
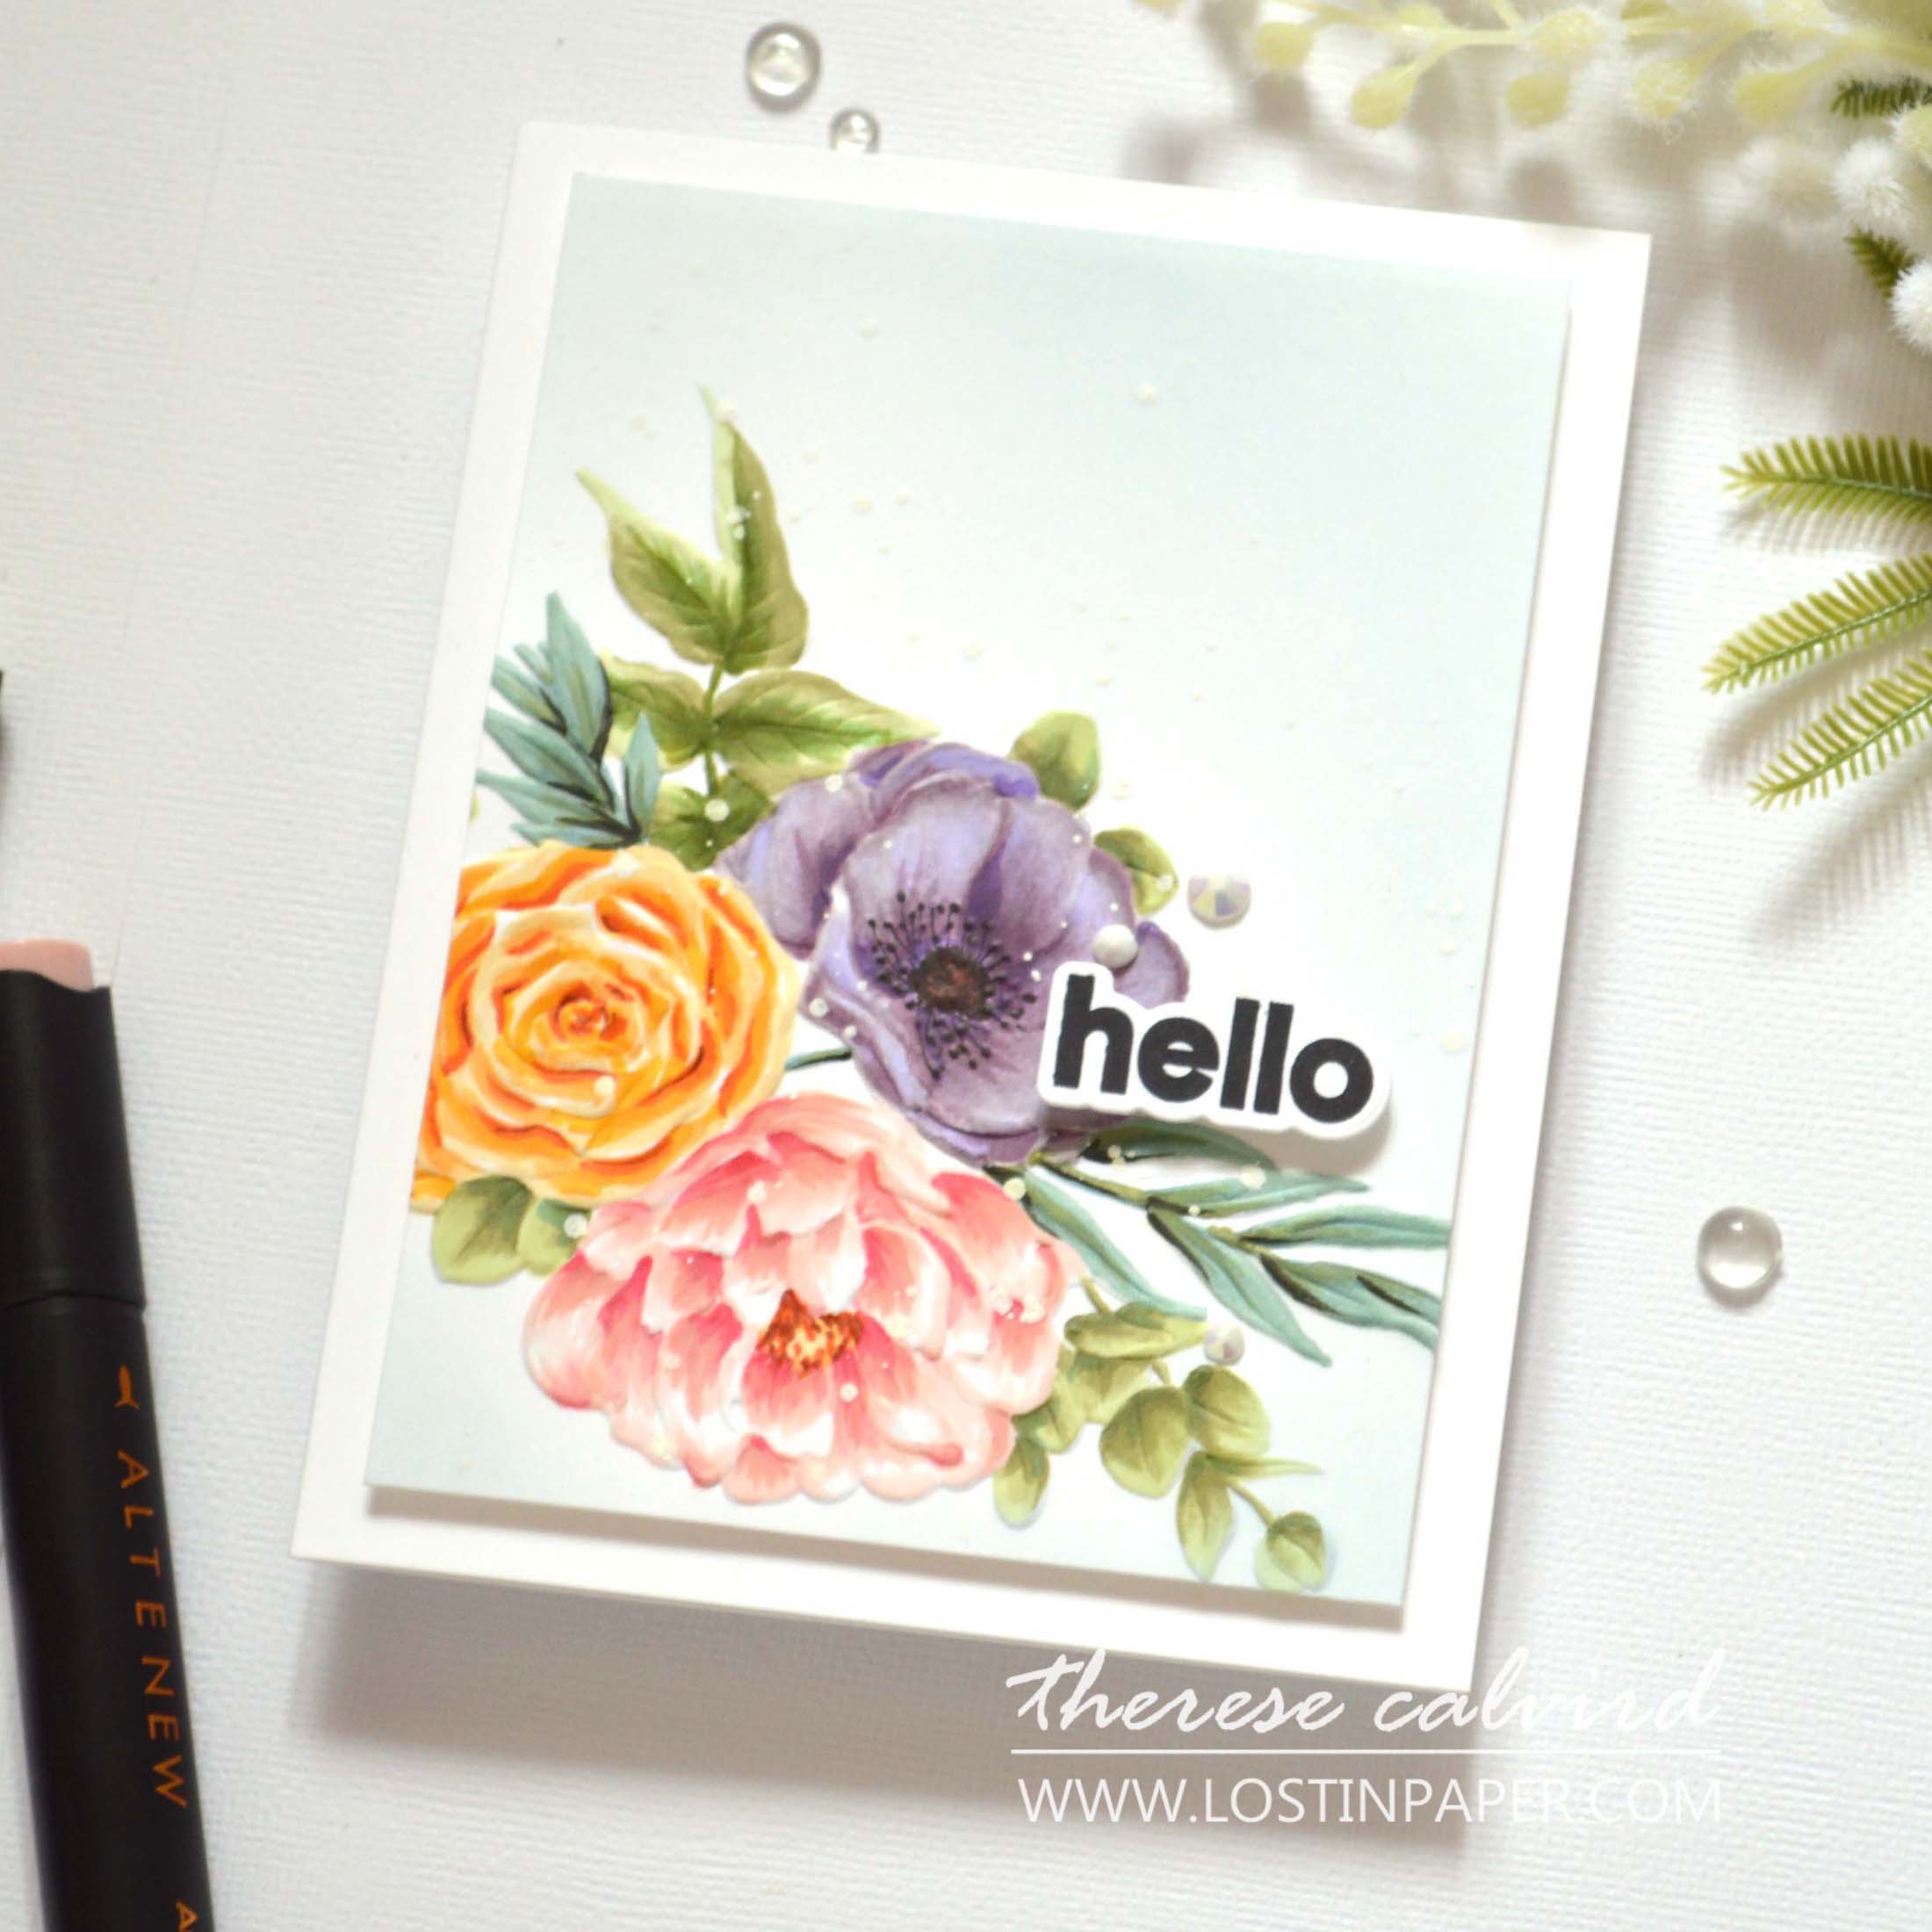
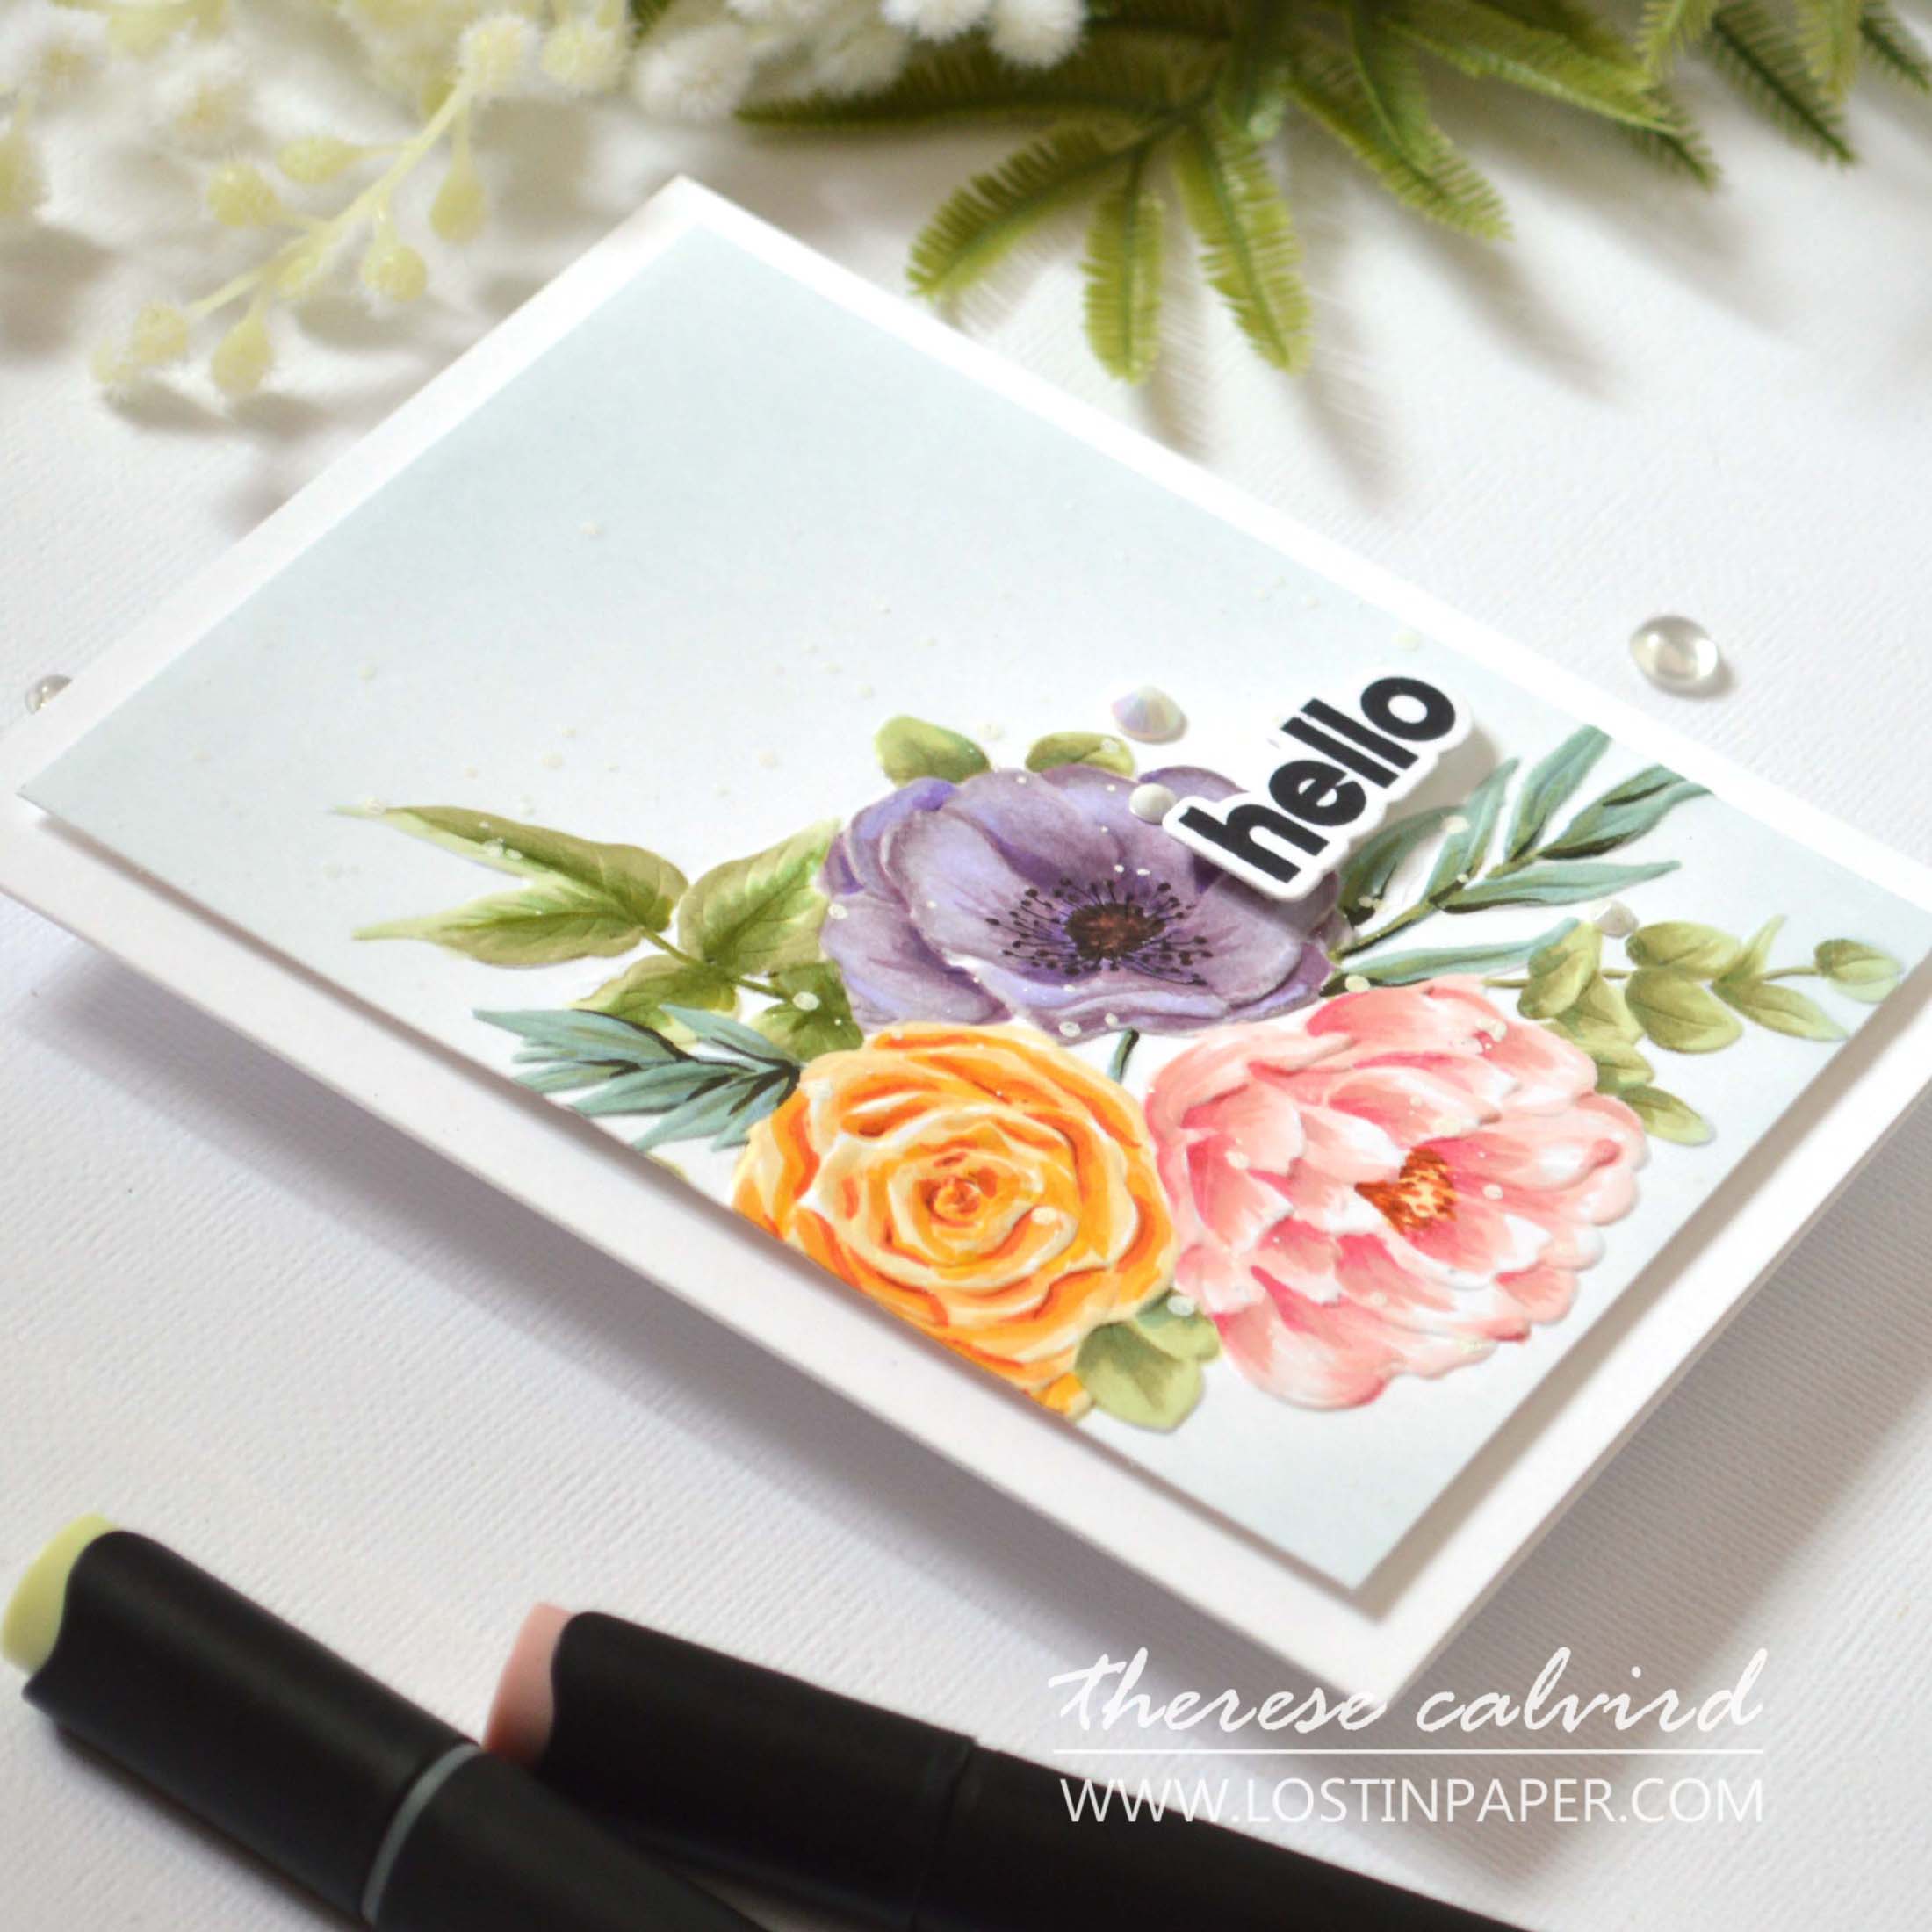
Idea #2 – Ink Blending
I wanted to stretch this technique a little and create a card, in a more ‘modern’ style.
So, I used the co-ordinating stencils and some ink blending to do this. A much EASIER and FASTER technique! It is a simple layering stencil set, but I chose to add only the ‘shadow’ layer to the petals of the flowers, this left some fun white highlights.
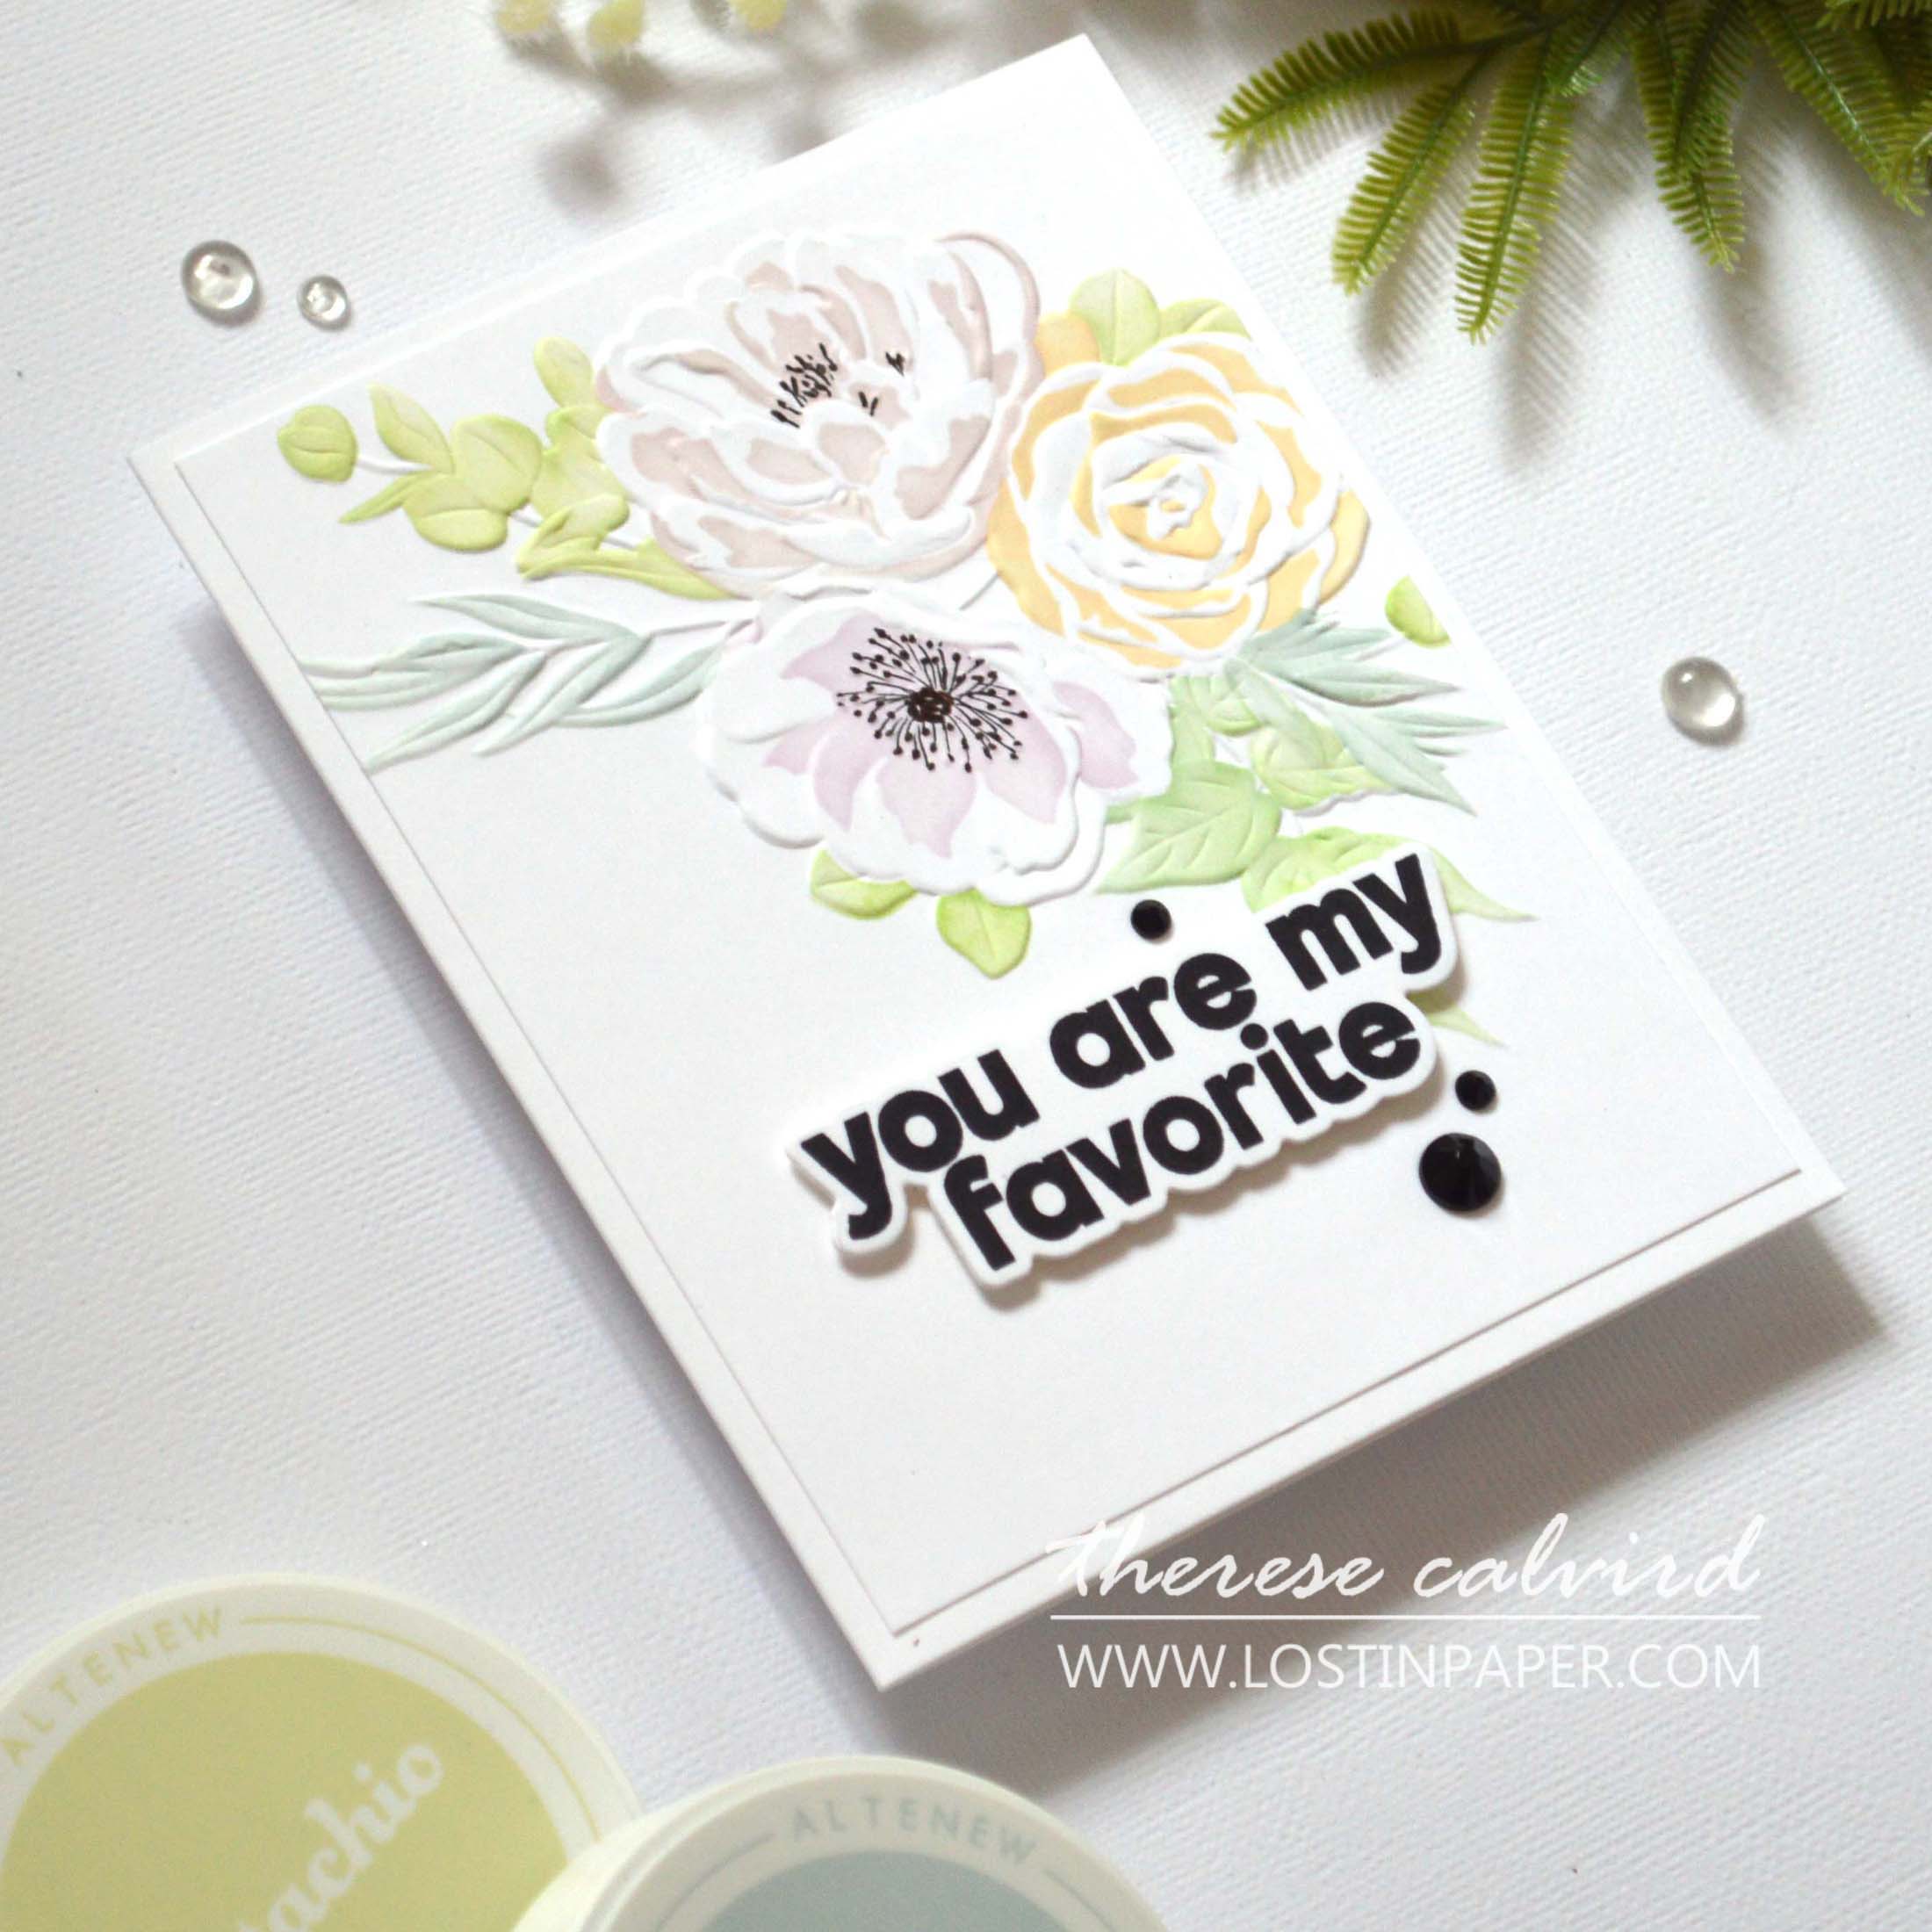
The extra details such as, drawing in the flower centres with markers and, some sparkles really added some interest to this simple modern design.
These sentiments are bold, and I am loving the font!
BONUS TIP: Did you see my recent card which inspired today’s ideas… you can check it out RIGHT HERE.
I hope you are inspired to add some colour to your world using a 3D Embossing Folder on your next handmade card project! If you do, don’t forget to share them on social media with me, I’d love to see what you make!
Crafty hugs,

Also, just in case you want to do a little shopping I’ve added the links below (some of them are affiliate links which means that I will receive a small portion of the sale at no extra cost to you). This is a great way to support me and the shops that we love 🥰!
Other Supplies:
Fresh Dye Ink: Altenew – Misty Morning | Peachy Glow | Pink Crystal | Silver Sage | Pistachio | Strawberry
Artist Markers: Y202 | Y205 | Y301 | Y615 | Y725 | Y762 | Y803 | Y932 | C006 | C027 | C028 | C030 | C031 | C010 | C011 | C735 | G011 | G825 | R112 |R611 | R801 | 0.
Fine Liner: 01
 Eclectic Bouquet ALT |  Dreamy Dahlias ALT | SSS |  Artist Markers Set N Cottage Garden ALT | SSS |  Artist Markers ALT | SSS |
 Obsidian ALT | SSS |  Tranquility ALT | SSS |  Frosted Foliage ALT | SSS |  Jade Dreams ALT | SSS |
 Sun-Kissed Delights ALT | SSS |  Blushberry Bliss ALT | SSS |  Dried Petals Ink Set ALT | SSS |  Ink Blending Tool ALT | SSS |
 Mini Blending Brush Set ALT | SSS |  Mother of Pearl ALT | SSS |  Black Onyx ALT | SSS |  Fine Liner Pen Set ALT | SSS |
 Pure White Spray ALT |  Fine Blade Scissors ALT | SSS |  Bone Folder Altenew ALT |  Stampwheel 2.0 ALT |
 Platinum 6 ALT | SSS |  9″ Fiskars Paper Trimmer AMZ | SSS |  1/2″ Ultra Sticky Tape ALT | SSS |  Foam Tape ALT | SSS |
 Satin Masking Tape ALT |
LOVE the ink blending technique. I can’t wait to use my 3D folders now.
Beautiful cards!
How wonderful! Hope you have fun creating Char!
do I HAVE a few? A few dozen, more like! But I love to play with them and am so happy to be inspired by your gorgeous cards and techniques, Therese! I haven’t made a card all week! Off I gooo… x
=] Michele
Yes, I haven’t been making any cards either, editing and sorting… but it needed to be done and now that it is, I’m a happy crafter!
Your pretty flowers have lifted my spirits on the rainy gray day! Thanks, Therese!
Yay! Thank you so very much!
It is always enjoyable watching you colour. I think you read my mind as I was planning to try colouring embossed images soon. I was going to try the background colouring technique as well.
Yes, that background technique is on my list too! I like it when they are very dark, even black!
Raise your hand if you are a “fast and easy” card maker! YES! Me, Me, Me!
However, the results of your alcohol marker coloring are FANTASTIC!
hahaha fast and easy, you are a true friend of mine June lol!
Where can I find the missing folder cheat sheet?
Hi there, you can use my link to it here https://tinyurl.com/333tdkbe Hope this helps, Happy Crafting, Therese
You always make it look so easy, Therese. Your marker coloring is fabulous. I may have to give it a try with one of my many floral embossing folders.
I hope you have fun with this technique Bobby, I have to say that I really enjoyed it!
Hand up!!! I don’t have any 3D embossing folders in my stash as yet, you have made me want some now lol. Fantastic ideas and looks stunning. Love your videos, as you already know. All the best my friend. You have been so supportive to me. Hugs xx
My pleasure Angellica, you are an amazing paper crafter! Thank you for your inspiration also x
Oh gorgeous. I have way to many embossing folders. I need to try these colouring techniques.
And they are so affordable too!