
Have you ever come UNSTUCK😉? Now, wouldn’t that be embarrassing…
It’s time to get Back to Basics and today we are sticking together, literally. Let’s talk about GLUE in papercrafting, you know it’s important, it’s what holds everything together! And I have a TON of Tips to share with you in today’s video.
You can watch the video here or in HD on YouTube right HERE.
I use affiliate links, this means that if you click on a product that is linked to an affiliate shop then I will receive a small portion of the sale at no extra cost to you).
This is a great way to support me as well as the shops that we love 🥰!
#GLUETALK
Let’s face it, we don’t need it ALL, but in papercrafting, you will find that it is helpful to have a variety of glues as they are used for different purposes. No, ONE glue, can do it all, but it does help to narrow it down into what each glue is actually used for and find a product that you like, which will tick as many of the boxes as possible. Something that suits your needs and will last the test of time.
I have narrowed it down to 3 major categories… plus a special one.
Let’s talk GLUE!
Liquid Glue
Is one of the most versatile and affordable glues, a little goes a long way. And, typically these glues have a strong hold, I have found this with all types of liquid glues (even those which are at the lower end of the budget range).
What is it for?
- Adhering panels or mat layers to a card base.
- Glueing embellishments (even plastic, such as rhinestones)
- Layering die cuts
- Adhering sentiments
- Attaching elements such as flowers
- Especially good for intricate die cuts/sentiments
- Some liquid glues double up as ‘repositionable’ glue (Tombow Mono Multi)

TIPS
- These glues are usually fast drying (some even immediate), but most of them will allow a few seconds before drying for you to move the cardstock panel or die cut into perfect placement.
- Don’t move the piece once it is in place, as you need to allow time for the glue to dry. This is particularly important, if you are attaching plastic embellishments.
- If you adhere intricate pieces, choose a glue with a fine tip applicator or purchase one to add to the bottle.
- Don’t add too much glue when adhering panels as it may warp cardstock (especially if it is thin cardstock)
- It may be easier to purchase a refill bottle, that way you can save money buying bulk AND you don’t have to do CPR to get that last little bit out of the bottle, you can simply top it up instead.
- Most glues dry clear, but some will leave a shiny residue, if this bothers you, choose a glue that dries with a matte finish instead.
My currrent liquid glue of choice is Bearly Arts, my reason for choosing this is, ease of use, fast drying, the fine tip applicator is included, definite lack of ‘clogging’, strong hold… and dare I say, cute refill bottle lol.
Foam Tape
If you want to add some ‘Pop’ or a 3D look to your project, then, foam tape is the answer. This is a fast and easy way to add depth and interest to any card, as well as add that something special to a clean & simple design.
What is it for?
- To add dimension to literally anything… Sentiments / Images / Flowers / Panels / Backgrounds
- Use it to make shaker cards
- Also, Interactive cards (which need dimension)
TIPS
- Foam tapes are worth a little more of an investment. This is one product where I have purchased cheaper versions and found they did not meet expectations. But luckily, in cardmaking, there are many great options to choose from.
- When choosing your favourite, in the roll style, consider if you would prefer one that is able to be ‘torn’ or if you are like me and happy to use scissors
(I share a great tip in today’s video how to prevent scissors becoming sticky)! - But, if you prefer foam squares, ensure that the release paper is easily removable and the foam tape is easy to handle.
- Look at both the width and thickness of the tapes, remember that you can always double it up if you need an element or a panel, to sit higher, such as in a shaker card.
- Having a thin version can be helpful, especially if you need to ‘build up’ an element to level out a design.
- Consider getting a black version of tape, if you make a lot of dark sentiments that you would like to pop up, it hides the tape a little more (obviously this is not essential, because, the white works well too).
- BONUS TIP: There are other ways to add dimension instead of using foam tape. Fun Foam (Funky Foam) and layering up scrap cardstock with liquid glue works a treat.
My current foam tape of choice it the Altenew Instant Dimension Foam Tape, this comes on a huge 33 metre long roll and lasts a LONG time. I was so excited when they recently released different sized versions of the same tape, I’m saving up to get them ALL!
Dry Adhesive
Don’t want to sit and wait for glue to dry, then dry adhesive is for you. And, with many different styles available, there is something for everyone. It is affordable and easy to use, but with so many choices, which one is right for you?
What is it for?
- Add immediate and strong hold to assemble card panels
- No waiting for glue to dry, so you can continue your project without delay
- Tape runners / dotted tape runners can be used to assemble layered die cut pieces easily
- Adhere sentiments and images to your design
TIPS
- Time saving is the main feature of these adhesives, no waiting for liquid glue to dry.
- Rolls of dry adhesive are very affordable, and come in a variety of widths and lengths.
- The release tape can be difficult to remove if you don’t have longer fingernails (but a picker tool can be useful here).
- Tape runners are easy to handle and quicker than cutting the tape and removing the release paper, but this is at a cost. Typically, these work out a little more expensive, but it may be worth the investiment, especially if you have arthritis or shaky hands, as they may be easier to use.
- Dotted tape runners are handy to add quick adhesive to die cuts when layering them as the ‘dots’ will only stick to the cardstock pieces.
- A4 sheets of adhesive are great to adhere backgrounds or large die cut pieces (and can be added before die cutting and create a ‘sticker’).
- Typically, dry adhesives have a strong hold, so ensure that your placement is correct before adhering. Although I have found some of the ‘very cheap’ tapes do not hold as strongly.
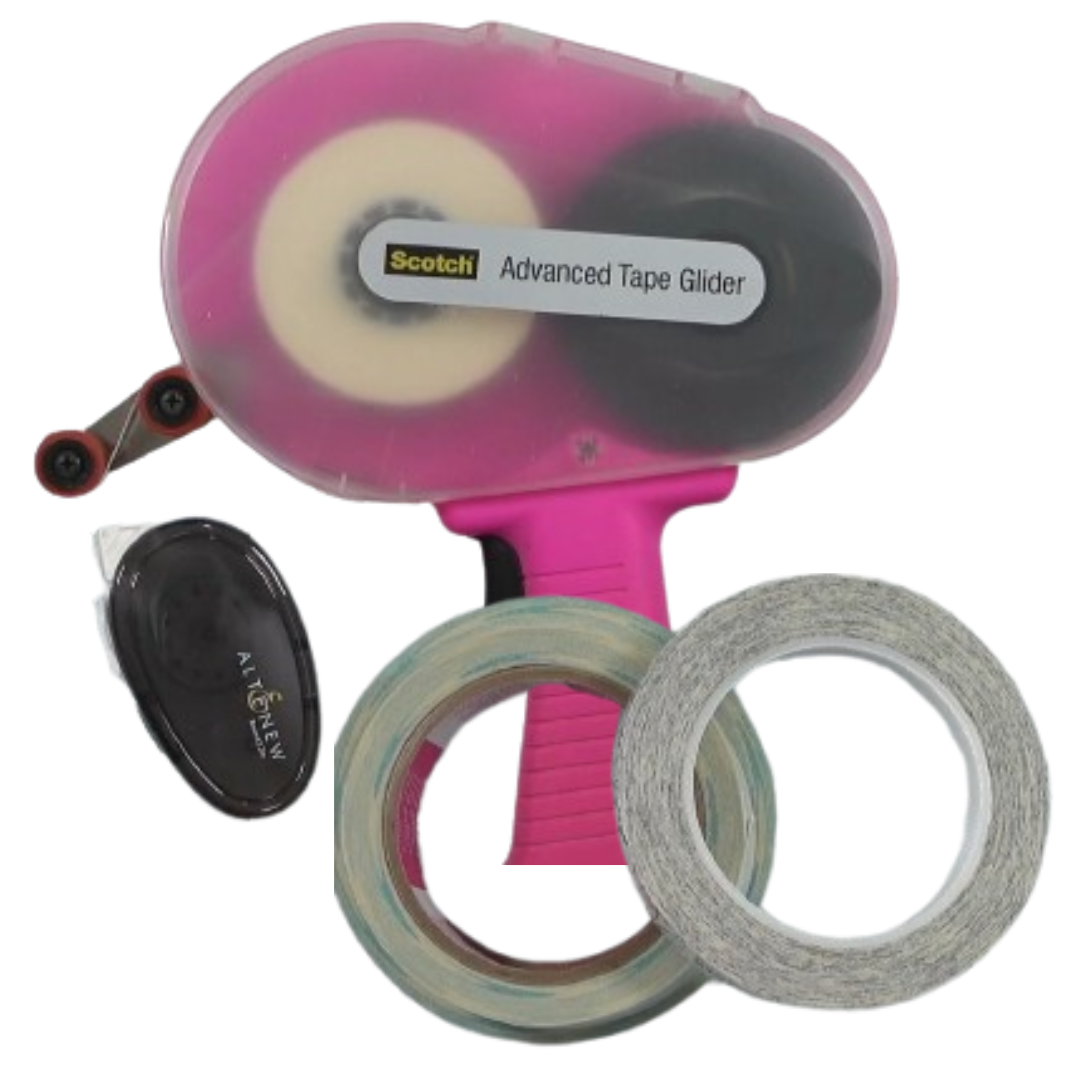
- A large tool, like the ATG (Advanced Tape Glider – pink ‘gun’ in the picture) is huge. There is a learning curve to using it, but the 3M tape that it holds is good quality and the rolls are ‘long’, making them good value. It takes up a LOT of space and they are becoming harder to source, I typically use it if I am in a hurry or making multiple projects such as Christmas cards.
My current favourite dry adhesives are the Glue Tape (dotted tape runner) from Altenew and I like both the Scor- tape and Altenew for the ‘rolls’ of dry adhesive. These all have a strong hold and are easy to use, but if I want to get picky, if you are looking for the strongest hold, I would say the Scor-tape is slightly stronger. Love that they come in all the sizes, my favourite is the 1/2″ roll.
Specialty Glues
Low Tack Tape – A tape which can be adhered and then removed from cardstock without damaging the cardstock**. I do actually use this one ALL of the time. Mostly, to hold my dies in place on the cardstock to prevent them shifting in the die cutting machine. This may damage your expensive dies, so taking a few seconds to do this may be worth the effort.
**In my experience ALL of the low tack tapes have the potential to tear some of the cardstocks when being removed, espeically after being pressed in the die cutting machine. In fact, I think some cardstocks enjoy being torn by tape.
Here are my tips to help prevent this from happening.
1. Use only a small amount of tape
2. ‘Detac’ the tape, especially if it is new, by tapping it on your skin or clothing a few times, before adding it to the cardstock
3. When possible, add the tape to the outside of the die on the section of cardstock that will be thrown away if possible.

This is like opening a can of worms… because there are literally glues for everything lol. So, I just chose a couple of the ones that I am keeping for the odd occasion when I need them.
Kool Tak – clear foam dimensional tape (not my favourite to use because it is VERY tacky and annoying, but if I have a very small piece I want to pop up, or the is see-through, then I will fight with it, just for you.
Sticky Specks – sheets of tiny tiny adhesive dots that can be easily added to a die cut piece to make it ‘into a sticker’. It works well for intricate die cuts and can be used on vellum, but it can make for sticky fingers. Note: Currently not available but Simon Says has a similar product HERE.
Pixie Spray – A low tack (repositionable) spray which can be used on the reverse side of a stencil, especially an intricate stencil, to prevent it from shifting during ink blending. I rarely use this as I prefer to use one of the sticky grid mats instead of cleaning the glue off the back of the stencil.
I hope this information was of value to you. Remember, that our ever evolving crafty spaces are our own, and what may work for me, may not suit you. But, I know that sometimes there is a little snippet of information that can really be a game changer. I always start by trying to use what I already have, but sometimes this is not possible… or not enough. Check your local stores for similar items that may suit you.
QUESTION: Do you have any favourite papercrafting glues, techinques or ideas? Let me know in the comments below, I would love to hear them!!
Thank you for spending your time with me today, sending crafty hugs your way!

Also, just in case you want to do a little shopping I’ve added the links below (some of them are affiliate links which means that I will receive a small portion of the sale at no extra cost to you). I truly appreciate your support of me and the stores that we love 🥰!
SUPPLIES:
*Certain content that appears on this site comes from Amazon, this content is provided ‘as is’ and is subject to change or removal at any time.
 Foam SSS |  Bearly Art Glue AMZ | SSS | Knitting Needle Caps AMZ | Tombow Mono Glue AMZ | SSS |
 Multi Medium Matte SSS |  Zig Chisel Glue Pen SSS |  ATG OTH |  Glue Tape ALT | SSS |
 Tape 1″ SSS |  1/4″ Ultra Sticky Tape ALT | SSS |  1″ Ultra Sticky Tape SSS |  Thin Foam Dots OTH |
 Foam Tape ALT | SSS |  Foam Tape NEW sizes! ALT | SSS |  Foam Strips OTH |  Quickie Glue Pen SSS |
 Foam Squares SSS |  Foam Squares SSS |  Satin Masking Tape ALT |  Best Ever Craft Tape SSS |
 Adhesive Sheets ALT | SSS | A4 Hard Cover Case AMZ |  Sticky Specks SSS |  Micro Dot Adhesive SSS |
 Pixie Spray OTH | Scissors AMZ | SSS |  Fine Blade Scissors ALT | SSS |  Perfect Picker ALT | SSS |
 Craft Scraper SSS |
Hi Therese. What a great run down of all the sticky stuff we can use! I didn’t realize how many I have and use until you listed then. You always have great content, presented with your special sense of humour. Thank you so much for all your information and inspiration.
Thank you so very much Lynda!
Such a brilliant article – I’m STUCK on Bearly Arts – it’s that itty bitty non-clogging feature that won my heart! But when it comes to stacking the really really fine die-cut words Multi Medium Matte is my go-to!
Is it bad that I have all of these options?
=] Michele
Nothing you do can be ‘bad’ my friend, and you took a look into my drawers… so, I cannot judge 🤣!
Thanks for the video and blog post. I have a couple of draws of adhesive and a working tub as well. I used to tell friends I was future proofing in case the world shut down and then 2020 happened. I’m currently trying to slim down the variety of brands and using up the ones I find are not what I like or have problems with.
Loved the tour of the adhesive space. I must admit to trying to zoom on the way you hook the altenew big tape roll on your trolley.
As always another informative video.
Crafty hugs
Thanks so much Lisa, please remind me to show you that hook at my next live x
I use specific brands of glue sticks when I am adhering backgrounds. I never use Elmers glue sticks or any brand that states temporary water washable adhesion.
Great tip, that would make sense that the hold wouldn’t be as strong with the word ‘temporary’!
Great video setting it all out clearly. My adhesive drawer is overflowing, but you are right, different products for different purposes! I must try the Bearly Arts glue, love the idea of a fine tip nozzle that keeps working!!
Hope you like the Bearly Arts, many other crafters seem to use this one as well as the Art Glitter Glue… apparently they are very similar.
I am surprised that you do not have the Precision Glue Press, Therese. I have found it much easier to use than trying to squeeze a bottle. It comes with Nuvo glue which I like but you can also get extra bottles and I plan to put my Bearly Arts in one when the current one is empty. I have an ancient roll of 3M tape that I hang from a 3M hook but when that is gone I will definitely be trying the Altenew tape.
Yes, Im surprised too Bobby lol. I think I was very busy last year (sadly not with crafty stuff) and I missed that boat, maybe I will have to buy a ticket lol.