
Do you BLEND? And if you do, what do you blend? Today, I share my blending journey and my ‘secret sauce’ on how I get the perfect blend without the stress!
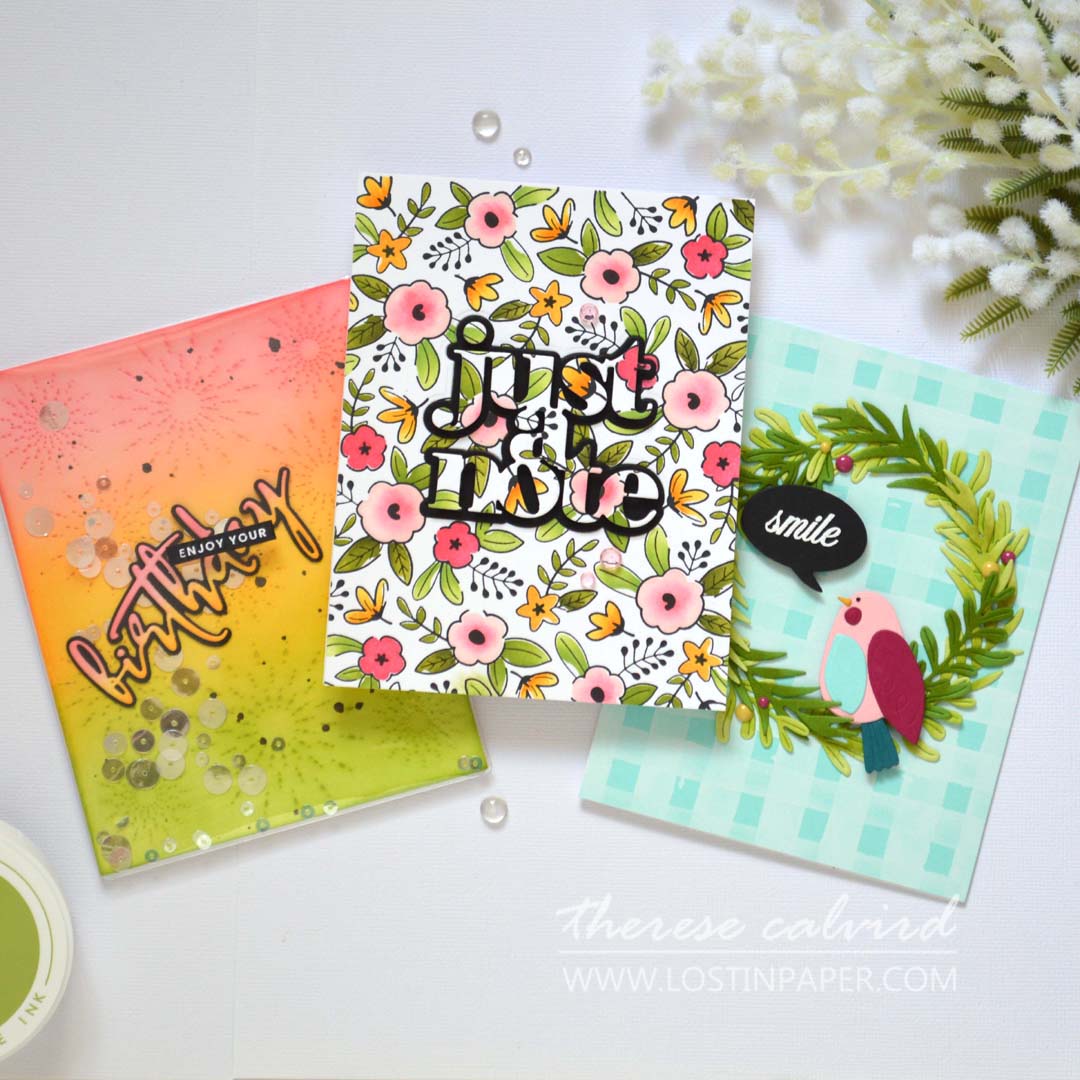
I have 5 techniques to share with you today, you can see the blending process in the video, but I also had to make some cards to show you how these ideas can be used in designs. Would you like to see today’s cards?
You can watch the video here or in HD on YouTube right HERE.
This post contains affiliate links (which means that I will receive a small portion of the sale at no extra cost to you). I truly appreciate your support of these card adventures!
#INKBLENDING
Honestly, it took me years to perfect Ink Blending, but it doesn’t have to be that way for you. I tried everything and unless I used Distress Inks and Bristol Smooth Cardstock, my blends were blotchy and heavy handed. So, what changed? It was the tools, with the introduction of the new style blending brushes. And, once I found what worked for me Ink Blending became easy, and I know it will be the same for you.
I can now blend on any cardstock using any of the inks that I own and achieve beautiful results. Which was perfect timing really, I would not have wanted to miss out on blending through all those gorgeous floral stencils which are now available!
#WHYINKBLEND
- You probably have everything you need to ink blend if you have inks, stencils and dies! By grabbing a brush or two, you can stretch your supplies and achieve new fun looks with the products you have.
- Ink blending allows you create unique colour combinations which will perfectly match your projects (Design Paper has it’s limitations).
- Ink blending is fast to do, whether colouring through stencils or covering a whole background panel, a project can come together in a matter of minutes.
- Can’t colour? Then layering stencils are your friend, you can create beautiful shaded flowers even if you are not a colourist!
#BLENDINGTIPS – MYSECRETSAUCE!
- I have a mix of different sized blending tools. Typically I use a large tool to cover backgrounds, a mini tool for most other blends (ie stencils and shading) and detailed brushes for the very fine details and shading.
- Find the tools that suit YOU. We all have different preferences and I would recommend trying a couple of different tools until you discover what works best for you.
My Secret Sauce: My ABSOLUTE favourite tools are the blending brushes from Altenew, they are pretty much ALL I use now! - I keep 4 of each sized tool so that I can have one for each colour family.
- I do not wash my brushes (though you can), I simply wipe them on a paper towel until they are ‘clean enough’ to use with the next colour I have chosen.
- NOTE: Do not mix dye inks and pigment inks on the same brush. And also, do not mix Distress Inks and Distress Oxides on the same brushes.
- When mixing colours, I choose colours that will blend well together. And, after laying down the first layer of blended colours I will come back with the original colours and re-blend them over top.
- Start off the edge of the cardstock and use light, even pressure. It is best to keep adding layers and not rushing by putting heavy pressure on the brushes. This will result in a heavy handed, uneven result with brush lines… ask me how I know 😉.
- There are many different ways to secure cardstock and stencils when blending. Low tack grid mats are available from many different brands as well as magnetic blending mats, these are all helpful but not essential. Tape or even Post-it notes can also be used to hold stencils in place.
- Use small blending brushes to add shading on areas where a ‘shadow’ would be, such as where the leaves meet the flower or the centre of a petal on a flower. Dont be afraid to mix different tones of colour together such as yellow and peach, this looks so very pretty on a flower.
- Allow a few minutes for the dye ink to dye (dry) into the paper, you will often find that any areas that may have looked ‘uneven’ will be gone.
- Still struggling? Start with Distress Inks if you have them, they have a different and very forgiving formula which is perfect for ink blending. Also try different cardstocks, some brands will blend better than others and when all else fails, use Bristol Smooth, it’s blending heaven.
- Don’t be afraid to experiment, remember after all, it’s only paper!
Are you ready for the techniques?
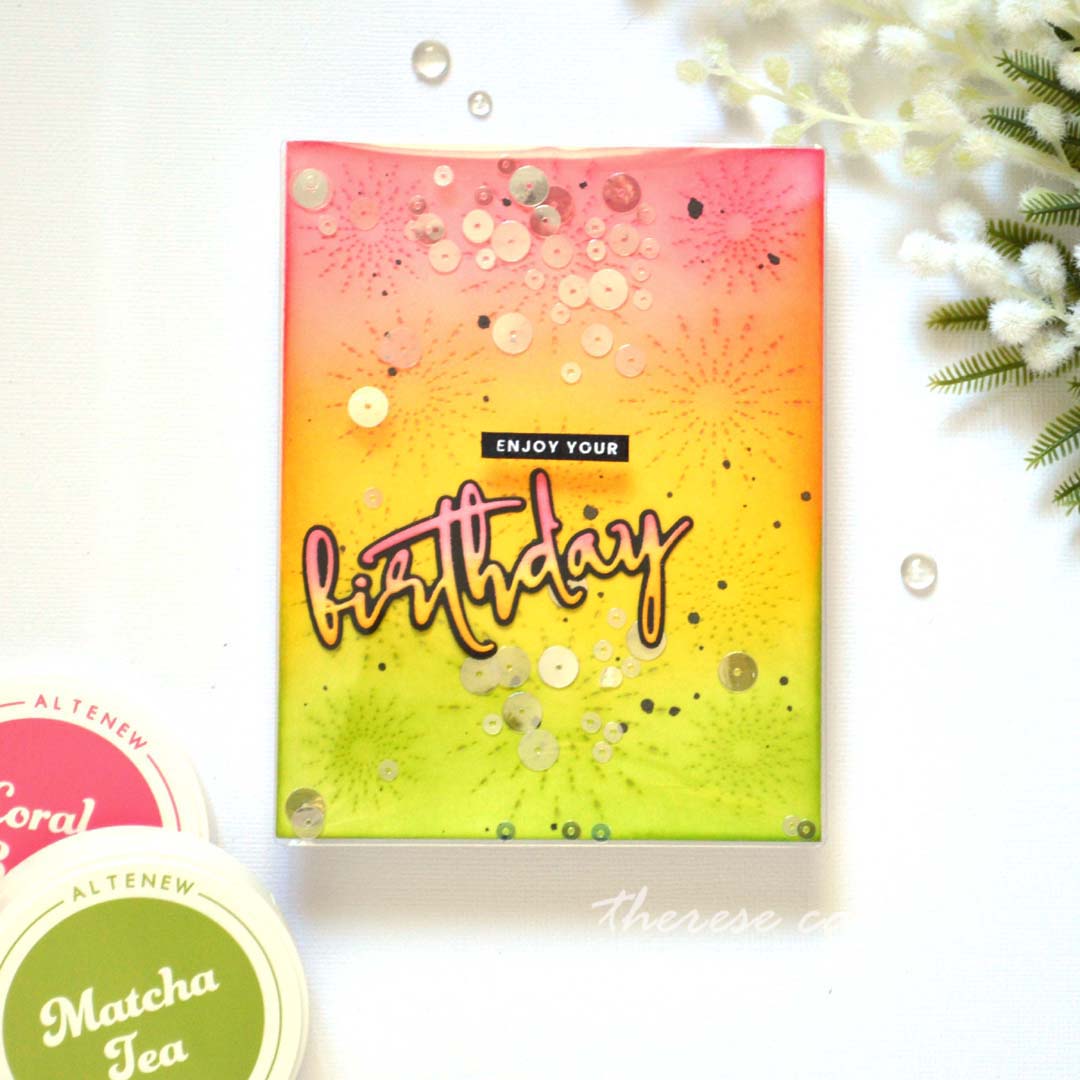
Technique #1 – Blended Background
What better way to begin and practice your ink blending journey than to create your very own multicoloured backgrounds. Play with different cardstocks, ink types and colour combinations.
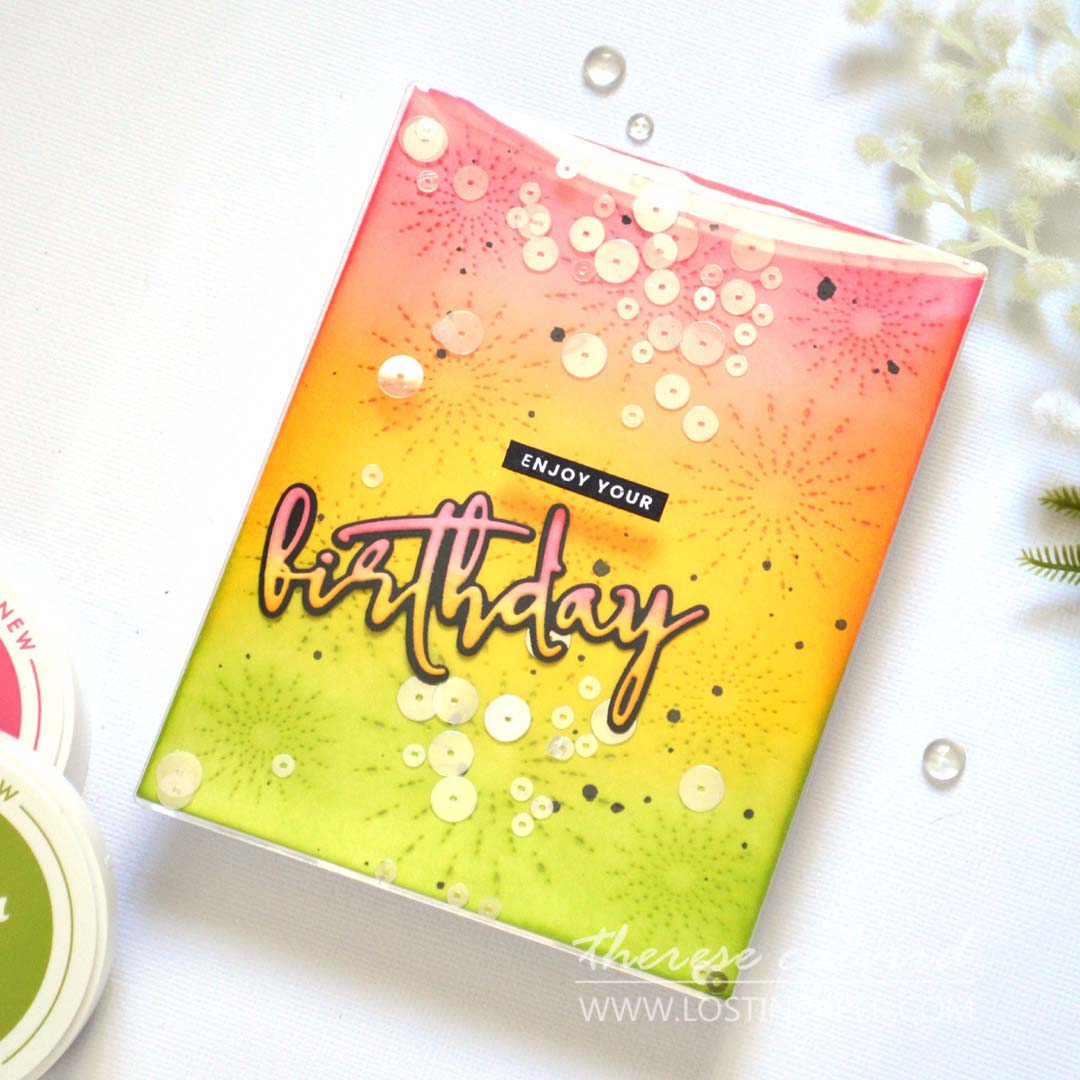
But, don’t just leave it there, these backgrounds are just the beginning, add extra layers,stamp or die cut them, splatter inks and paints, even clear water adds unique patterns when it reacts with the waterbased dye inks.
BONUS IDEA: Today I added a fun pattern using a Cover Die but stepped it up by blending another layer of ink over top of this which gave the pattern more definition!
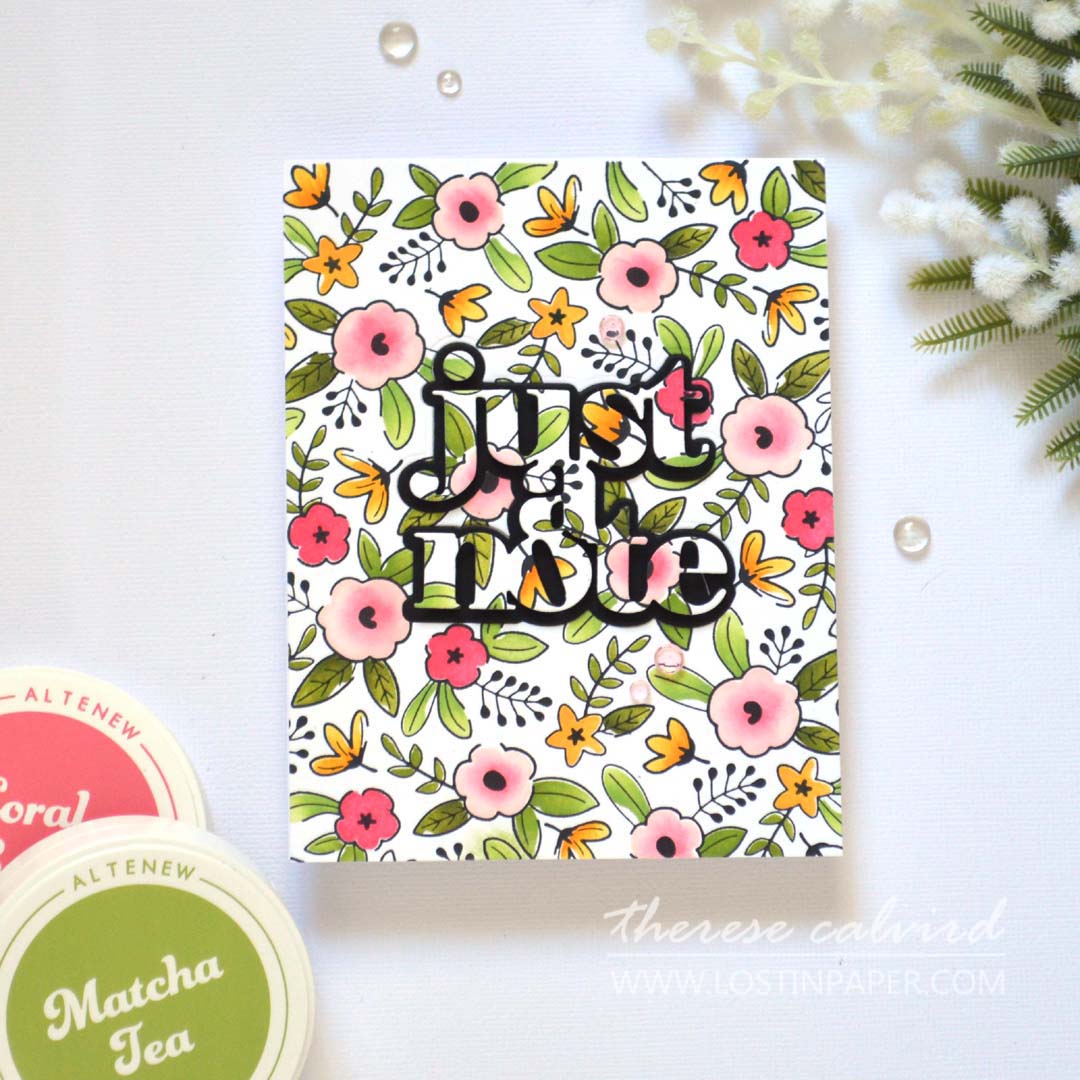
Technique #2 – Blended Sentiment
It was easy to make a perfectly matching die cut sentiment by blending it with the same ink colours. And, you can either blend the colours before or after die cutting!
Technique #3 – Stencils
There are so many options available when it comes to stamps, foiled images, and press plate images with coordinating stencils or even layering stencils. Having the ability to blend single or mutliple layers makes it easy to create quick and easy beautiful designs, even if you can’t colour.

Technique #4 – Add Shading
A single layer of colour looks beautiful on a design such as this, but adding a little shading using either detailed or mini blending brushes adds that little extra something, something!
Technique #5 – Blend Coloured Card
It’s not cheating is it? Starting with coloured cardstock is another speedy hack. Having a base colour makes it easy to use a mini/detailed blending tool to create some quick shading to precut die cuts. These leaves were die cut from green cardstock and I used a darker shade of green ink to blend on the centre of the leaf to add some colour variation.

Technique #6 – Stencil Background
This background also started with a piece of coloured cardstock. I used a striped stencil to add some white lines but chose to flip the stencil and add a second layer of white lines crossing over the first.
PRO TIP: Take a peek at your stencils and see if you have any that you could flip, turn and angle or repeat for a fun different look. Check out this VIDEO HERE where I stenciled over a stenciled image!

Have you been inspired to try some Ink Blending on your Cards? Let me know in the comments below if you are going to try any of these techniques and if so, I’d love to see what you have created, so don’t forget to link me on Social Media!
Thank you for spending your time with me today, sending crafty hugs your way!

I use affiliate links which means that I will receive a small portion of the sale at no extra cost to you).
I truly appreciate your support of my card adventures!
Supplies:
Alex Syberia Designs – Dazzling FIreworks Cover Die | Birthday & Wish Die | Winter Foliage Die | Garden Tweets Die
Altenew – Sweet Bouquet Stamp Set | Cupped Flowers Stamp Set | Watercolor Stripes Stencil
Spellbinders – Floral Celebration Bundle
Penny Black – Chat Bubbles
Concord & 9th – Just Saying Dies
Inks – Red Cosmos | Forest Trails | Golden Sunset | Cloud White
Concord & 9th Cardstock: Black | Parsley | Sprout | Pink Lemonade | Wildberry | Aqua Sky | Peacock | Sunflower.
I just love your epic ideas, Therese! You spoil us!
=]
You know I love you right!!
Awesome post! So much information is valuable! TFS 😀
Thank you so much Vicki, so glad you enjoyed it!
Utterly agree, I wasn’t great with ink blending at all, I found the make up blenders with long handles so helpful and game changer for me. This information is so valuable and informative, will be taking tips from this. Thank you for sharing xx
Glad you to hear you found a tool that worked for you, I almost gave up on ink blending until those handle brushes came out. I really liked them, but I feel like I have better control without the handle (arthritis).
Thanks for the wonderful video, Therese! Terrific cards all around both those pretty little stenciled flowers have my heart today!
Thanks so much, that one was my fave too!
Your blends are perfection!
Thank you so very much Lisa x